Tag Archives: mouse

Tiny Undervalued Hardware Companions

After playing/working with computers for more then 25 years I started to appreciate small but handy valuable stuff – like adapters or handlers or … yeah – all kind of stuff. With many of them I did not even knew they existed until I find out about them – mostly accidentally or after long searching for some problem solution. Today I will share them with You – so maybe they will end up handy also for You.

… and while they make my life easier – they are mostly very cheap too.

The Table of Contents is below.

  • RJ45 Angle Adapters
  • RJ45 Angle Cable Adapters
  • RJ45 Join Adapters
  • SATA to USB-C or USB-A Adapters
  • Angle USB-C and USB-A Adapters
  • USB-A <=> USB-C Adapters
  • Tiny USB WiFi or Bluetooth Dongle
  • USB-C <=> Micro USB Adapter
  • USB-C <=> Laptops/Routers/5.5mmx2.5mm Adapters
  • Creative BT-W2 USB-A Bluetooth Adapter
  • External Microphone for SONY Headphones
  • Headphones Handle
  • Dual USB-C and USB-A Pendrive (SanDisk)
  • Tiny USB-A Hub
  • Quad USB-C / USB-A / Lightning / Micro USB Adapter with MicroSD Card Slot
  • Angle Power Adapters
  • C13/C14 Power Adapters with Additional C1/C2 or C5/C6 Sockets
  • HDMI 3in1 Switch with Remote Control
  • Cable Organizers
  • Mouse Jigger
  • FM Transmitter
  • Summary

The whole article can ‘feel’ like a sponsored entry for the https://aliexpress.com portal – but it is not – its just the most cheap place I was able to find these gems. Feel free to share even cheaper one if You have one.

~

RJ45 Angle Adapters

I mostly use laptops to do various tasks and cables sticking out on the sides perpendicularly does not help. Not many laptops today have the RJ45 LAN socket – but if they do – they are mostly on the side of the laptop.

Thanks to such angle RJ45 adapters it is no longer a problem.

You can find them for about $2 – for example – on https://aliexpress.com page – with the RJ45 ANGLE ADAPTER keywords in their search.

~

RJ45 Angle Cable Adapters

The mentioned earlier RJ45 Angle Adapters are quite bulky – but as an alternative its possible to get a short 40cm cable with smaller plug.

Not sure if its noticeable on the picture below – but I also cut the top ‘cover’ with knife of the plug – so its easier to detach.
There are of course all four angles to choose from.

One may also use the end of that 40cm cable-adapter as a ‘stopper’ to not fall inside the desk hole as shown on the image below.

You can find them for about $2 – for example – on https://aliexpress.com – with the RJ45 ANGLE ADAPTER CABLE keywords in their search.

~

RJ45 Join Adapters

Often I found myself in a situation that the currently available LAN cable was too short to reach and it needed a lot of work to plot another – longer one.

With these simple ‘join’ adapters it is no longer a problem. You would not use them in a serious Data Center with 10+ GE speeds – but for home 1.0-2.5 GE speeds its more then enough.

You can find them for about $1-$2 – for example – on https://aliexpress.com – with the RJ45 JOIN ADAPTER keywords in their search.

~

SATA to USB-C or USB-A Adapters

Multiple times I needed to clone some old disk to new SSD – just to make an old system faster.

I usually boot from some USB drive with FreeBSD and while new SSD is attached with these adapters – I then execute dd(8) command to clone the old HDD disk to new SSD drive … and then just swap them out.

You can find them for about $1-$5 – for example – on https://aliexpress.com – with the SATA USB ADAPTER keywords in their search.

~

Angle USB-C and USB-A Adapters

As we already talked about RJ45 angle adapters … there are also USB-C and USB-A angle adapters.

The do the same good job with cables to not stick out on a side of a laptop.

You can find them for about $1-$3 – for example – on https://aliexpress.com – with the ANGLE USB ADAPTER keywords in their search.

~

USB-A <=> USB-C Adapters

In the progressing and always changing world yesterday the USB-A was king and tomorrow the USB-C will be.

There are multiple cases in which you will need these – from simple USB headphones to USB pendrives and other stuff.

You can find them for about $1-$3 – for example – on https://aliexpress.com – with the USB-C USB-A ADAPTER keywords in their search.

~

Tiny USB WiFi or Bluetooth Dongle

Multiple times I have found myself in a situation where it was very convenient to just add some WiFi or Bluetooth chip over USB port and do the job instead of trying to achieve the same without such chips.

While I usually omit Bluetooth I can not say the same about WiFi … and as FreeBSD lacks a little in that department – using a very tiny chip such as Realtek RTL8188CUS often does the job done.

You can find them for about $1-$3 – for example – on https://aliexpress.com – with the WIFI USB or BLUETOOTH USB keywords in their search.

~

USB-C <=> Micro USB Adapter

In the past – in the USB Micro times – I remember using an adapter to be able to charge – then new and uncommon – USB-C devices.

Fast forward several years and now the situation is the other way around (as expected). The USB-C is the standard and USB Micro devices are less and less common … but there are still here. To not have to keep separate dedicated USB Micro cables I use a small USB-C to USB Micro adapters.

Such adapter takes USB-C as input power and is able to charge USB Micro devices.

You can find them for about $1-$2 – for example – on https://aliexpress.com – with the USB-C USB MICRO ADAPTER keywords in their search.

~

USB-C <=> Laptops/Routers/5.5mmx2.5mm Adapters

When it comes to delivering power to my (and not only) laptops – the new standard seems to be the USB-C connector with ‘requirement’ of 45W or more (it depends).

Not that long ago I discovered that even laptops as old as 13 years – ThinkPad X220/T420s/W520 – can be powered the same – but with simple and very cheap adapter cables – such as these below. From the left there is 5.5mm/2.5mm typical router socket – then more modern ThinkPad X270/T470s (and many more) – then oldschool models from 2011 year – ThinkPads such as X220/T420s/W520 models.
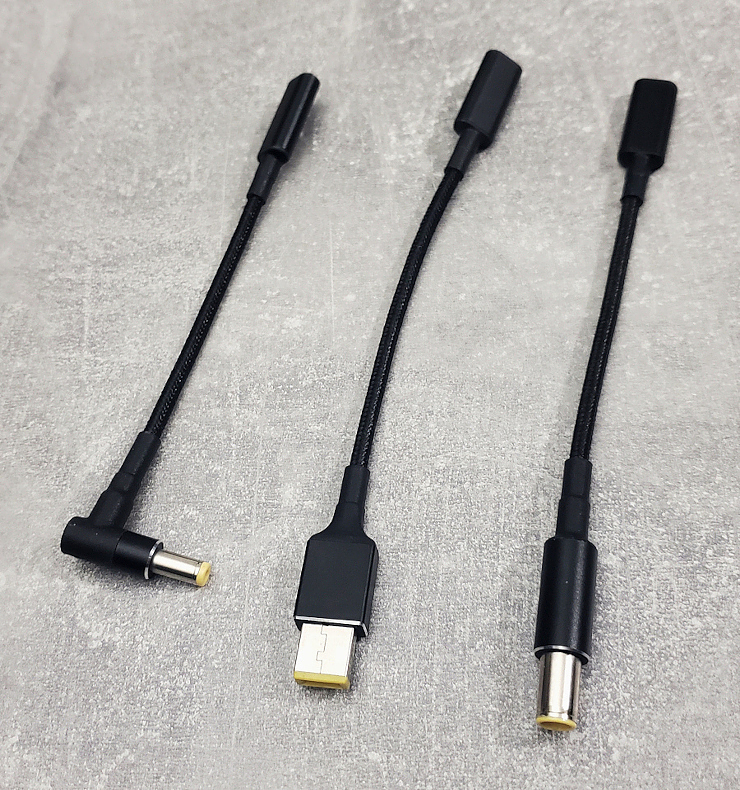
All they need is a USB-C power input.

You need to only meet two requirements – the USB charger that will make enough power for example 20V at 3.25A for 65W that would power ThinkPad X220/T420s or 20V at 6.75A for 135W that would power ThinkPad W520. While the official power supply for ThinkPad W520 is 170W – its perfectly fine to use the 135W power adapter from ThinkPad W510 to power ThinkPad W520 laptop.

This makes organizing cables (and chargers) a lot easier – for example – I would not be able to fit 3 ‘dedicated’ ThinkPad chargers in that white cable organizer behind laptops – but I will fir there two powerful 65W and 85W USB-C chargers perfectly fine.

You can find these power adapters for about $1-$3 – for example – on https://aliexpress.com – with the USB-C ADAPTER LAPTOP ROUTER keywords in their search.

~

Creative BT-W2 USB-A Bluetooth Adapter

When I have to cope with Bluetooth technology – its ‘tolerable’ on Android devices such as phones/tablets and mostly nowhere else. After bad audio (just not working) Bluetooth possibilities on FreeBSD I decided to try the hardware solution instead. The audio related Bluetooth on FreeBSD have failed me too many times – to the point called enough is enough – that also means I do not want to waste any more time trying to figure the way using FreeBSD Bluetooth stack devices anymore – at least for audio related devices.

Not so long ago I got the Sony WH1000XM4 headphones. I am/was a big fan of the Technics RP-F290 cable headphones (Jack or Mini Jack based). They have so much BASS and ‘power’ that I could not ask for more … and their cost is very low – like $24 or less. The only ‘downside’ of the Technics RP-F290 headphones is that they are audio only – they do not have any microphone at all – they are dedicated for music only – and that is OK – they do GREAT in that role.

I have tried some Bluetooth based headphones in the past – and they were SHIT to say the least. Not enough ‘power’ – not enough BASS etc. After reading multiple reviews I decided to give Sony WH1000XM4 headphones a chance … and I was not disappointed. Its the first time after Technics RP-F290 cable headphones that ANY Bluetooth based headphone delivered. I was (and I still am) really satisfied with them.

This is where the USB powered Creative BT-W2 comes handy. Its also relatively cheap as the cost of used unit is less then $20 – at least that is the price I payed for mine in Poland. The Creative BT-W2 allows to connect Bluetooth audio devices everywhere – even on OpenBSD – on the system that cut off Bluetooth stack entirely – and it works well on FreeBSD too. The ‘downside’ of the Sony WH1000XM4 headphones is that they do have microphone – but only in Bluetooth node – they have Mini Jack connector – but for audio only …

This is also only downside of the Creative BT-W2 solution – it transmits only audio – but w/o microphone. Its more then OK for listening music – but if You have to do live conferencing/meetings on FreeBSD as I do – its a dead end.

I have tried to find a solution to this problem – to the point that I wanted to abandon Sony WH1000XM4 headphones entirely and find some Mini Jack (or Jack) based BASS oriented headphones that will also have a working microphone.

On my journey I have found a solution that I did not expected at all – and that was the solution that solved all my problems – and allowed me to enjoy the Sony WH1000XM4 headphones – but more about that in the next ‘subsection’.

~

External Microphone for SONY Headphones

You already know the downsides of the Sony WH1000XM4 headphones that were giving me headaches. Now its time to address them.

After many hours of searching the Internet I have found a very ‘usable’ Mini Jack cable. A cable that came with microphone and a one that perfectly integrated with Sony WH1000XM4 headphones … and FreeBSD as well.

Its available to buy for $22 on amazon.de (and possible other locations) and its called Boom Microphone Cable. Thanks to the knowledge that Sony WH1000XM4 headphones have Mini Jack port with microphone part – the Boom Microphone Cable cable even comes with volume controls and even come with physical kill switch for microphone.

After You attach this Boom Microphone Cable to the Sony WH1000XM4 headphones it looks (and works) like a natural solution.
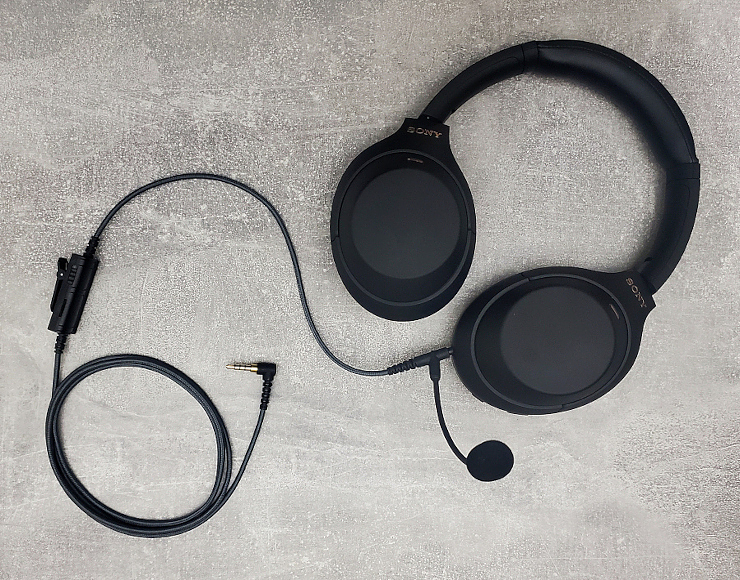
The only ‘downside’ is generally the downside of the Sony WH1000XM4 headphones – that You CAN NOT disable their silencing while you speak – so using them in ‘passive’ mode with Boom Microphone Cable is preferred to meet all needs.

EDIT: After reading comments to this article I learned that this ‘silencing’ is called Speak to Chat and it can be disabled in the SONY Android app or by holding two fingers on the right earcup until the headphones say “Speak to Chat disabled.” Thank You for that.

~

Headphones Handle

I got used to the fact that I just put my headphones on the desk … but I wanted something more useful – after some searching it was obvious to me that I needed just some headphones handle that I could attach somewhere.

After another several hours of browsing I have found a ‘part’ that would fit perfectly – a $4-5 part from https://aliexpress.com that I could find with the HEADPHONES HOLDER keywords in their search.

Here is how it works on my desk.

… and its 360 degrees adjustable as well.

Above the headphones handle You can see the ‘hero’ of the AMD Based FreeBSD Desktop article.

~

Dual USB-C and USB-A Pendrive (SanDisk)

With all my ‘bad’ experiences with PTP connections for Android based devices (and other places) I really liked the SanDisk Ultra Dual Drive.

Its really handy for many transfers … and its more fast then slow as well.

~

Tiny USB-A Hub

When You need to connect several USB-A devices the USB ports count often come short fast – this is where this tiny USB-A hub comes handy.

With its dirt cheap $1-2 price (at https://aliexpress.com with USB HUB keywords) its a ‘steal’ … and it is a 3 port hub – there is another USB-A port at the end of it – the one that is not visible.

~

Quad USB-C / USB-A / Lightning / Micro USB Adapter with MicroSD Card Slot

… as we are talking various USB-A or USB-C solutions I could not mention this quad port adapter with MicroSD card slot.

I do not even remember how many times I have used it to copy/backup contents of my phone(s) and/or tablet(s).

Nowadays I believe I use the Dual USB-C / USB-A Pendrive more … but not always.

For $8-9 on its not a bad solution to have.

Batteries … I mean SD card – not included πŸ™‚

~

Angle Power Adapters

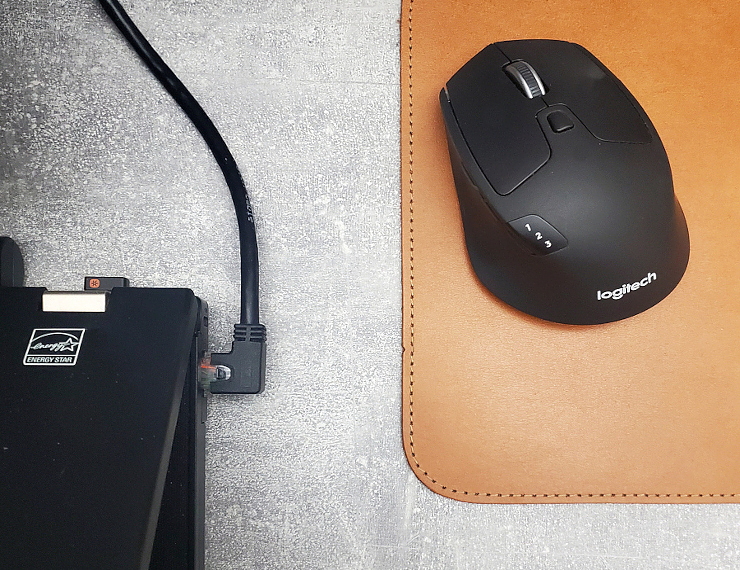
I have often found that the angle with which the power cord sticks out of a PC is definitely not ideal – this is where angle power adapters come handy.

Here is how it looks (being used) on my PC.

They are available for about $1-2 on https://aliexpress.com with ANGLE C13 CABLE keywords on the search box.

C13/C14 Power Adapters with Additional C1/C2 or C5/C6 Sockets

After You have spent some time to lay down the C13/C14 power cables just to power your PC its really annoying to do the same for another set of C1/C2 or C5/C6 cables/sockets … but not anymore.

Now with single cable adapter You are able to power more then one computer – depending on the needs with additional connectors.
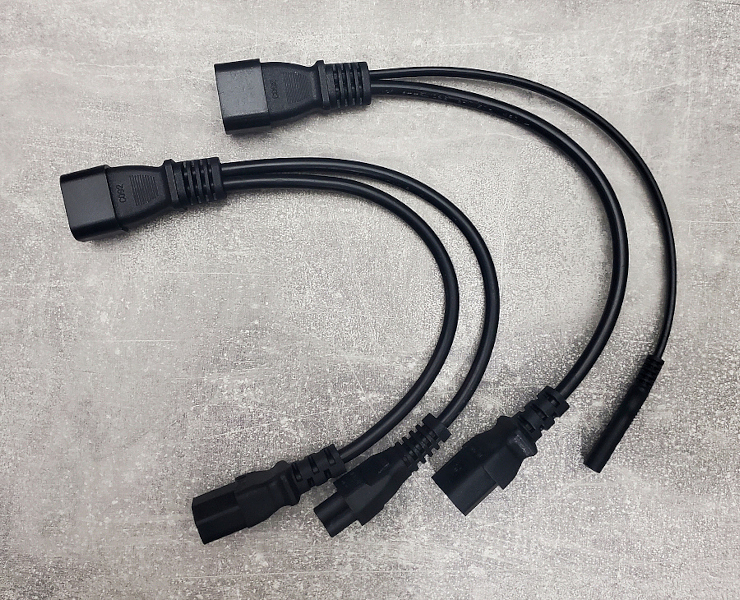
They are available for $1-2 on https://aliexpress.com with DUAL C13 CABLE keywords on the search box.

~

HDMI 3in1 Switch with Remote Control

I happen to have a 2010 FullHD 50 Inch TV that has ONLY ONE port of HDMI kind … and it was pretty annoying to say the least … up to the time I added a HDMI switch/hub to it.

The HDMI switch along with its remote below.

For the record – I have used the UGreen 3in1 HDMI Switch with 4K @ 30Hz Capability and Remote and I was able to get one for $16.

~

Cable Organizers

To not have a mess in the cables its useful to have them organized in some way.

I use multiple solutions for that.

Lets start with simple organizers.
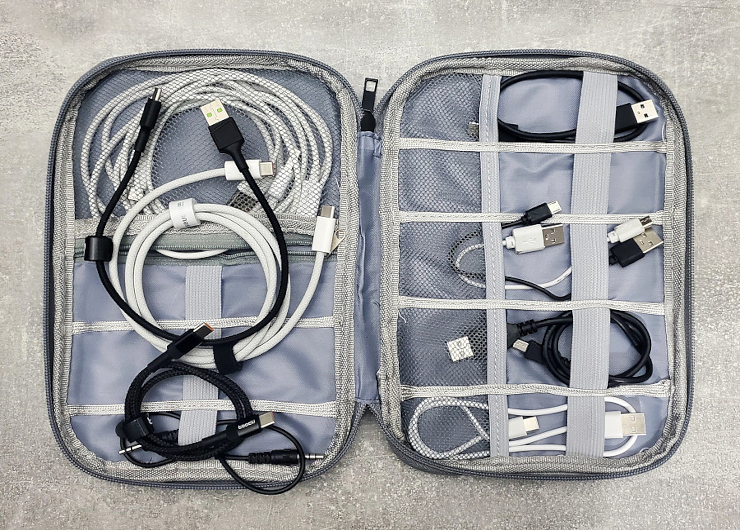
… and a larger/taller one for more capacity/possibilities.

They are available for $3-9 on https://aliexpress.com with CABLE ORGANIZER keywords on the search box.

I also use some IKEA containers …

… and smaller boxes in which I keep the tiny things.

I do not even remember after what product these boxes are … and that does not even matter I think.

~

Mouse Jigger

While there are many software settings or solutions to prevent screen from locking up – there is one bulletproof solution what just always works – a hardware USB mouse jigger.

I use a very simple one with 3 modes – but its more then enough for me needs.

Feel free to check other offers with USB MOUSE JIGGER at https://aliexpress.com search box.

~

FM Transmitter

Last but not least – the car FM transmitter.

My daily ‘real’ driver (I mean on the real road outside) is the 2006 Dodge Magnum car. I really love it for the simplicity and calm that it provides during the ride – but on the audio side it only has an old FM/AM radio and a CD slot … and not MP3 support in that one.

This is where the FM transmitter such as mine Blow comes really handy.

It supports two modes. One is being a Bluetooth slave of your phone – it just plays on the car speakers anything you are currently playing on your phone – it also has microphone builtin – so You can also use it as a ‘loud’ phone talking device.

I use it in a more simple mode – I just attach a tiny Lexar S47 32GB pendrive to it – and play a random song of it.

Besides these features it also has additional USB-A port available to attach a cable to it and charge some device.

I was able to get one a new one for about $19.

~

Summary

The mentioned devices above are probably not the only ones that make my life easier – but definitely the most crucial ones.

Feel free to share your ‘helper’ hardware in the comments.

Regards.

EOF

SAP Copy Paste with Mouse Buttons

Seems like a very unusual topic for a UNIX oriented blog – especially as it will be on the Windows system πŸ™‚

For some unknown reason for me – some genius at SAP decided – that to copy a record/field from their SAP interface – you need to first press [CTRL]+[Y] keys and then [CTRL]+[C]. Do not ask me where is logic in that.

mouse-manager-logo-sap

When you do (fortunately I do not) make many of these ‘copy/paste’ actions with SAP – it may become quite dull and irritating. Especially as the letter [Y] is one of the biggest distance from the [CTRL] key …

Needed Hardware

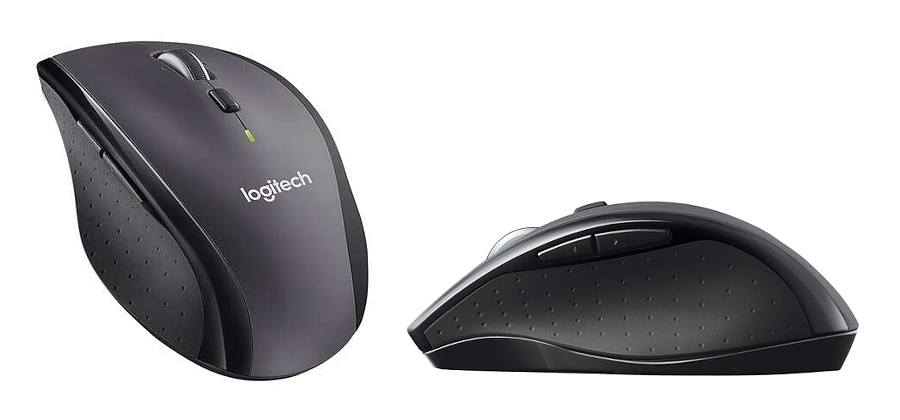
To use this copy paste with mouse buttons – you will of course need a mouse that has some other additional two buttons. Good suggestions are Logitech M705 (especially first generation) or Logitech M720 – for the record this is not a sponsored entry πŸ™‚

mouse-M705-GEN2

These mice also make a great UNIX mouse – UNIX Mouse Shootout – as described here.

Needed Software

After checking what is available and supported on all Windows versions I was fortunate to find the Mouse Manager written by Reality Ripple Software.

mouse-manager-window

Its free to use and has no license at all – which means you can legally use it in professional/corporate environments. They also accept donations here if you liked it πŸ™‚

Installation or Copy Over

The Mouse Manager installer requires Windows Administrative Rights … so you will not be able to install it by yourself on a company laptop – and probably you should not to avoid being in conflict with some compliance and security rules you got there. But if you know what You are doing there is a way to overcome that.

mouse-manager-improvise

Use other computer with Windows where you have Administrative Rights (or even Linux/FreeBSD with WINE) – like your personal computer for example – and install it there. Then copy these two files from Program Files directory and put them on your corporate laptop – even on your Desktop or Documents folders:

  • MouseManager.exe
  • MouseManager.pdb

Now just start the MouseManager.exe and you are ready to go.

Configuration

Now we will just type the [CTRL]+[Y] and [CTRL]+[C] keys for the Button 5 and [CTRL]+[V] keys for the Button 4 on the Mouse.

mouse-manager-profile-config

Now you can copy/paste SAP records with mouse buttons πŸ™‚

Make sure you have selected this profile in the Windows System Tray area.

mouse-manager-profile

EOF

FreeBSD 13.1 on ThinkPad W520

I created whole FreeBSD Desktop series … but I never created an article describing how I run FreeBSD on my own daily driver – the Lenovo ThinkPad W520 from 2011 – the last one with the so much appreciated 7-row keyboard. In this article I will share how I configured FreeBSD to make the most of it. If you are curious why I use such old laptop then my older Epitaph to Laptops article explains that in detail.

This is the Table of Contents for this article.

  • FreeBSD 13.1 on ThinkPad W520
  • ThinkPad W520
  • Specifications
  • FreeBSD System Configuration
  • Desktop Environment
    • Openbox
    • XFCE
    • GNOME
  • Accessories
    • Smaller Power Supply
    • Mouse Companion
    • Two Additional USB 3.0 Ports
    • Larger Custom Battery
  • Experience
  • Summary

ThinkPad W520

This machine was out-fucking-standing when it was released in 2011 … and expensive as hell also πŸ™‚ With 4 physical cores and up to 32 GB RAM only a few laptops could compete with it – Dell Precision M4600 – also could do that back then … but not exactly the same. You see – the last Dell Precision to carry similar 7-row keyboard was Dell Precision M4500 – but that one was from 2010 and was able to pack only … 8 GB RAM (official) and 16 GB RAM (unofficial) – so its not a fair comparison. Today 11 years (!) later ThinkPad W520 is still very capable and powerful machine. The only thing that you may need to do is to replace the thermal paste. I also did that – Classic ThinkPad Thermal Paste Change – as described here.

0THIS-w520-freebsd

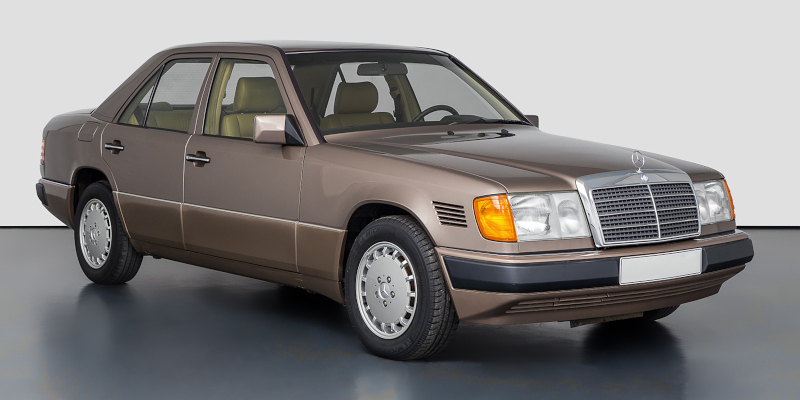
To make you imagine how big that 11 years time span in IT is I will try to show you example with a car. Its like driving 30 years old Mercedes-Benz W124 from 1992 today because IT world and hardware changes and improves a lot faster then automobile industry. The Mercedes-Benz W124 with its indestructible automatic transmission and engine along with comfortable suspension and automatic air conditioning – offers daily experience not that far away from today’s cars – the meritum is definitely fulfilled. I know that from first hand since I owned one not that long ago. Not to mention its legendary reliability. Its also a car that is very liked by mechanics as its very ‘serviceable’ and has lots of space for everything. You do not need to disassemble entire front bumper and the headlight just to replace a broken light beam.

w520.mercedes.w124

This is the same that I would say about ThinkPad W520 today. You can put three (!) storage devices at the same time. Two 2.5 SATA drives and one mSATA disk. Assuming you would use 8 TB 2.5 Samsung QVO drives and 2 TB mSATA drive you would have 18 TB of storage … in a 11 years old laptop. You can grow that to 19TB with 1TB SD card in the slot … and we even did not touched any USB ports yet. Today you are able to get ThinkPad W520 in nice condition for about $300 if you are not heisty and getting 32 GB of DDR3 RAM costs another $100 so its pretty affordable hardware.

Specifications

For the record below You will find specs of mine machine. I also added driver and/or package that is used to support these devices.

CPU: Intel Core i7-2820QM 2.30GHz (4C/8T) Sandy Bridge 32nm
RAM: 32 GB (4 * 8GB DDR3)
HDD0: 128GB mSATA Samsung PM830 (system)
HDD1: 4 TB 2.5 SATA Samsung 860 QVO (data)
GFX0: Intel HD Graphics 3000 (integrated) [graphics/drm-kmod]
GFX1: Nvidia Quadro 2000M (discrete) [x11/nvidia-driver-390] {nvidia}
SCR: 15.6 1920x1080
USB: 2 x USB 2.0 + 2 x USB 3.0 [ehci(4) + xhci(4)]
AUDIO: Conexant CX20590 [snd_hda(4)]
PORTS0: 1 x VGA
PORTS1: 1 x DisplayPort
PORTS2: 1 x eSata
SD: Card Reader 5in1 [sdhci(4)]
LAN: 10/100/1000 Intel 82579LM Gigabit [em(4)]
WIFI: Intel Centrino Ultimate-N 6300 AGN 802.11n [iwn(4)]
BT: Bluetooth 3.0 [ng_ubt(4)]
CAM: Webcam 720p [multimedia/webcamd]

Articles such as this one often focuses on what works and is supported by FreeBSD and what is problematic or does not work at all. The very nice thing about ThinkPad W520 under FreeBSD command is that EVERYTHING works. From Bluetooth through Card Reader and also multiple suspend/resume cycles. I am doing months of uptime on that laptop and I reboot only when I need to update the system or I want to test something … but that often also does not need reboot now as you can just reroot into other BE as described in my other ZFS Boot Environments Revolutions article.

I do not need the compute power of discrete Nvidia Quadro 2000M card so I disabled it in the BIOS – but when I tried it with drivers from the FreeBSD Ports – everything worked as desired. I use integrated Intel HD Graphics 3000 which is more then enough for my needs. To be honest I would get ThinkPad T520 which can be bought with integrated graphics only but it has two downsides. The T520 does not have any USB 3.0 ports – that one I could probably live with but … it comes only with Dual Core CPUs. You can of course place a Quad Core CPU in it by yourself – but as W520 exist I do not see a reason not to get one πŸ™‚

FreeBSD System Configuration

From many things that I really like about FreeBSD (more here – Quare FreeBSD? – in separate article) is that it can be mostly configured using just 3 files. This configuration already features all power management settings that I described in the The Power to Serve – FreeBSD Power Management article.

I installed FreeBSD in a pretty standard way with GELI full disk encryption enabled and with ZFS as the filesystem as I can not live without ZFS Boot Environments. The FreeBSD installer automatically detects and applies the so called ‘Lenovo Fix‘. When in doubt the installation procedure is described in the FreeBSD Desktop – Part 2.1 – Install FreeBSD 12 article.

Main FreeBSD configuration files.

  • /etc/rc.conf – system and services configuration
  • /etc/sysctl.conf – runtime parameters configuration
  • /boot/loader.conf – parameters configurable at boot

I will also include these below as they are also important:

  • /etc/devfs.rules – devices configuration
  • /etc/fstab – filesystems configuration
  • /etc/ttys – terminal initialization configuration
  • /etc/wpa_supplicant.conf – WiFi configuration
  • /usr/local/etc/automount.confautomount(8) configuration
  • /usr/local/etc/doas.confdoas(1) configuration
  • id(1) groups membership
  • /usr/local/etc/X11/xorg.conf.d/* – X11 configuration

First the main /etc/rc.conf configuration file.

% cat /etc/rc.conf
# SILENCE # ------------------------------------------------------------------
  rc_startmsgs=NO

# NETWORK # ------------------------------------------------------------------
  hostname=w520.local
  background_dhclient=YES
  extra_netfs_types=NFS
  defaultroute_delay=3
  defaultroute_carrier_delay=3
  gateway_enable=YES
  harvest_mask=351
  rtsol_flags="-i"
  rtsold_flags="-a -i"

# MODULES/COMMON/BASE # ------------------------------------------------------
  kld_list="${kld_list} /boot/modules/i915kms.ko"
  kld_list="${kld_list} fusefs coretemp sem cpuctl ichsmb cuse"
  kld_list="${kld_list} libiconv cd9660_iconv msdosfs_iconv udf_iconv"

# MODULES/VIRTUALBOX # -------------------------------------------------------
  vboxnet_enable=YES
  kld_list="${kld_list} vboxdrv vboxnetadp vboxnetflt"

# POWER
  performance_cx_lowest=C1
  economy_cx_lowest=Cmax
  powerd_enable=YES
  powerd_flags="-n adaptive -a hiadaptive -b adaptive -m 800 -M 2000"

# DAEMONS | yes # ------------------------------------------------------------
  zfs_enable=YES
  xdm_enable=YES
  xdm_tty=ttyv4
  nfs_client_enable=YES
  ubuntu_enable=YES
  moused_enable=YES
  syslogd_flags='-s -s'
  sshd_enable=YES
  local_unbound_enable=YES
  webcamd_enable=YES
  rctl_enable=YES

# DAEMONS | no # -------------------------------------------------------------
  linux_enable=NO
  sendmail_enable=NONE
  sendmail_submit_enable=NO
  sendmail_outbound_enable=NO
  sendmail_msp_queue_enable=NO

# FS # -----------------------------------------------------------------------
  fsck_y_enable=YES
  clear_tmp_enable=YES
  clear_tmp_X=YES
  growfs_enable=YES

# OTHER # --------------------------------------------------------------------
  keyrate=fast
  keymap=pl.kbd
  virecover_enable=NO
  update_motd=NO
  devfs_system_ruleset=desktop
  hostid_enable=NO
  savecore_enable=NO

Now the runtime parameters /etc/sysctl.conf file.

% cat /etc/sysctl.conf
# SECURITY
  security.bsd.see_jail_proc=0
  security.bsd.unprivileged_proc_debug=0

# SECURITY/RANDOM PID
  kern.randompid=1

# ANNOYING THINGS
  vfs.usermount=1
  kern.coredump=0
  hw.syscons.bell=0
  kern.vt.enable_bell=0

# ZFS DELETE FUCKUP TRIM (DEFAULT: 64)
  vfs.zfs.vdev.trim_max_active=1

# ZFS ARC TUNING
  vfs.zfs.arc.min=134217728
  vfs.zfs.arc.max=536870912

# ZFS ARC FREE ENFORCE @ 1024 \* 1024 \* 3
  vfs.zfs.arc_free_target=3145728

# JAILS/ALLOW UPGRADES IN JAILS
  security.jail.chflags_allowed=1

# JAILS/ALLOW RAW SOCKETS
  security.jail.allow_raw_sockets=1

# DESKTOP/INTERACTIVITY
  kern.sched.preempt_thresh=224

# DESKTOP QUANTUM FOR TIMESHARE THREADS IN stathz TICKS (12) NomadBSD
  kern.sched.slice=3

# DESKTOP/IRIDIUM/CHROMIUM
  kern.ipc.shm_allow_removed=1

# SAMPLE RATE CONVERTER QUALITY (0=low .. 4=high) (1) NomadBSD
  hw.snd.feeder_rate_quality=3

# PERFORMANCE/ALL SHARED MEMORY SEGMENTS WILL BE MAPPED TO UNPAGEABLE RAM
  kern.ipc.shm_use_phys=1

# VIRTUALBOX aio(4) SETTINGS
  vfs.aio.max_buf_aio=8192
  vfs.aio.max_aio_queue_per_proc=65536
  vfs.aio.max_aio_per_proc=8192
  vfs.aio.max_aio_queue=65536

# NETWORK/DO NOT SEND RST ON SEGMENTS TO CLOSED PORTS
  net.inet.tcp.blackhole=2

# NETWORK/DO NOT SEND PORT UNREACHABLES FOR REFUSED CONNECTS
  net.inet.udp.blackhole=1

# NETWORK/LIMIT ON SYN/ACK RETRANSMISSIONS (3)
  net.inet.tcp.syncache.rexmtlimit=0

# NETWORK/USE TCP SYN COOKIES IF THE SYNCACHE OVERFLOWS (1)
  net.inet.tcp.syncookies=0

# NETWORK/ASSIGN RANDOM ip_id VALUES (0)
  net.inet.ip.random_id=1

# NETWORK/ENABLE SENDING IP REDIRECTS (1)
  net.inet.ip.redirect=0

# NETWORK/IGNORE ICMP REDIRECTS (0)
  net.inet.icmp.drop_redirect=1

# NETWORK/DROP TCP PACKETS WITH SYN+FIN SET (0)
  net.inet.tcp.drop_synfin=1

# NETWORK/RECYCLE CLOSED FIN_WAIT_2 CONNECTIONS FASTER (0)
  net.inet.tcp.fast_finwait2_recycle=1

# NETWORK/CERTAIN ICMP UNREACHABLE MESSAGES MAY ABORT CONNECTIONS IN SYN_SENT (1)
  net.inet.tcp.icmp_may_rst=0

Now the boot parameters in /boot/loader.conf file.

% cat /boot/loader.conf
# CONSOLE COMMON
  autoboot_delay=1       # OPTION '-1' MEANS NO WAIT AND 'NO' MEANS INFINITE WAIT
  hw.usb.no_boot_wait=0  # DO NOT WAIT FOR USB DEVICES FOR ROOT (/) FILESYSTEM
  boot_mute=YES          # SAME AS '-m' IN LOADER - MUTE CONSOLE WITH FreeBSD LOGO
  loader_logo=none       # DESIRED LOGO: fbsdbw beastiebw beastie none
  loader_menu_frame="none"
  screen.font="6x12"

# CONSOLE RESOLUTION
  efi_max_resolution="1920x1080"

# WINE FIX
  machdep.max_ldt_segment=2048

# MODULES - BOOT
  geom_eli_load=YES
  zfs_load=YES

# drm-kmod PACKAGE - USE SEMAPHORES FOR INTER-RING SYNC
  compat.linuxkpi.semaphores=1

# drm-kmod PACKAGE - ENABLE POWER-SAVING RENDER C-STATE 6
  compat.linuxkpi.enable_rc6=7

# drm-kmod PACKAGE - ENABLE POWER-SAVING DISPLAY C-STATES
  compat.linuxkpi.enable_dc=2

# drm-kmod PACKAGE - ENABLE FRAME BUFFER COMPRESSION FOR POWER SAVINGS
  compat.linuxkpi.enable_fbc=1

# ENABLE SYNAPTICS
  hw.psm.synaptics_support=1

# DISABLE /dev/diskid/* ENTRIES FOR DISKS
  kern.geom.label.disk_ident.enable=0

# DISABLE /dev/gptid/* ENTRIES FOR DISKS
  kern.geom.label.gptid.enable=0

# TERMINAL vt(4) COLORS
  kern.vt.color.0.rgb="#000000"
  kern.vt.color.1.rgb="#dc322f"
  kern.vt.color.2.rgb="#859900"
  kern.vt.color.3.rgb="#b58900"
  kern.vt.color.4.rgb="#268bd2"
  kern.vt.color.5.rgb="#ec0048"
  kern.vt.color.6.rgb="#2aa198"
  kern.vt.color.7.rgb="#94a3a5"
  kern.vt.color.8.rgb="#586e75"
  kern.vt.color.9.rgb="#cb4b16"
  kern.vt.color.10.rgb="#859900"
  kern.vt.color.11.rgb="#b58900"
  kern.vt.color.12.rgb="#268bd2"
  kern.vt.color.13.rgb="#d33682"
  kern.vt.color.14.rgb="#2aa198"
  kern.vt.color.15.rgb="#6c71c4"

# RACCT/RCTL RESOURCE LIMITS
  kern.racct.enable=1

# DISABLE ZFS PREFETCH
  vfs.zfs.prefetch_disable=1

# POWER MGMT / POWER OFF DEVICES WITHOUT ATTACHED DRIVER
  hw.pci.do_power_nodriver=3

# POWER MANAGEMENT FOR EVERY USED AHCI CHANNEL (ahcich 0-7)
  hint.ahcich.0.pm_level=5
  hint.ahcich.1.pm_level=5
  hint.ahcich.2.pm_level=5
  hint.ahcich.3.pm_level=5
  hint.ahcich.4.pm_level=5
  hint.ahcich.5.pm_level=5
  hint.ahcich.6.pm_level=5
  hint.ahcich.7.pm_level=5

# GELI THREADS
  kern.geom.eli.threads=4

Now the mentioned /etc/devfs.rules file.

% cat /etc/devfs.rules
[desktop=10]
add path 'acd*'      mode 0660 group operator
add path 'cd*'       mode 0660 group operator
add path 'da*'       mode 0660 group operator
add path 'pass*'     mode 0660 group operator
add path 'xpt*'      mode 0660 group operator
add path 'fd*'       mode 0660 group operator
add path 'md*'       mode 0660 group operator
add path 'uscanner*' mode 0660 group operator
add path 'ugen*'     mode 0660 group operator
add path 'usb/*'     mode 0660 group operator
add path 'video*'    mode 0660 group operator
add path 'cuse*'     mode 0660 group operator
add path 'lpt*'      mode 0660 group cups
add path 'ulpt*'     mode 0660 group cups
add path 'unlpt*'    mode 0660 group cups

Filesystems and SWAP configuration.

% cat /etc/fstab
# SWAP
  /dev/gpt/swap0  none  swap  sw  0 0

# FreeBSD PSEUDO - NEEDED BY wine(1)
  procfs  /proc  procfs  rw  0 0

# Ubuntu Linux PSEUDO
  linprocfs  /compat/ubuntu/proc     linprocfs  rw,late                    0 0
  linsysfs   /compat/ubuntu/sys      linsysfs   rw,late                    0 0
  devfs      /compat/ubuntu/dev      devfs      rw,late                    0 0
  fdescfs    /compat/ubuntu/dev/fd   fdescfs    rw,late,linrdlnk           0 0
  tmpfs      /compat/ubuntu/dev/shm  tmpfs      rw,late,size=1g,mode=1777  0 0
  /home      /compat/ubuntu/home     nullfs     rw,late                    0 0
  /tmp       /compat/ubuntu/tmp      nullfs     rw,late                    0 0

Terminals configuration under /etc/ttys file. Important part is the ttyv4 entry to match the xdm_tty=ttyv4 value from /etc/rc.conf file.

% grep '^[^#]' /etc/ttys | cat
console none                            unknown off insecure
ttyv0   "/usr/libexec/getty Pc"         xterm   onifexists secure
ttyv1   "/usr/libexec/getty Pc"         xterm   onifexists secure
ttyv2   "/usr/libexec/getty Pc"         xterm   onifexists secure
ttyv3   "/usr/libexec/getty Pc"         xterm   onifexists secure
ttyv4   "/usr/libexec/getty Pc"         xterm   off secure
ttyv5   "/usr/libexec/getty Pc"         xterm   off secure
ttyv6   "/usr/libexec/getty Pc"         xterm   off secure
ttyv7   "/usr/libexec/getty Pc"         xterm   off secure
ttyv4   "/usr/local/bin/xdm -nodaemon"  xterm   off secure
ttyu0   "/usr/libexec/getty 3wire"      vt100   onifconsole secure
ttyu1   "/usr/libexec/getty 3wire"      vt100   onifconsole secure
ttyu2   "/usr/libexec/getty 3wire"      vt100   onifconsole secure
ttyu3   "/usr/libexec/getty 3wire"      vt100   onifconsole secure
dcons   "/usr/libexec/getty std.9600"   vt100   off secure
xc0     "/usr/libexec/getty Pc"         xterm   onifconsole secure
rcons   "/usr/libexec/getty std.9600"   vt100   onifconsole secure

Wireless config – as an example for different network types. As you have seen I did not included any network information in the /etc/rc.conf file – this is because I use my own network.sh solution to connect to various both wire and wireless networks – FreeBSD Network Management with network.sh Script – described in detail here.

# cat /etc/wpa_supplicant.conf
# GENERAL
eapol_version=2
ap_scan=1
fast_reauth=1

# OPEN NETWORKS
network={
  key_mgmt=NONE
  priority=0
}

# NETWORK WITH HIDDEN SSID
network={
  scan_ssid=1
  ssid="hidden-network"
  psk="12341234"
  priority=0
}

# NAMED OPEN NETWORK
network={
  ssid="Free_Internet"
  key_mgmt=NONE
  priority=0
}

# NORMAL WPA/WPA2 SECURED NETWORK
network={
  ssid="SECURED"
  psk="12345678"
}

The automount(8) config.

% cat /usr/local/etc/automount.conf
  USERUMOUNT=YES
  USER=vermaden
  FM='caja --no-desktop'
  NICENAMES=YES

The doas(1) configuration.

# cat /usr/local/etc/doas.conf
# CORE
  permit nopass keepenv root     as root
  permit nopass keepenv vermaden as root

# THE network.sh SCRIPT
  # pw groupmod network -m YOURUSERNAME
  # cat /usr/local/etc/doas.conf
  permit nopass :network as root cmd /etc/rc.d/netif args onerestart
  permit nopass :network as root cmd /usr/sbin/service args squid onerestart
  permit nopass :network as root cmd dhclient
  permit nopass :network as root cmd ifconfig
  permit nopass :network as root cmd killall args -9 dhclient
  permit nopass :network as root cmd killall args -9 ppp
  permit nopass :network as root cmd killall args -9 wpa_supplicant
  permit nopass :network as root cmd ppp
  permit nopass :network as root cmd route
  permit nopass :network as root cmd tee args -a /etc/resolv.conf
  permit nopass :network as root cmd tee args /etc/resolv.conf
  permit nopass :network as root cmd umount
  permit nopass :network as root cmd wpa_supplicant

Groups I am member of with id(1) output.

% id vermaden | tr ' ' '\n' | tr ',' '\n'
uid=1000(vermaden)
gid=1000(vermaden)
groups=1000(vermaden)
0(wheel)
5(operator)
44(video)
69(network)
145(webcamd)
920(vboxusers)

Current X11 configuration.

% cat /usr/local/etc/X11/xorg.conf.d/card.conf
Section "Device"
  Identifier "Card0"
  Option "DPMS"
  Driver "intel"
  Option "DRI" "3"
  Option "AccelMethod" "sna"
  Option "TearFree" "true"
EndSection

% cat /usr/local/etc/X11/xorg.conf.d/flags.conf
Section "ServerFlags"
  Option "DontZap" "off"
EndSection

% cat /usr/local/etc/X11/xorg.conf.d/keyboard.conf
Section "InputDevice"
  Identifier "Keyboard0"
  Driver "kbd"
  Option "XkbLayout" "pl"
  Option "XkbOptions" "terminate:ctrl_alt_bksp,ctrl:nocaps"
EndSection

% cat /usr/local/etc/X11/xorg.conf.d/touchpad.conf
Section "InputClass"
  Identifier "touchpad"
  MatchIsTouchpad "on"
  Driver "libinput"
  Option "Tapping" "on"
  Option "NaturalScrolling" "on"
EndSection

I also do not rely on ‘stock’ fan speeds and set my own speeds according to CPU temperature with acpi-thinkpad-fan.sh script.

Desktop Environment

Openbox

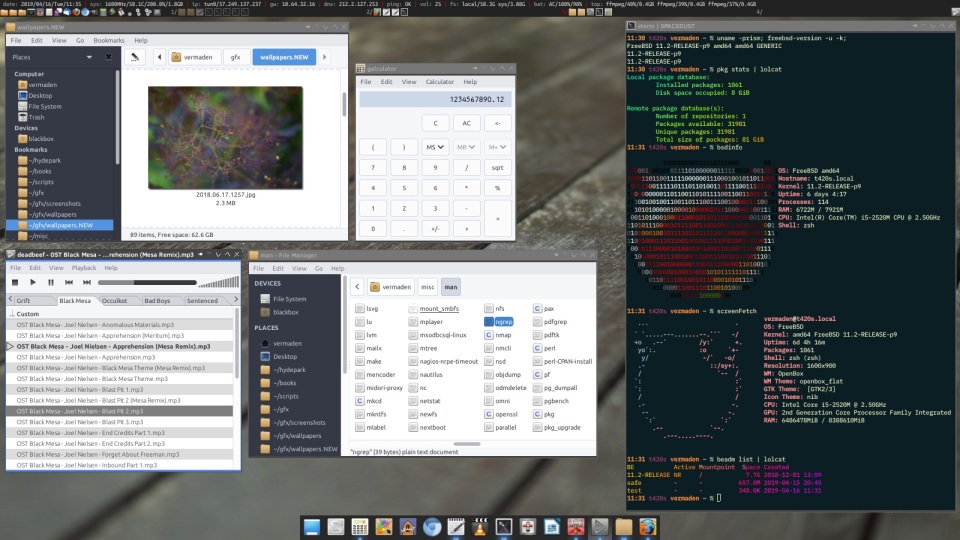
As for the ‘desktop environment’ that I use – its my custom setup with Openbox along with tools like Tint2 and Dzen2 – for the most basic setup. The screenshot is from FreeBSD 11.1 but it looks exactly the same today.

freebsd-desktop-2019-04

I described this setup in details in the entire FreeBSD Desktop series.

XFCE

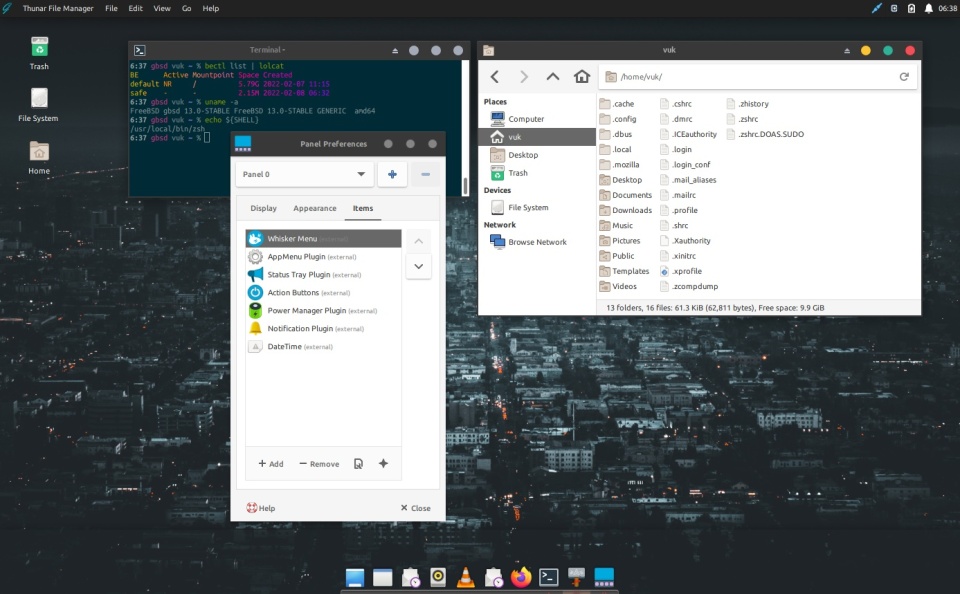
I have also tried XFCE – I liked it especially with the Global Menu app-menu plugin. You go this way with this XFCE Cupertino Way handy guide.

xfce-ghostbsd

GNOME

I also tried GNOME for a test – it did not suit me well so I went back to my Openbox setup – but You may find it more comfortable to use. Here is the FreeBSD GNOME 3 Fast Track article that will help you with that.

gnome-4-apps

Accessories

There are some accessories that are very handy with the ThinkPad W520 laptop. I will describe them below.

Smaller Power Supply

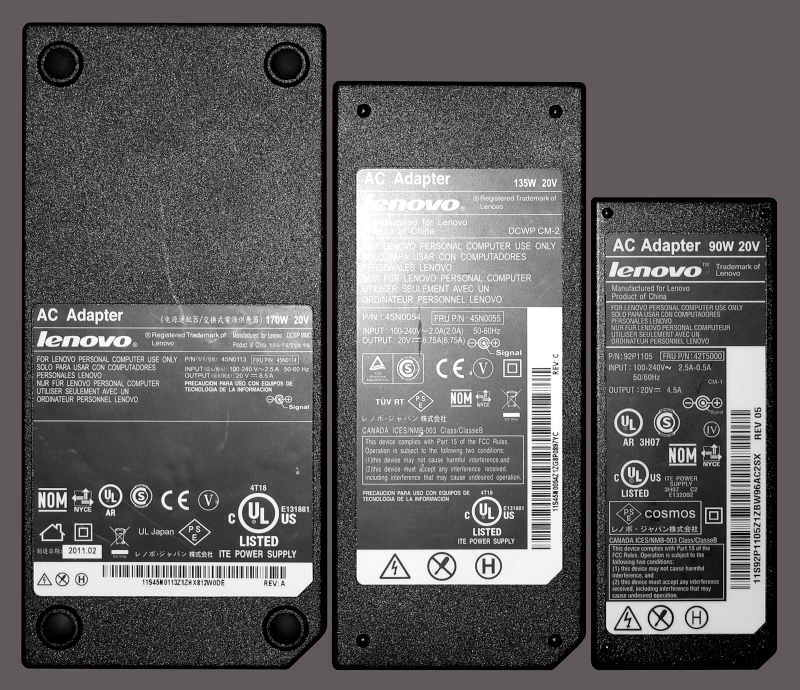
The ThinkPad W520 comes with quite large brick of ThinkPad 170W Power Supply. It works. Its OK … but you can use smaller one and more universal at the same time. I use the ThinkPad 135W Power Supply that originally was sold with ThinkPad W510 – the earlier model. Besides being smaller in size it also has one additional advantage. Its plug is round and also fits into other ThinkPads from this line like ThinkPad X220 or ThinkPad T420s. The original ThinkPad 170W Power Supply unfortunately only fits into the ThinkPad W520 laptop. Below you can compare their sizes.

w520.ps

Mouse Companion

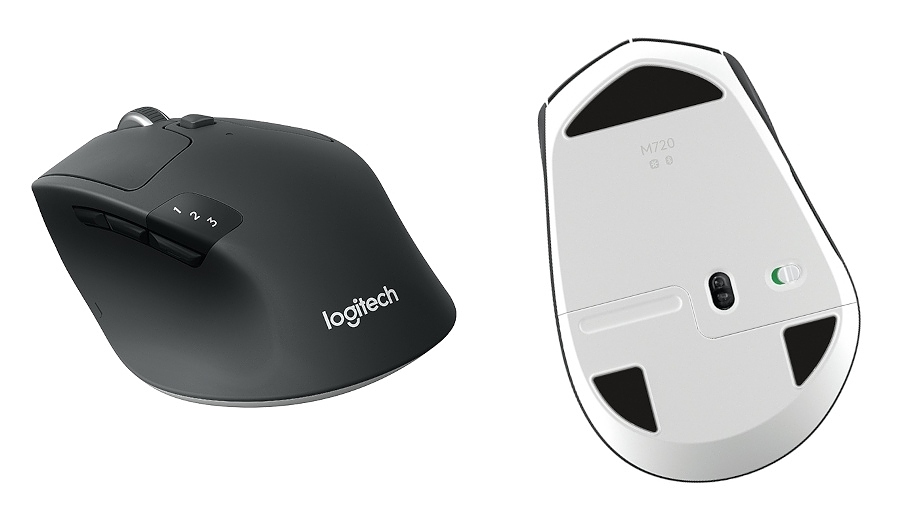
After checking many mouse models – as described in the UNIX Mouse Shootout article – I finally settled with Logitech Triathlon M720 mouse. I have plugged the Lenovo USB Receiver into the back ‘powered’ USB port. While I use that mouse over the USB receiver you can also connect it using Bluetooth – also to other computers. This mouse has a special dedicated button to switch between 3 different computers. Unfortunately the copy-paste between them does not work πŸ™‚

mouse-M720

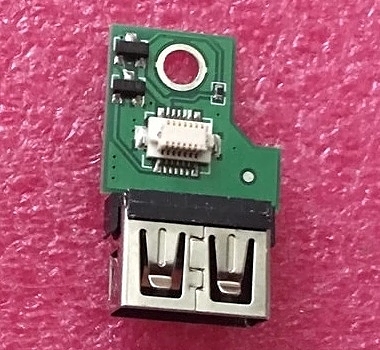
If you would like to ‘save’ that port for something else then you may use special USB board adapter that you will place in the Bluetooth module under the palm rest. You would loose Bluetooth support then of course – but not everyone uses that. Its available for example on Aliexpress site and looks like that.

w520.usb-bluetooth-pink

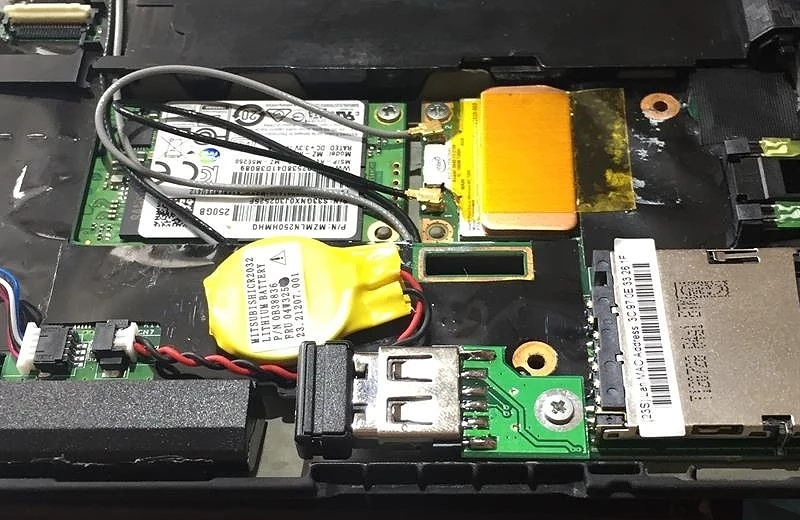
I do not use it as I do not need the ‘back’ USB port so below you will find its mounted picture on the ThinkPad X220 laptop instead – along with the Lenovo USB Receiver attached.

w520.usb-bluetooth

Two Additional USB 3.0 Ports

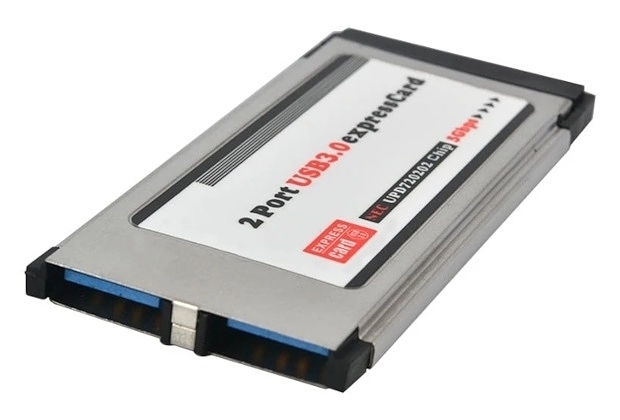
The ThinkPad W520 comes with not well known today ExpressCard port. With this cheap adapter from Aliexpress you can add two additional USB 3.0 ports. You may of course do not need that many ports – but if you are left handed then you probably use mouse on the left of your laptop – then USB ports on the right will be handy.

w520.express

These USB 3.0 ports may be also useful with some bhyve(8) setups. Currently its not supported to pass-thru just a single USB port to a virtual machine. You need to pass thru entire controller. This way you can pass-thru that controller to bhyve(8) VM and have another USB 3.0 ports on the host.

Larger Custom Battery

The original largest extended battery for ThinkPad W520 had 9400mAh capacity. Its possible to get even larger custom extended battery but in the same physical size and shape – with 9600mAh capacity – and for only about $50. To remind you the original one costs closer to $200 unfortunately. I got mine from this Aliexpress page. With my power settings and with this battery along with enabled WiFi and screen brightness just one step less then maximum brightness it show more then 7 hours of time left in acpiconf(8) command.

% acpiconf -i 0
Design capacity:        10368 mAh
Last full capacity:     10368 mAh
Technology:             secondary (rechargeable)
Design voltage:         10800 mV
Capacity (warn):        518 mAh
Capacity (low):         18 mAh
Low/warn granularity:   1 mAh
Warn/full granularity:  1 mAh
Model number:           42T4763
Serial number:              1
Type:                   LION
OEM info:               SANYO
State:                  discharging
Remaining capacity:     97%
Remaining time:         7:17
Present rate:           1393 mA (17086 mW)
Present voltage:        12266 mV

As you can see from the command above this custom battery size is even reported as closer to 10400mAh instead of advertised 9600maH. I do not know how to check which one is closer to truth – but the fact is that it allows longer work then the official one – and for smaller price.

Experience

This laptop along with its smaller and lighter brothers such as ThinkPad X220 or ThinkPad T420s are the best machines I know to work on FreeBSD … but maybe its because I do not use newer laptops πŸ™‚ The general experience of FreeBSD on ThinkPad W520 is stable and uninterrupted work count in days and weeks of uptime. The suspend/resume works like a charm with many cycles possible – not just one. I one even recorded such suspend/resume cycle with many applications and games running on a busy FreeBSD system. Its available here FreeBSD 12.2 Suspend/Resume on a Vimeo page.

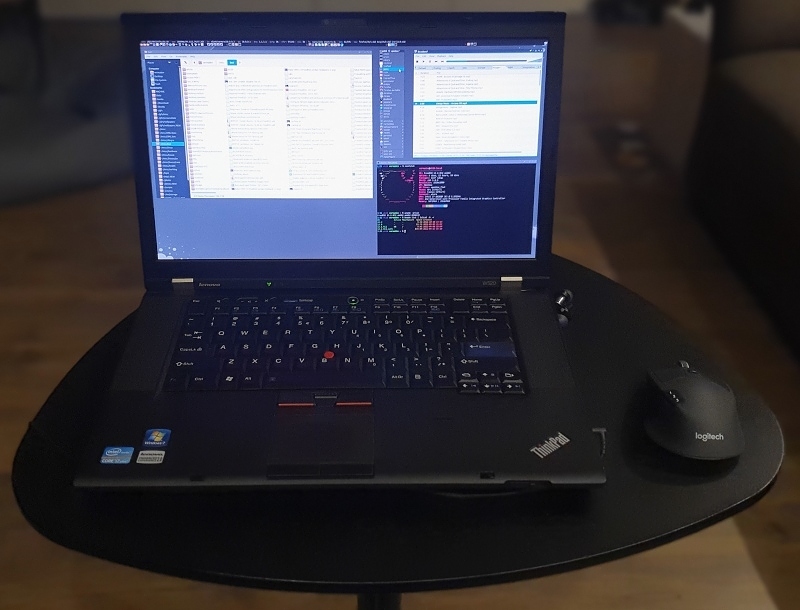
Here is now its being used daily.

w520.real

Summary

I have been using this laptop since many years and I even laugh that as its a decade old – I would use it for the next decade πŸ™‚ Most/all of this configuration applies to other ThinkPad models from this lineup like X220/T420s/T420/T520 … probably even L520 (but I did not tested that one).

EOF

UNIX Mouse Shootout

While most hardcore UNIX users prefer keyboard shortcuts over anything else – and I often align with that view – I really do appreciate good mouse on my UNIX system. In the end its close to impossible to edit images in GIMP without mouse for example. This ‘shootout’ will definitely be subjective as it will be limited only to mice that I own(ed). I will not bore you with all the technical specifications of these devices – you can check them on your own.

Besides – UNIX has two copy/paste buffers instead of just one like in most systems. There is PRIMARY and SECONDARY buffers in X11 for mouse. One is used when you use Copy/Paste options from menus and/or keyboard shortcuts like [CTRL]+[C] and [CTRL]+[V] ones. The other one is used when you just SELECT the text. After releasing the left mouse button (and finishing the selection) you have that text stored in your SECONDARY buffer. You may now paste that with pressing the third/middle mouse button. But the PRIMARY buffer did not changed during that operation so you can also paste the other text you had in your PRIMARY buffer from the earlier [CTRL]+[C] operation. This makes mouse on UNIX more useful – definitely bigger then in other systems.

While Bluetooth is widely used on most mobile phones/tables and even cars now I do not find it desired as the only protocol for the mouse. I do not have anything against it when it comes as an additional possibility like with the Logitech M720 Triathlon mouse – its even nice that way – but I would not use mouse that the only possible way to connect/operate is by Bluetooth protocol. Maybe on a macOS UNIX but definitely not on FreeBSD UNIX πŸ™‚

AMIGA ‘Tank’ Mouse

The first mouse device that I used was the oldschool AMIGA ‘Tank’ Mouse which I used alongside my first computer – AMIGA A600. When I used it or played Cannon Fodder it felt more then up to the task but using only two buttons mouse (without any scroll and third button) in 2021 feels almost impossible for me.

mouse-amiga-tank

It was possible to run AMIGA UNIX (also known as Amix) on AMIGA hardware. That was an AT&T Unix System V Release 4 developed as alternative to default AmigaOS but you needed Amiga A3000UX hardware for that.

amiga-unix

Unfortunately the AMIGA A600 was not supported 😦

Lenovo and ThinkPad Twins

One of my older/earlier mouse models that I used were quite ‘identical’ mouse models Lenovo Wireless USB Mouse (0A36188) and ThinkPad Wireless USB Mouse (0A36193) – both made by Lenovo for the record. They have the same size and work mostly the same but the older one – ThinkPad model (0A36193) – had more responsive third button (the one under the wheel) – the Lenovo (0A36188) kinda needed real strength to press it – that was its downside.

mouse-thinkpad-lenovo

I still own the ThinkPad one (0A36193) and use it from time to time when I travel – the two AA batteries allow quite long operation of more then a month – which is more then enough for my standards.

Its my first mouse that got additional buttons on the scroll wheel for left and right operations – I used it for volume control on my UNIX system which was (and still is) VERY convenient.

While I really like its/their small size – but after some longer use I really miss some more ergonomic shape under my hand. That means that it ‘will do’ for short periods of usage in travel situations but for long work use something more ergonomic then these.

Logitech Marathon M705 (GEN 1)

I got it after more then a year of using Lenovo and ThinkPad mice. It was real upgrade with quite nice profiled shape to the right hand. It was also quite heavy – but that was good – it felt really good to operate in hand. It was branded as very long to use without changing or charging the batteries and it really did provided in that department – I needed to change/charge the batteries maybe once a year or less often. It was also more precise then simple ThinkPad/Lenovo mouse.

mouse-M705-GEN1

The volume buttons from the wheel that I used on the Lenovo and ThinkPad mice was not quite possible here. While the mouse have these left/right buttons on the wheel they were clumsy and not very precise – so you loss more time trying to press them properly then doing it the other way. With Logitech M705 I ‘moved’ my volume controls to other two buttons that were available under the thumb button. Fortunately there are two of those additional buttons so it was perfect for volume up and volume down actions.

This is also the first mouse that allowed to toggle the wheel to be ‘clickless’ – you can literally spin it for several seconds without any resistance – it just keeps rolling itself – and to be honest – that is one of the features I now DEMAND from any mouse. It makes life so much better (and faster). Instead of scrolling many – many times to get where its needed – you just spin it once and wait till you get there – and even a lot faster then with ‘traditional’ clicking mouse wheel.

Another advantage of that approach is that tip of your finger does not hurt after all day long of scrolling … and if you need precision clicking wheel – then just toggle it and you can click-scroll as usual.

With LogitechΒ Marathon M705 mouse I also grow another ‘useful’ habit (or need) in a mouse. I started to use the lower thumb button to toggle between pause/play for my Deadbeef music player. Before that I used to switch to Workspace 3 where it plays music and press [C] key to toggle pause/play. After adding additional deadbeef --play-pause action to my xbindkeys(1) config now all I have to do to toggle between play and pause is to just push my thumb mouse button. Way faster πŸ™‚

Logitech Performance MX

After reading many comparisons with Logitech MX Master generations I finally settled on the Logitech Performance MX mouse. It is really big and that is really big advantage. It handles/lies really nice in a hand and being quite large and heavy it is very precise and you got ‘good’ feeling and confidence of using it. I really liked it till I got to know its two big downsides … first was the battery time. I needed to change/charge battery about once a week. That was REALLY disappointing. The other downside was that it was not able to properly operate on a flat WOOD surface (like on the photo below). Plain simple flat wood. All other mice worked well on this surface while this one did not. The marketed Darkfield sensor was useless. These were the two reasons that I got rid of it.

mouse-logitech-performance-MX

Same as with M705 the left/right buttons on the wheel were not very precise so I used the additional thumb buttons for volume management. The Logitech Performance MX mouse also comes with micro USB port at the front so you may use the mouse while you are charging it. Its real pity that Logitech did not used two (or even three) AA batteries for this mouse to make it last longer … but that would not resolve the Darkfield sensor not able to cope with movement on the wood πŸ™‚

Logitech Marathon M705 (GEN 2)

I have read a lot of hate and disappointment about the latest generation of Logitech Marathon M705 mouse. Also the lower thumb button is missing and currently it uses only one AA battery. It still provides very long time without the need to change/charge and its lighter now. Its neither bad nor good – its just different. The precision is similar but after using Logitech Performance MX you really miss that big size.

mouse-M705-GEN2

The second generation of M705 did not improved the left/right buttons on the wheel so I decided to stick with additional thumb buttons for volume management.

I also really missed that lower thumb button that is gone from the GEN 2 Logitech Marathon M705 mouse – needed to go back to my [C] routine …

Logitech Triathlon M720

I recently got the possibility to check and use the Logitech Triathlon M720 mouse and I must say that I am positively surprised. Its both Bluetooth and USB dongle mouse so you can choose which way you would like to connect it to your computers. The plural form is intended here as the Logitech M720 allows you to switch between 3 computers with additional dedicated button. It also got ‘back’ the lower thumb button that was missing on the latest generation of the Logitech M705 mouse. The light/white lower bottom of the mouse looks little strange though … but its kinda not visible when it is laying on the table.

mouse-M720

The M720 has more precise left/right buttons on the wheel but I got so used to manage volume with my thumb that I currently keep these ‘wheel’ buttons unused.

Having the lower thumb button again I was also able to get back to my toggle play/pause Deadbeef operation. Yay!

Another useful use case I discovered recently is the ‘misuse’ of the button that switches between 3 computers. I started to use it to ‘suspend’ (generally off) the mouse if I do not want the mouse to ‘wake’ the screen – to not accidentally turn on the screen when I move the mouse accidentally. I mean – sometimes I turn off the screen (with shortcut that executes xset dpms force off command) and then I switch the mouse M720 mouse to channel number 2 to it will not be able to communicate with USB receiver and turn on my screen in again accidentally.

Missing

I never owned Logitech MX Master mouse. I used version ‘3’ for short time as one of my buddies own it and it felt quite similar to Logitech Performance MX in operation but not quite the same. Similar but different. I think that it would be comfortable but not sure about the precision on wood and battery time. Maybe I will got it some day and add an update here.

mouse-MX-master

… but given the fact that Logitech MX Master mouse also has micro USB port at its front for charging I would suspect that battery time is also not that great. Similarly like the Logitech Triathlon M720 it also allows to switch its presence between 3 computers. There is also additional wheel for vertical scrolling. Never used that but maybe it would be useful in GIMP for example.

Summary

So what does a good UNIX mouse feature? I would summarize all the needed (or at least useful) feats in a list below.

  • needs to be at lest a little ergonomic
  • allows to toggle wheel between click and clickless operation
  • have additional buttons for custom actions
  • allows more then one month of work on batteries
  • works on different surfaces without a problem
  • has a USB dongle so Bluetooth is not needed

What other features you desire in mouse? I also thought about ‘vertical’ mouse type/shape and also about trackball. I tried my neighbor Logitech trackball several times but I am not sure I would get used to it after so many years of ricing the mice πŸ™‚

External Discussions

EOF