When You use only one connection on FreeBSD, then the best practice is to just put its whole configuration into the /etc/rc.conf file, for example typical server redundant connection would look like that one below.
cloned_interfaces="lagg0"
ifconfig_igb0="-lro -tso -vlanhwtag mtu 9000 up"
ifconfig_igb1="-lro -tso -vlanhwtag mtu 9000 up"
ifconfig_lagg0="laggproto lacp laggport igb0 laggport igb1 up"
ifconfig_lagg0_alias0="inet 10.254.17.2/24"
If You must use more then one connection and You often switch between them, sometimes several times a day, then using the main FreeBSD’s config file is not the most convenient way for such operations.
For laptops where You often switch between WWAN (usually 3G connection) and WLAN (typical WiFi connection) and even LAN cable.
You can of course use graphical NetworkMgr from GhostBSD project which is described as “Python GTK3 network manager for FreeBSD, GhostBSD, TrueOS and DragonFlyBSD. NetworkMgr support both netif and OpenRC network” citing the project site – https://github.com/GhostBSD/networkmgr – it is also available in FreeBSD Ports and as package – net-mgmt/networkmgr.

What I miss in NetworkMgr is the WWAN connection management, DNS management, optional random MAC generation and network shares unmount at disconnect from network. With my solution – network.sh – you still need to edit /etc/wpa_supplicant.conf and /etc/ppp/ppp.conf files by hand so it’s also not a perfect solution for typical desktop usage, but you do not edit these files every day.
As I use WWAN, WLAN and LAN connections on my laptop depends on the location I wrote a script to automate this connection management in a deterministic and convenient way, at least for me.
It can also set DNS to some safe/nologging providers or even a random safe DNS and generate legitimate MAC address for both LAN and WLAN if needed, even with real OUI first three octets if You also have additional network.sh.oui.txt file with them inside.
Here is the network.sh script help message.
% network.sh help
USAGE:
  network.sh TYPE [OPTIONS]

TYPES:
  lan
  wlan
  wwan
  dns

OPTIONS:
  start
  start SSID|PROFILE
  stop
  example

EXAMPLES:
  network.sh lan start
  network.sh lan start IP.IP.IP.IP/MASK
  network.sh lan start IP.IP.IP.IP/MASK GW.GW.GW.GW
  network.sh lan restart
  network.sh wlan start
  network.sh wlan start HOME-NETWORK-SSID
  network.sh wwan example
  network.sh dns onic
  network.sh dns udns
  network.sh dns nextdns
  network.sh dns cloudflare
  network.sh dns ibm
  network.sh dns random
  network.sh dns IP.IP.IP.IP
  network.sh doas
  network.sh sudo
  network.sh status
If You run network.sh with appreciate arguments to start network connection it will display on the screen what commands it would run to achieve that. It also makes use of sudo(8) or doas(1) assuming that You are in the network group. To add yourself into the network group type this command below.
# pw groupmod network -m yourself
The network.sh doas command will print what rights it needs to work without root privileges, same for network.sh sudo command, an example below.
% network.sh doas
  # pw groupmod network -m YOURUSERNAME
  # cat /usr/local/etc/doas.conf
  permit nopass :network as root cmd /etc/rc.d/netif args onerestart
  permit nopass :network as root cmd /usr/sbin/service args squid onerestart
  permit nopass :network as root cmd dhclient
  permit nopass :network as root cmd ifconfig
  permit nopass :network as root cmd killall args -9 dhclient
  permit nopass :network as root cmd killall args -9 ppp
  permit nopass :network as root cmd killall args -9 wpa_supplicant
  permit nopass :network as root cmd ppp
  permit nopass :network as root cmd route
  permit nopass :network as root cmd tee args -a /etc/resolv.conf
  permit nopass :network as root cmd tee args /etc/resolv.conf
  permit nopass :network as root cmd umount
  permit nopass :network as root cmd wpa_supplicant
The network.sh script does not edit /usr/local/etc/doas.conf or /usr/local/etc/sudoers files, You have to put these lines there by yourself. An example doas setup for network.sh script is below.
# pkg install -y doas

# cat >> /usr/local/etc/doas.conf << __EOF
permit nopass :network as root cmd /etc/rc.d/netif args onerestart
permit nopass :network as root cmd /usr/sbin/service args squid onerestart
permit nopass :network as root cmd dhclient
permit nopass :network as root cmd ifconfig
permit nopass :network as root cmd killall args -9 dhclient
permit nopass :network as root cmd killall args -9 ppp
permit nopass :network as root cmd killall args -9 wpa_supplicant
permit nopass :network as root cmd ppp
permit nopass :network as root cmd route
permit nopass :network as root cmd tee args -a /etc/resolv.conf
permit nopass :network as root cmd tee args /etc/resolv.conf
permit nopass :network as root cmd umount
permit nopass :network as root cmd wpa_supplicant
__EOF
#

# pw groupmod network -m yourself
The network.sh script upon disconnect would also forcefully unmount all network shares.
The idea is that it does only one connection type at a time, When You type network.sh lan start and then type network.sh wlan start, then it will reset entire FreeBSD network stack to defaults (to settings that are in /etc/rc.conf file) and then connect to WiFi in a ‘clean network environment’ as I could say. As I use 3 different methods of connecting to various networks I do not have any network settings in the /etc/rc.conf file, but You may prefer for example to have DHCP for local LAN enabled if that is more convenient for You.
The settings are on the beginning of the network.sh script, You should modify them to your needs and hardware that You own.
# SETTINGS
LAN_IF=em0
LAN_RANDOM_MAC=0
WLAN_IF=wlan0
WLAN_PH=iwn0
WLAN_RANDOM_MAC=0
WLAN_COUNTRY=PL
WLAN_REGDOMAIN=NONE
WWAN_IF=tun0
WWAN_PROFILE=WWAN
NAME=${0##*/}
NETFS="nfs,smbfs,fusefs.sshfs"
TIMEOUT=16
DELAY=0.5
SUDO_WHICH=0
SUDO=0
DOAS_WHICH=0
DOAS=1
ROOT=0
You can specify other NETFS filesystems that You want to forcefully unmount during network stop or set different physical WLAN adapter (WLAN_PH option), like ath0 for Atheros chips. similar for LAN interface which also defaults to Intel based network card with em0 driver (LAN_IF option).
If you want to disable random MAC address for LAN with LAN_RANDOM_MAC=0 and enable generation of random MAC address for WiFi networks with WLAN_RANDOM_MAC=1 option.
You should also decide if You want to use sudo (SUDO option) or doas (DOAS option).
Here is network.sh script.
Here is example of all network connections stop.
% network.sh stop
doas killall -9 wpa_supplicant
doas killall -9 ppp
doas killall -9 dhclient
doas ifconfig wlan0 destroy
doas ifconfig em0 down
echo | doas tee /etc/resolv.conf
doas /etc/rc.d/netif onerestart
%
Here is example of WLAN (or should I say WiFi) network connection start.
% network.sh wlan start
__network_reset()
__net_shares_umount()
doas killall -9 wpa_supplicant
doas killall -9 ppp
doas killall -9 dhclient
doas ifconfig em0 down
doas ifconfig wlan0 down
echo | doas tee /etc/resolv.conf
doas /etc/rc.d/netif restart
doas ifconfig wlan0 up
doas ifconfig wlan0 scan
doas ifconfig wlan0 ssid -
doas wpa_supplicant -i wlan0 -c /etc/wpa_supplicant.conf -s -B
__wlan_wait_associated()
doas dhclient -q wlan0
__dns_check_gateway()
echo | doas tee /etc/resolv.conf
echo 'nameserver 10.0.0.1' | doas tee -a /etc/resolv.conf
__dns_check()
__squid_restart()
doas ifconfig wlan0 powersave
Here is example od DNS change.
% network.sh dns ibm
echo | doas tee /etc/resolv.conf
echo 'nameserver 9.9.9.9' | doas tee -a /etc/resolv.conf
If You have any problems with the network.sh script then let me know, I will try to fix them ASAP.
If You are more into OpenBSD then FreeBSD then Vincent Delft wrote nmctl – Network Manager Control tool for OpenBSD – available here – http://vincentdelft.be/post/post_20171023.
Ther is also another OpenBSD project by Aaron Poffenberger for network management – netctl – cli network-location manager for OpenBSD – available here – https://github.com/akpoff/netctl.
UPDATE 1 – Connect to Open/Unsecured WiFi Network
Recently when I was attending the Salt workshop during NLUUG Autumn Conference 2018 at Utrecht, Nederlands I wanted to connect to open unsecured WiFi network called 'Utrecht Hotel'. My phone of course attached to it instantly but on the other hand FreeBSD was not able to connect to it. As it turns out if you want to enable wpa_supplicant(8) to connect to open unsecured network a separate /etc/wpa_supplicant.conf option is needed (on option for all open unsecured
networks – no need to create such rule for each open/unsecured network).
Its these lines in the /etc/wpa_supplicant.conf file:
% grep -C 2 key_mgmt=NONE /etc/wpa_supplicant.conf

network={
        key_mgmt=NONE
        priority=0
}
I also modified the network.sh to contain that information in the examples section and also made little fix to always reset the previously set/forced SSID during earlier usage.
# ifconfig wlan0 ssid -
Now the network.sh should be even more pleasant to use.
UPDATE 2 – Openbox Integration
In on of the FreeBSD Desktop series articles I described how to setup Openbox window manager – FreeBSD Desktop – Part 12 – Configuration – Openbox – available here.
Below is an example of integration of that network.sh script with Openbox window manager.

… and here is the code used in the ~/.config/openbox/menu.xml file.

UPDATE 3 – Updated Status Page
I have jest added reworked status page to the network.sh script.
Its already updated in the GitHub ‘network’ repository:
https://github.com/vermaden/scripts/blob/master/network.sh
Here is how it looks.

UPDATE 4 – Major Rework
After using network.sh script for a while I saw some needed changes. Time has come and I finally made them. I also find a problem when already about creating wlan0 virtual device from physical device (like iwn0).
When you start network.sh script for the first time and wlan0 is not yet created then the problem does not exists but when wlan0 already exists then network.sh waited for whopping 22 seconds on this single command. Now network.sh checks if the wlan0 device already exists which allows now WiFi connection in less then 3 seconds.
Before.
#DOAS# permit nopass :network as root cmd ifconfig
#SUDO# %network ALL = NOPASSWD: /sbin/ifconfig *
${CMD} ifconfig ${WLAN_IF} create wlandev ${WLAN_PH} 2> /dev/null
echo ${CMD} ifconfig ${WLAN_IF} create wlandev ${WLAN_PH}
After.
if ! ifconfig ${WLAN_IF} 1> /dev/null 2> /dev/null
then
  #DOAS# permit nopass :network as root cmd ifconfig
  #SUDO# %network ALL = NOPASSWD: /sbin/ifconfig *
  ${CMD} ifconfig ${WLAN_IF} create wlandev ${WLAN_PH} 2> /dev/null
  echo ${CMD} ifconfig ${WLAN_IF} create wlandev ${WLAN_PH}
fi
I used gnomon to benchmark the script execution.
Here is its simple installation process.
# pkg install -y npm
# npm install -g gnomon
Here is how it performed before the optiomization. About 25 seconds.
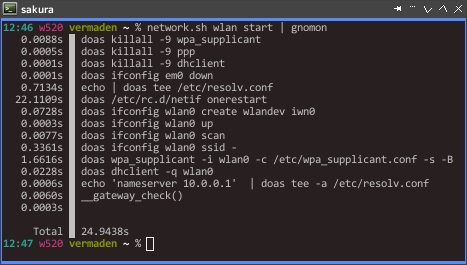
And here is how it performs now. About 3 seconds.

At first I suspected the /etc/rc.d/netif FreeBSD startup script but the real enemy was the tart ifconfig wlan0 create wlandev iwn0 command.
I also made it more verbose to better know where the time is wasted.

Its now possible to set static IP and gateway in LAN mode and static IP in DNS mode.

The complete summary of changes and improvements is here:
- Static IP address and gateway on LAN now possible.
- Specify DNS by IP address.
- Simplified __random_mac() function.
- Fixed __wlan_wait_associated() function.
- Removed unneded call for “create wlandev” in WLAN mode.
- Other minor fixes.
- WiFi (re)connection now possible under 3 seconds instead of 25+ seconds.
I also created a dedicated GitHub repository for network.sh script.

Pingback: FreeBSD Network Management with network.sh Script - FreeBSDNews.com
Pingback: Scripted network management (FreeBSD) | 0ddn1x: tricks with *nix
Pingback: FreeBSD Desktop – Part 2 – Install | vermaden
Pingback: Home | vermaden
Pingback: FreeBSD Desktop – Part 12 – Configuration – Openbox | vermaden
Handy thing in ppp is that it can expand environment variables in ppp.conf. I use “set device $CUA” to handle the problem with multiple usb serial ports appearing in random order. Might be better handled by creating symlinks via devd, though.
LikeLike
Good point.
LikeLike
I find net/wpa_supplicant_gui to be very useful too, actually I like it better than NetworkMgr as a graphical solution 🙂
LikeLike
Pingback: In Other BSDs for 2018/11/24 – DragonFly BSD Digest
Pingback: The Power to Serve – FreeBSD Power Management | 𝚟𝚎𝚛𝚖𝚊𝚍𝚎𝚗
Your script is amazing! I was actually missing a proper command line network tool on FreeBSD. I was used to the convenience of netctl on Archlinux using systemd. Now I can finally make the switch.
LikeLike
Glad you found it useful 🙂
Nice to hear that such small things as network.sh are able to make some people at least try FreeBSD.
Good luck with the switch, feel free to ask me anything (by comments here or directly by CONTACT on the blog) if you face any problems with FreeBSD (and you will like with any new thing people do).
Regards.
LikeLike
Pingback: FreeBSD GNOME 3 Fast Track | 𝚟𝚎𝚛𝚖𝚊𝚍𝚎𝚗
Pingback: Valuable News – 2020/11/09 | 𝚟𝚎𝚛𝚖𝚊𝚍𝚎𝚗
@vermaden have you any tips how to connect to a vpn. In my company i geht a ovpn file and to login i uave a username and password and a 2fa password via freeotp APP. Idont knowis it posible with FreeBSD. I get it und er Linux running with the networkmgr butdont know how to run it und er FreeBSD
LikeLiked by 1 person
Try that:
LikeLike
Ah thanks. I will try that later. Thanks for your help
LikeLike
Pingback: XFCE Cupertino Way | 𝚟𝚎𝚛𝚖𝚊𝚍𝚎𝚗
Pingback: FreeBSD 13.1 on ThinkPad W520 | 𝚟𝚎𝚛𝚖𝚊𝚍𝚎𝚗
Pingback: FreeBSD 13.2 on ThinkPad T14 (GEN1) | 𝚟𝚎𝚛𝚖𝚊𝚍𝚎𝚗
would be cool to have a wifibox0 section so that it would be easy to switch from that work-around to native WiFi easily. I hate having to use wifibox, but it is a very nice tool and an necessary evil these days.
LikeLike
When I edit doas.conf and add the rights the script needs to work, I receive a doas: syntax error at line 15, that’s where “permit nopass :network as root cmd vm switch address” is, so I cannot use the script properly, is there something I can do?, thanks in advance.
LikeLike
This is my current working doas.conf file.
LikeLike