Tag Archives: laptop

Sensible Firefox Setup

I really wanted to do that Firefox guide earlier but always other things came up as usual. But that also has some upsides.

firefox.logo.2009.400

Yes – I used the Firefox logo from 2009 (some reported it is from 2013) as I believe it looks a lot better then the current one … below You can check the Firefox logo declining progress.

firefox.logo.progress

Fortunately progress of the Firefox browser seems to be directed in a good direction.

Below You will find Table of Contents for this article.

  • Magic of the Past
  • Clean Start
  • Logins and Passwords
  • Extensions
  • Preferences
  • about:config
  • Interface
  • Export/Import Bookmarks
  • Summary

Lets start then.

Magic of the Past

I struggled a lot … to find new home after Opera 12.x was killed in 2013. Its Presto engine was fast and standards (ACID3) compliant. Opera 12.x had official FreeBSD support (and was in the Ports). It had builtin Opera Mail client – imagine having Thunderbird integrated into Firefox … It has Torrent client integrated – image having Transmission integrated into Firefox as well. It had extensions support. It supported really intelligent Mouse Gestures – like it already new where the Next in Thread on the Mailing Lists link is … Opera provided at that time synchronization with Opera Mini on the phone (and other Opera instances as well) … and while having all that it was ultra fast and low on resources. Kinda like a dream. Total opposite of today’s Slack client taking 2 GB RAM …

opera-2010-12

So much potential lost … and while having all these features it had very little market share … this reminds me of a quote by Waldemar Łysiak from its Statek (1994) book.

“If majority is always right – let’s eat shit… millions of flies can’t be wrong.”

Even in 2007 the Opera allowed some crazy browsing modes … and these were not the times of FullHD or higher resolutions. When You had 1280×1024 back then on a huge CTR screen it felt like king.

opera-2007-01

Dead. Killed. Abandoned.

After a lot of time I finally settled on Firefox – and while it will never be the same – this is the closest I was able to get.

Today I will try to share the sensible Firefox setup – to focus on the web and not on the browser.

Clean Start

Lets start with a clean start (and a backup if You already use Firefox). Copy your config on a side and remove everything.

% mv ~/.mozilla ~/.mozilla.BACKUP
% rm -rf ~/.cache/mozilla/firefox

This is how the clean Firefox 123.0 more or less should look like.

firefox-first-start-clean

Complete list of what is stored where – https://support.mozilla.org/en-US/kb/profiles-where-firefox-stores-user-data – is available here.

Logins and Passwords

If you already used Firefox – or want to know how to backup your Logins and Passwords – do these.

My old Firefox profile was ah3fnzb3.default-release and the new name was generated as o3pdrjav.default-release as shown below.

We will be copying/protecting the key3.db/key4.db and logins.json files.

% cd ~/.mozilla.BACKUP.BROKEN/firefox/ah3fnzb3.default-release
 
% cp key*.db logins.json ~/.mozilla/firefox/o3pdrjav.default-release/

You may want to also copy handlers.json for download actions and persdict.dat for personal dictionary.

Complete information of what is stored where is available – https://support.mozilla.org/en-US/kb/profiles-where-firefox-stores-user-data – here.

Extensions

We will now focus Firefox Extensions. Today (at least for me) its impossible to just browse the Internet w/o at least uBlock Origin and Still Don’t Care About Cookies plugins … but there are more of them useful.

Currently I use below ones as a minimum and sometimes experiment with other ones.

Note about the additional preferences for some of the plugins.

The is a genius page of additional content for uBlock Originhttps://majkiit.github.io/polish-ads-filter/en/ – available here.

firefox-polish-ads-filters

Subscribe to as many lists as You want – all supported and working in uBlock Origin tool.

For the Expire History by Days I would suggest picking some limit – I use 33 days.

firefox-history-expire

Some notable mentions of other extensions that You may find useful.

Feel free to share You favorite extensions in the comments.

Preferences

Now … the preferences for Firefox I have chosen are displayed below … but its not all of course – there would be additional about:config section.

Sorry that they took that much place … initially I wanted to write everything down as text summary – but then You would have to find that in the Preferences page and … it would took even more time.

The General tab.

firefox-prefs-general

The Home tab.

firefox-prefs-home

The Search tab.

firefox-prefs-search

… and last but not least – the Privacy and Security tab.

firefox-prefs-privacy-security

about:config

As PITA as it is – there are also many of these … this time summarized in a text fashion below.

firefox-about-config-warning

The list is below.

ABOUT:CONFIG                                                   VALUE        COMMENT
browser.cache.memory.enable                                    false        -
browser.compactmode.show                                       true         (compact layout)
browser.display.show_image_placeholders                        false        -
browser.download.alwaysOpenPanel                               false        (do not show downloads box everytime)
browser.download.autohideButton                                false        -
browser.download.improvements_to_download_panel                false        (normal download behavior)
browser.download.saveLinkAsFilenameTimeout                     0            (faster)
browser.link.open_newwindow.restriction                        0            (open windows as tabs)
browser.link.open_newwindow                                    3            (open link in new tab)
browser.search.openintab                                       true         (search bar will open new tab for results)
browser.search.suggest.enabled                                 false        -
browser.sessionhistory.max_entries                             5            50
browser.sessionstore.interval                                  85000        15000
browser.tabs.animate                                           false        -
browser.tabs.insertRelatedAfterCurrent                         false        -
browser.tabs.tabMinWidth                                       10           76
browser.tabs.loadBookmarksInTabs	                       true         (open links in new tabs)
dom.block_download_insecure                                    false        (normal download without yelling)
dom.event.contextmenu.enabled                                  false        (allow right click)
dom.media.autoplay-policy-detection.enabled                    false        (autoplay)
dom.webnotifications.enabled                                   false        -
general.smoothScroll.lines                                     false        -
general.smoothScroll.mouseWheel                                false        -
general.smoothScroll.other                                     false        -
general.smoothScroll.pages                                     false        -
general.smoothScroll.pixels                                    false        -
general.smoothScroll.scrollbars                                false        -
geo.enabled                                                    false        -
gfx.xrender.enabled                                            true         (works in Thunderbird too)
image.jxl.enabled                                              true         (JPEG XL)
loop.enabled                                                   false        -
media.autoplay.allow-extension-background-pages                false        (autoplay)
media.autoplay.default                                         0            (autoplay)
media.autoplay.enabled                                         false        (autoplay)
media.block-autoplay-until-in-foreground                       false        (autoplay)
media.ffmpeg.vaapi.enabled                                     true         (VA-API)
media.peerconnection.enabled                                   false        -
media.webrtc.hw.h264.enabled                                   false        -
network.http.http3.enabled                                     false        -
network.negotiate-auth.allow-insecure-ntlm-v1                  true         (sharepoint)
network.prefetch-next                                          false        -
network.trr.mode                                               5            (disable TRR DNS)
pdfjs.defaultZoomValue                                         page-fit     -
privacy.firstparty.isolate                                     true         -
privacy.firstparty.isolate.block_post_message                  true         -
privacy.trackingprotection.enabled                             true         -
security.dialog_enable_delay                                   0            -
security.notification_enable_delay                             0            -
security.ssl3.rsa_fips_des_ede3_sha                            false        -
security.tls.version.fallback-limit                            0            -
security.tls.version.max                                       4            -
security.tls.version.min                                       0            (IBM/HMC)
security.tls.insecure_fallback_hosts                           10.20.30.40  (IBM/HMC)
widget.gtk.overlay-scrollbars.enabled                          false        (normal scrollbar)
toolkit.scrollbox.smoothScroll                                 false        -
ABOUT:CONFIG                                                   VALUE        COMMENT

… and some (optional for some) privacy related stuff.

ABOUT:CONFIG                                                   VALUE        COMMENT
browser.safebrowsing.downloads.enabled                         false        (privacy)
browser.safebrowsing.downloads.remote.url                      127.0.0.1    (privacy)
browser.safebrowsing.enabled                                   false        (privacy)
browser.safebrowsing.malware.enabled                           false        (privacy)
browser.safebrowsing.provider.google.advisoryURL               127.0.0.1    (privacy)
browser.safebrowsing.provider.google.gethashURL                127.0.0.1    (privacy)
browser.safebrowsing.provider.google.reportMalwareMistakeURL   127.0.0.1    (privacy)
browser.safebrowsing.provider.google.reportPhishMistakeURL     127.0.0.1    (privacy)
browser.safebrowsing.provider.google.reportURL                 127.0.0.1    (privacy)
browser.safebrowsing.provider.google.updateURL                 127.0.0.1    (privacy)
browser.safebrowsing.provider.google4.advisoryURL              127.0.0.1    (privacy)
browser.safebrowsing.provider.google4.dataSharingURL           127.0.0.1    (privacy)
browser.safebrowsing.provider.google4.gethashURL               127.0.0.1    (privacy)
browser.safebrowsing.provider.google4.reportMalwareMistakeURL  127.0.0.1    (privacy)
browser.safebrowsing.provider.google4.reportPhishMistakeURL    127.0.0.1    (privacy)
browser.safebrowsing.provider.google4.reportURL                127.0.0.1    (privacy)
browser.safebrowsing.provider.google4.updateURL                127.0.0.1   -(privacy)
browser.safebrowsing.provider.google4.updateURL                127.0.0.1    (privacy)
browser.safebrowsing.provider.mozilla.gethashURL               127.0.0.1    (privacy)
browser.safebrowsing.provider.mozilla.updateURL                127.0.0.1    (privacy)
browser.safebrowsing.reportMalwareMistakeURL                   127.0.0.1    (privacy)
browser.safebrowsing.reportPhishMistakeURL                     127.0.0.1    (privacy)
browser.safebrowsing.reportPhishURL                            127.0.0.1    (privacy)
browser.safebrowsing.reportURL                                 127.0.0.1    (privacy)
browser.safebrowsing.updateURL                                 127.0.0.1    (privacy)
captivedetect.canonicalContent                                 127.0.0.1    (privacy)
captivedetect.canonicalURL                                     127.0.0.1    (privacy)
toolkit.telemetry.enabled                                      false        (privacy)
captivedetect.maxRetryCount                                    0            (privacy)
captivedetect.maxWaitingTime                                   0            (privacy)
captivedetect.pollingTime                                      0            (privacy)
datareporting.healthreport.about.reportUrl                     127.0.0.1    (privacy)
datareporting.healthreport.infoURL                             127.0.0.1    (privacy)
datareporting.healthreport.service.enabled                     false        (privacy)
datareporting.healthreport.uploadEnabled                       false        (privacy)
extensions.pocket.enabled                                      false        (privacy)
ABOUT:CONFIG                                                   VALUE        COMMENT

Looks for example like that.

firefox-127.0.0.1

One of the things I learned that is possible to ‘glob’ the about:config options. This way you can enter – for example the bro*ses*deb value and Firefox will filter possible options for You.

firefox-about-config-glob

Interface

I am a fan of the Compact layout – it needs one more step (browser.compactmode.show = true) to be visible and was already done in the previous section.

firefox-compact-interface

The details are in one of the Mozilla – https://support.mozilla.org/en-US/kb/compact-mode-workaround-firefox – support pages.

To start click somewhere besides buttons and select Customize Toolbar… – like that.

firefox-customize

On the lower side You will now find needed option as shown below.

firefox-compact-interface-where

Also feel free to setup your preferred buttons and search box if needed.

This is how mine config looks like after all these tasks.

firefox-setup-complete

Export/Import Bookmarks

You may want to also backup/restore your bookmarks … assuming you have any.

Summary

I wanted to focus only on config part and no the Firefox features – this maybe some time in the future πŸ™‚

Regards,

EOF

FreeBSD Desktop – Part 29 – Configuration – Audio Improvements

I recently added some improvements to my audio configs and settings on FreeBSD desktop.


freebsd-audio

Each of these ideas is nothing special or groundbreaking – but they all improve usability of daily FreeBSD desktop experience.

The Table of Contents for this article contains.

  • Default Audio Output
  • PulseAudio Output Change
  • Openbox Generated Sound Menu
  • Automatic Audio Output Change
  • Direct Deadbeef Audio Controls
  • Reset mixer(1) Settings
  • Sound for USB Device Attach/Detach
  • Default Audio Output
  • Summary

One of the usual things on a FreeBSD desktop is that user needs to – after attaching USB headphones – manually switch to them with sysctl(8) as root and then restart all audio apps so they will be able to use new audio output.

// LIST SOUND DEVICES

desktop # cat /dev/sndstat
Installed devices:
pcm0: <Conexant CX20590 (Analog 2.0+HP/2.0)> (play/rec) default
No devices installed from userspace


// AFTER ATTACHING USB HEADPHONES NEW pcm1 DEVICE APPEARS

desktop # cat /dev/sndstat
Installed devices:
pcm0: <Conexant CX20590 (Analog 2.0+HP/2.0)> (play/rec)
pcm1: <USB audio> (play/rec) default
No devices installed from userspace


// SWITCH TO NEW pcm1 DEVICE WITH sysctl(8) COMMAND

desktop # sysctl hw.snd.default_unit=1

… and after you are done listening the audio on USB audio device – then You need to do the opposite – switch back the hw.snd.default_unit to 0 sound device and also restart the audio apps again.

PulseAudio Output Change

On of the things that is indirectly forced on FreeBSD desktop users is PulseAudio. Not that long from now Firefox default audio output was switched from native FreeBSD OSS to PulseAudio for example. More and more apps are switched to it … but there at least is ONE advantage in that situation. When using PulseAudio You can switch its output on the fly as many times as You want without the need to kill or restart the applications playing audio.

Here is how it looks from the command line perspective.

// LIST PulseAudio OUTPUTS

desktop % pactl list sinks | grep 'Name: '
        Name: oss_output.dsp0
        Name: oss_output.dsp1

desktop % pactl get-default-sink
oss_output.dsp0


// SET dsp1 (ITS pcm1 ON FREEBSD DEVICES) AS DEFAULT AUDIO OUTPUT

desktop % pactl set-default-sink oss_output.dsp1

desktop % pactl get-default-sink
oss_output.dsp1


// SWITCH BACK TO dsp0 AUDIO OUTPUT

desktop % pactl set-default-sink oss_output.dsp0

desktop % pactl get-default-sink
oss_output.dsp0

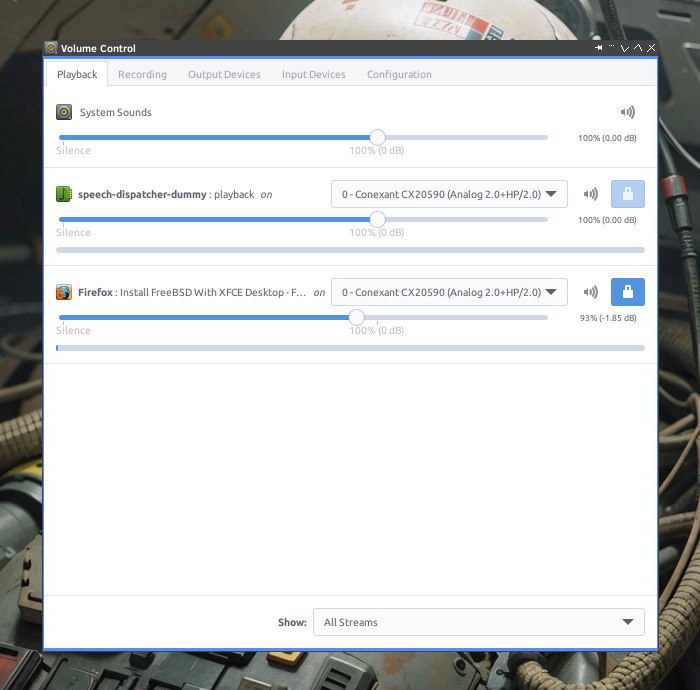
But You can also use GUI pavucontrol(1) command to change PulseAudio output.

Here is the Playback tab opened.

pavucontrol-list

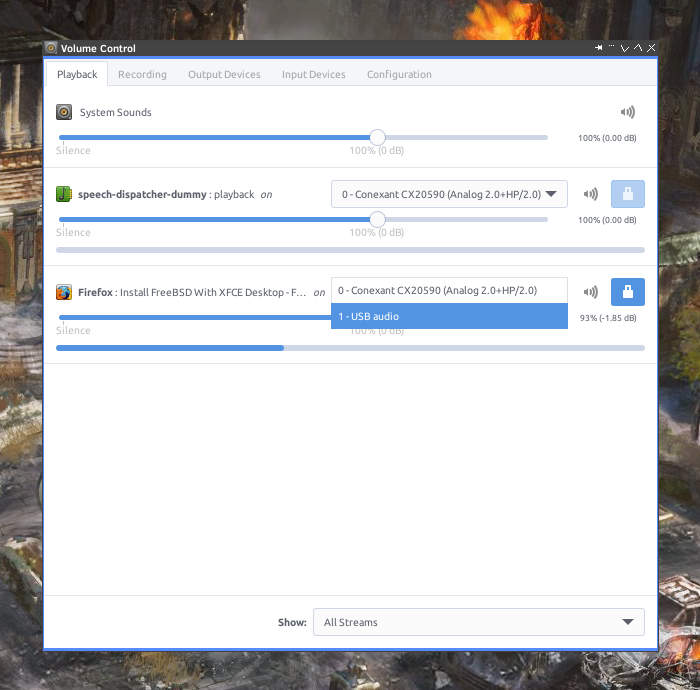
… and here is how You can switch current output audio device on the fly.

pavucontrol-select

Openbox Generated Sound Menu

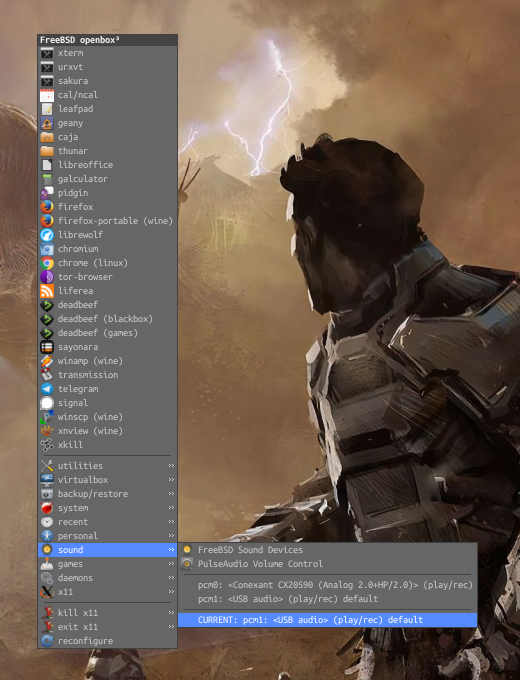
I used it since quite long time – but I updated it with news links – for example to PulseAudio graphical interface.

The part that goes into the Openbox menu configurations is shown below.

<menu id="sound" label="sound" execute="__openbox_freebsd_sound.sh" icon="/home/vermaden/.config/openbox/icons/speaker.png" />

It looks like that on my system.

openbox-sound-menu

If You use Openbox then you may download it from this – __openbox_freebsd_sound.sh – place.

Automatic Audio Output Change

It is possible – with the use of FreeBSD devd(8) daemon – to make FreeBSD automatically switch to new audio source after its attach. I wrote the audio-source-switch.sh script for that purpose.

Here is the needed devd(8) configuration to make it work.

desktop # pkg install -y x11/zenity

desktop % cat /usr/local/etc/devd/audio_source.conf
                                                                                                                                                         
# USB/HEADPHONES/attach
attach 100 {
  device-name "pcm[0-9]+";
  action "su -l vermaden -c 'env DISPLAY=:0 /home/vermaden/scripts/audio-source-switch.sh attach 1> /dev/null 2> /dev/null &' &";
};

# USB/HEADPHONES/detach
detach 100 {
  device-name "pcm[0-9]+";
  action "su -l vermaden -c 'env DISPLAY=:0 /home/vermaden/scripts/audio-source-switch.sh detach 1> /dev/null 2> /dev/null &' &";
};

Remember to restart the devd(8) daemon everytime You dump a new config in the /usr/local/etc/devd directory.

Keep in mind that x11/zenity is needed for it to display information properly.

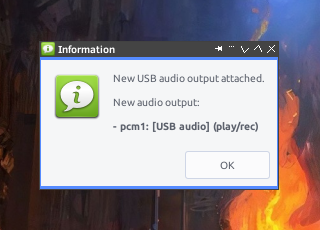
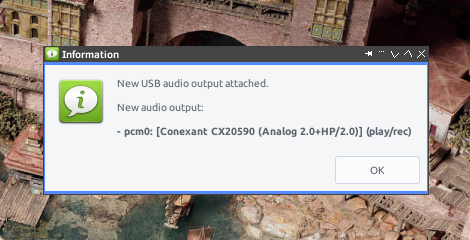
Now – after this change – when You plug in new USB audio output – You will see this zenity(1) dialog window.

new-audio-nothing-playing-attach

But that is only if You DO NOT play any audio currently.

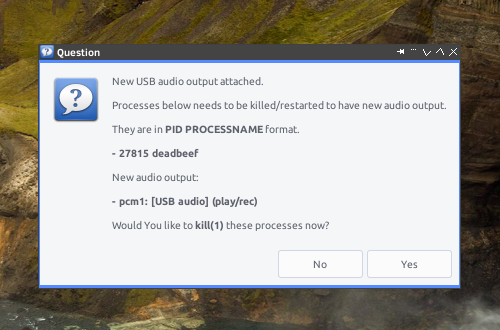
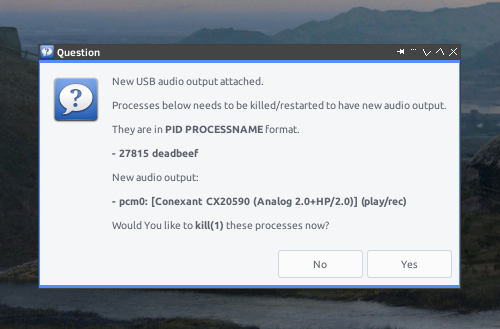
If – for example – You currently use Deadbeef audio player to play music – You will see this zenity(1) dialog instead.

new-audio-output-attach

It will ask You if You want to kill that Deadbeef PID – so if You start it again – You will be able to use new audio output – but You may NOT want to kill it – hence the question.

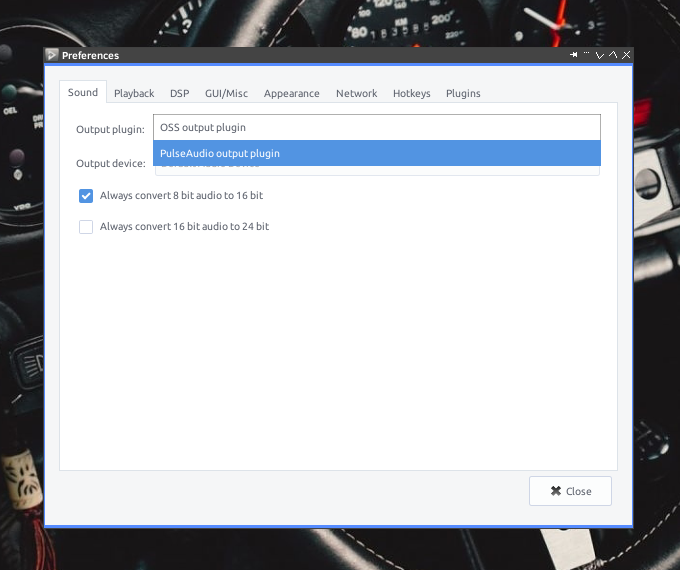
You may also recompile Deadbeef with PulseAudio output support. Here is how the Deadbeef options in Preferences looks like after recompilation with PulseAudio support.

deadbeed-pulseaudio-output

If You already have another USB audio output attached and decided to detach it – and nothing is playing the audio – my zenity(1) script will dialog this dialog.

new-audio-nothing-playing-detach

… and if something is using the FreeBSD audio/sound subsystem – then this one.

tint2-deadbeef-buttons

Direct Deadbeef Audio Controls

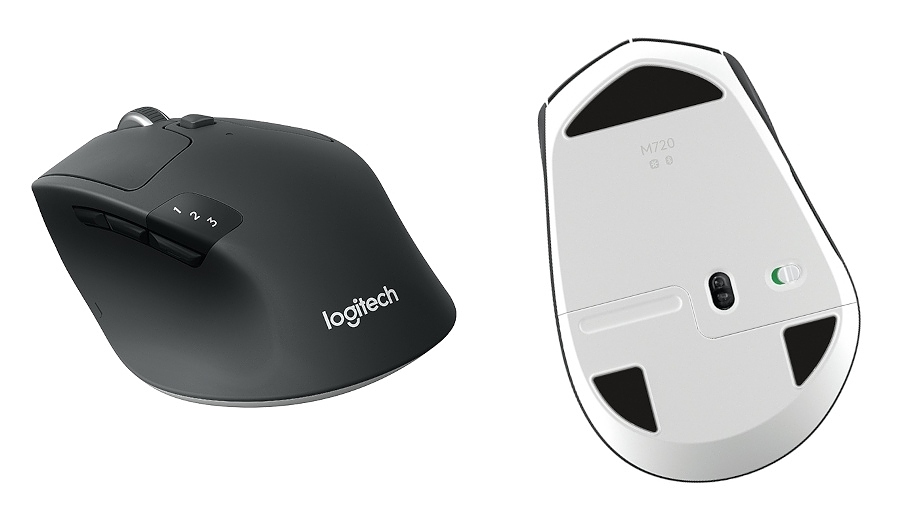
I really like the mouse I use daily – the Logitech M720 – as much as I really like to use the additional buttons to increase/decrease the volume – I would really wish it would have ANOTHER two additional buttons for the next and previous song on the Deadbeef player.

Because of that I decided to add a dedicated set of buttons on my Tint2 bar on top – that would allow me to change the current Deadbeef song to the next one … or previous one … or pause it.

new-audio-output-detach

The Tint2 config was updates with this content.

desktop % grep player ~/.tint2rc
  launcher_item_app      = /home/vermaden/.apps/player-prev.desktop
  launcher_item_app      = /home/vermaden/.apps/player-stop.desktop
  launcher_item_app      = /home/vermaden/.apps/player-pause.desktop
  launcher_item_app      = /home/vermaden/.apps/player-play.desktop
  launcher_item_app      = /home/vermaden/.apps/player-next.desktop

… and the Deadbeef buttons configs looks as follows.

desktop % cat ~/.apps/player-next.desktop
[Desktop Entry]
Type=Application
Name=Deadbeef
Exec=deadbeef --next
Icon=/home/vermaden/.icons/vermaden/player-next.png

desktop % cat ~/.apps/player-pause.desktop
[Desktop Entry]
Type=Application
Name=Deadbeef
Exec=deadbeef --toggle-pause
Icon=/home/vermaden/.icons/vermaden/player-pause.png

desktop % cat ~/.apps/player-play.desktop
[Desktop Entry]
Type=Application
Name=Deadbeef
Exec=deadbeef --play
Icon=/home/vermaden/.icons/vermaden/player-play.png

desktop % cat ~/.apps/player-prev.desktop
[Desktop Entry]
Type=Application
Name=Deadbeef
Exec=deadbeef --prev
Icon=/home/vermaden/.icons/vermaden/player-prev.png

desktop % cat ~/.apps/player-stop.desktop
[Desktop Entry]
Type=Application
Name=Deadbeef
Exec=deadbeef --stop
Icon=/home/vermaden/.icons/vermaden/player-stop.png

Reset mixer(1) Settings

One of the things that annoyed me was the mixer settings when I tried to join some call/teleconference. It seemed like a random pointless fuckup. Not anymore. With small and simple mix.sh script it all gets to normal and everything works out of the box.

Here is how the mix.sh script looks like.

desktop % cat ~/scripts/mix.sh
mixer vol.volume=0.6
mixer mic.volume=0.85
mixer rec.volume=0.85
mixer pcm.volume=1.0
mixer speaker.volume=0.0
mixer monitor.volume=0.0
mixer

… and how it works.

desktop % mix.sh 
pcm0:mixer:  on hdaa0  (play/rec) (default)
    vol       = 0.60:0.60     pbk
    pcm       = 1.00:1.00     pbk
    speaker   = 0.00:0.00     pbk
    mic       = 0.85:0.85     rec src
    rec       = 0.85:0.85     pbk
    monitor   = 0.00:0.00     rec

Sound for USB Device Attach/Detach

Most desktop oriented operating systems do play some type of sound for device attach/detach so the user would get a feedback that the system is aware of his actions – like – well – attaching or detaching a USB device πŸ™‚

By default FreeBSD does not do anything like that – but its not hard to add such an action to the FreeBSD devd(8) daemon.

With the following devd(8) config FreeBSD will now play a dedicated sound on each USB device attach or detach event.

In the beginning I did not knew which sound to pick from – but after some thoughts I decided to pick some Worms Armageddon sounds – from the 007 sound theme.

worms-logo

The devd(8) config looks like that one below.

desktop # pkg install -y audio/mpg123

desktop % cat /usr/local/etc/devd/USB.conf

# USB/attach
notify 10 {
  match "system" "USB";
  match "type"   "ATTACH";
  action "su -l vermaden -c 'env DISPLAY=:0 /usr/local/bin/mpg123 /usr/local/etc/devd/USB.attach.mp3' &";
};

# USB/detach
notify 10 {
  match "system" "USB";
  match "type"   "DETACH";
  action "su -l vermaden -c 'env DISPLAY=:0 /usr/local/bin/mpg123 /usr/local/etc/devd/USB.detach.mp3' &";
};

I also assume that You will have audio/mpg123 installed to play these sounds.

Because WordPress is very limited – it will not allow me to upload plain MP3 files – but we will overcome that limitation. For the record – it is not a technical limitation – its just a limitation of the FREE PLAN that I am using on the WordPress page.

bear-grylls

Here are the commands You need to execute to fetch these two MP3 files.

desktop ~ # fetch \
              -o /usr/local/etc/devd/usb.detach.mp3.zip
              https://vermaden.files.wordpress.com/2024/01/usb.detach.mp3_.docx
/usr/local/etc/devd/usb.detach.mp3.zip                9588  B   40 MBps    00s

desktop ~ # fetch \
              -o /usr/local/etc/devd/usb.attach.mp3.zip \
              https://vermaden.files.wordpress.com/2024/01/usb.attach.mp3_.docx
/usr/local/etc/devd/usb.attach.mp3.zip                  11 kB   41 MBps    00s

desktop ~ # cd /usr/local/etc/devd

desktop /usr/local/etc/devd # unzip usb.detach.mp3.zip
Archive:  usb.detach.mp3.zip
 extracting: USB.detach.mp3  

desktop /usr/local/etc/devd # unzip usb.attach.mp3.zip
Archive:  usb.attach.mp3.zip
 extracting: USB.attach.mp3  

Now as You have the needed MP3 files – restart the devd(8) daemon.

Now everytime You will attach or detach USB device You will hear appropriate Worms Armageddon sound.

Summary

I think that I can say that nothing prevents You from running FreeBSD desktop daily. If the FreeBSD is the desktop You want – and You are still running macOS or Windows instead – You are just lazy as fuck πŸ™‚

UPDATE 1 – Other FreeBSD Audio Improvements

As usual I got a lot additional good stuff from the comments from many places.

Below I would try to summarize them.

Firefox

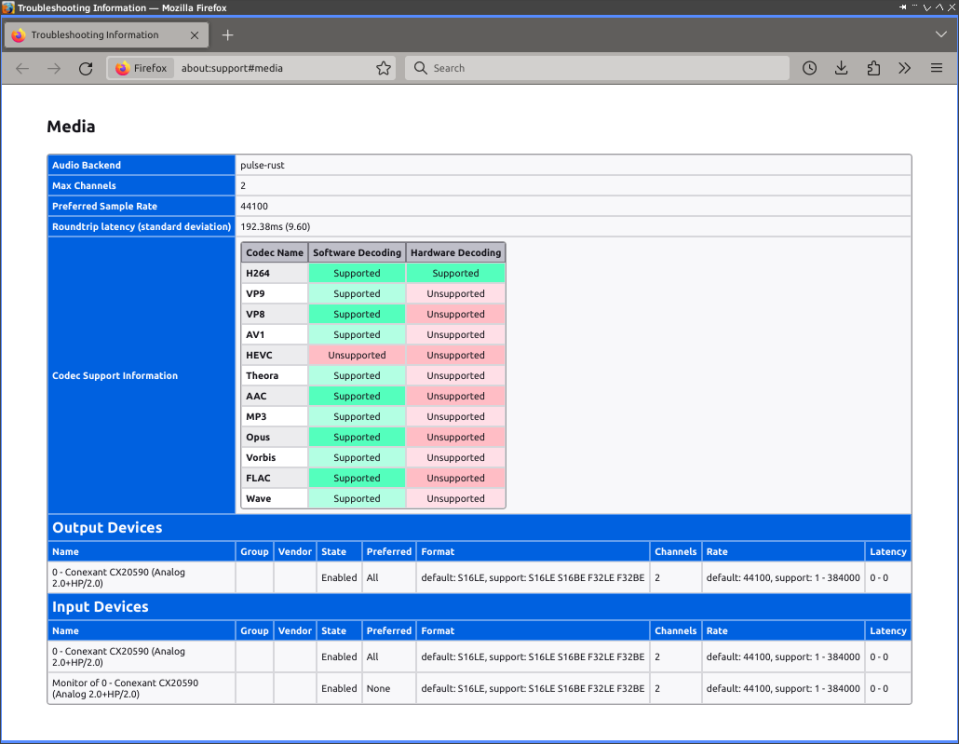
For the Firefox browser its possible to check the media/audio devices with about:support#media URL.

UPDATE1-firefox-media

GTK-Mixer

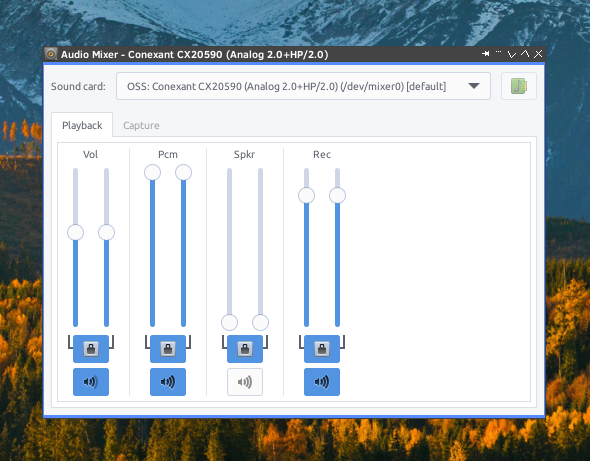
To have a GUI for the various volume settings You can use GTK-Mixer and its available in the FreeBSD package as audio/gtk-mixer name.

desktop # pkg install audio/gtk-mixer

desktop % gtk-mixer

Here is how it looks like.

UPDATE1-gtk-mixer

FreeBSD Audio Stack Improvements

Seems that Christos Margiolis is already working on some Audio Stack Improvements on FreeBSD thanks to FreeBSD Foundation.

This is his message:

The past (and first) week working on the audio stack, sponsored by the FreeBSD Foundation, I:

- Set up my development environment; a VM image running -CURRENT in bhyve with PCI-passthru
  enabled to do all of the driver (kernel generallly) development in the VM.

- Wrote a small series of patches for vmrun.sh:
  https://reviews.freebsd.org/D43269
  https://reviews.freebsd.org/D43270

- Modified the snd_uaudio(4) driver to provide information about the sound card
  (manufacturer, model and attached driver), as opposed to the current generic "USB Audio"
  string, so /dev/sndstat and programs like mixer(8) can output more useful information
  about USB audio devices.
  https://reviews.freebsd.org/D43347

- Submitted a patch to update (and unify) the description format for all sound devices,
  since some of them haven't been touched for years.
  https://reviews.freebsd.org/D43349

- Implemented device_set_descf() , a printf-like version of device_set_desc().
  https://reviews.freebsd.org/D43370

- Was preparing a few more smaller patches.

- Started looking into possible solutions to
  https://bugs.freebsd.org/bugzilla/show_bug.cgi?id=194727
  also mentioned in the first paragraph of the BUGS section of the snd_uaudio(4) man page.

Christos

Check the the links from the message above – a lot of great FreeBSD Audio Stack changes are coming.

PulseAudio

Someone also notified my that instead of writing a script for PulseAudio to automatically switch to just connected device on could load the module-switch-on-port-available or module-switch-on-connect module.

Check the details in the pacmd list-modules command.

desktop % pacmd list-modules | grep -B 1 -A 7 module-switch 
    index: 4
        name: 
        argument: 
        used: -1
        load once: yes
        properties:
                module.author = "David Henningsson"
                module.description = "Switches ports and profiles when devices are plugged/unplugged"
                module.version = "16.1"

EOF

FreeBSD Desktop – Part 28 – Configuration – Corner Actions

I am not a big fan of macOS desktop experience. I use latest macOS daily on M1 laptop and its quite far from what I call ‘productive’ environment. Yes – all the ‘enterprise’ applications are the … but that does not make a productive desktop alone. To be honest – the version that I enjoyed the most was Mac OS X Snow Leopard … but that was about a decade ago … and I still preferred my FreeBSD desktop even way back then.

One of the nice features that macOS (or earlier Mac OS X) provided were the so called Corner Actions. They are not crucial to any workload as one can either quite fast launch the needed processes by hand or by dmenu(1) or by other means (such as keyboard shortcuts) – but yeah – its not bad to have another useful feature under your mouse … assuming that mouse make You more productive – its not counter-productive for some.

You may want to check other articles in the FreeBSD Desktop series on the FreeBSD Desktop – Global Page where you will find links to all episodes of the series along with table of contents for each episode’s contents.

Python Based Solution

Upon my FreeBSD desktop/laptop/workstation journey I once found a Python based solution called cb-hotcorners from now discontinued CrunchBang Linux. It was not very usable as it used ‘polling’ type of thing – You set the ‘delay’ between checks and the Python script ACTIVELY checked if anything is needed to be done – if not it skips to next ‘wait’ cycle – if yes – it starts your configured executable. It may not sound as bad as it seams but keeping your cursor parked for about a second or so in the corner hoping for the script to do the right job is far from productive … not to mention wasted battery time and CPU cycles on that active waiting loop … just no.

While the CrunchBang is long gone there are two spiritual successors – CrunchBang++ and BunsenLabs ones. Seems I need to check them some time for other possible Openbox friendly features.

xidle(1)

Recently someone poked me on X/Twitter about xidle(1) running the suspend/resume command twice instead of just once … but after some digging I figured out that the xidle(1) also has some other features … and one of them is the Corner Actions feature.

After ‘bad’ experiences of slow and inefficient Python solution I checked how it would do the job … and it was instant match! πŸ™‚

For the record – the pkg(8) packages that need to be installed are listed below.

% pkg install -y xidle caja leafpad xterm skippy-xd

These two scripts below the __openbox_restart_xidle.sh and __openbox_stop_xidle.sh do all the needed job here. First one is to start needed config. Second one is to ‘stop’ all running xidle(1) instances.

% cat ~/scripts/__openbox_restart_xidle.sh
#! /bin/sh

xidle -area 3 -delay 0 -nw -program '/usr/local/bin/caja --no-desktop' &
xidle -area 3 -delay 0 -ne -program '/usr/local/bin/skippy-xd'         &
xidle -area 3 -delay 0 -sw -program '/usr/local/bin/leafpad'           &
xidle -area 3 -delay 0 -se -program '/home/vermaden/scripts/xterm.sh'  &


% cat ~/scripts/__openbox_stop_xidle.sh
#! /bin/sh

killall -9 xidle &

Below you will find xidle(1) in action on a screencast.

Actions

I configured the following xidle(1) actions:

  TOP-LEFT   caja(1) file manager
  BOT-LEFT   leafpad(1) text editor
  TOP-RIGHT  skippy-xd(1) task switcher
  BOT-RIGHT  xterm(1) terminal

Below are the running xidle(1) processes for that purpose.

xidle-ps

I still did not yet got used to it and I sometimes forgot that its there – but I would definitely keep it – muscle memory would come πŸ™‚

Side Effect

As a side effect of getting involved with xidle(1) the person from X/Twitter created a FreeBSD BUG report – 275761 – x11/xidle: triggers twice – and it was also fixed.

Delayed Automatic Suspend

As the bug is now fixed You may also want to use xidle(1) for automatic suspend of the machine after some period of inactivity. Here is the command You would use to get that feature.

% xidle -timeout 900 -program '/usr/local/bin/doas /usr/sbin/zzz'

Summary

Feel free to comment and share other useful desktop features that make your daily work better.

UPDATE 1 – Using xdotool(1) Instead

Someone on Lobsters made me realize that the same Corner Actions can be made with xdotool(1) instead. As I already use xdotool(1) for several other tasks – that would limit the amount of needed tools to accomplish the tasks for needed features of my customized FreeBSD Desktop experience.

Here are the stop and startup scripts for xdotool(1) based solution.

% cat ~/scripts/__openbox_restart_xdotool.sh
#! /bin/sh

xdotool behave_screen_edge top-left     exec caja --browser --no-desktop &
xdotool behave_screen_edge top-right    exec skippy-xd                   &
xdotool behave_screen_edge bottom-left  exec leafpad                     &
xdotool behave_screen_edge bottom-right exec xterm.sh                    &


% cat ~/scripts/__openbox_stop_xdotool.sh
#! /bin/sh

killall -9 xdotool &

It generally works the same so why bother with xidle(1) … after short test seems that xidle(1) is a lot more efficient and takes a lot less CPU time to do the same.

I have made a simple test of starting the solution – then using all four corners action and then checked CPU time (and RAM) used.

To my surprise the xdotool(1) while doing the same took slightly more RAM … but about 8 times more CPU time then xidle(1) tool. Below you will find the results after usage of both solutions.

// xidle(1)
% ps aux | grep -e xidle -e xdotool -e RSS | cut -c 42-
  RSS TT  STAT STARTED         TIME COMMAND
 4344  3  S    13:13        0:00.01 xidle -area 3 -delay 0 -nw -program caja --browser --no-desktop
 4332  3  S    13:13        0:00.01 xidle -area 3 -delay 0 -ne -program skippy-xd
 4336  3  S    13:13        0:00.01 xidle -area 3 -delay 0 -sw -program leafpad
 4332  3  S    13:13        0:00.01 xidle -area 3 -delay 0 -se -program xterm.sh

// xdotool(1)
% ps aux | grep -e xidle -e xdotool -e RSS | cut -c 42-
  RSS TT  STAT STARTED         TIME COMMAND
 5244  3  S    13:14        0:00.08 xdotool behave_screen_edge top-left exec caja --browser --no-desktop
 5236  3  S    13:14        0:00.08 xdotool behave_screen_edge top-right exec skippy-xd
 5244  3  S    13:14        0:00.08 xdotool behave_screen_edge bottom-left exec leafpad
 5252  3  S    13:14        0:00.08 xdotool behave_screen_edge bottom-right exec xterm.sh

Does that make a huge difference? No. If you already have xdotool(1) installed then you may use it for that purpose – I just wanted to check out of curiosity.

EOF

Fix linux-browser-installer(8) on FreeBSD

If you want to play DRM locked media on FreeBSD or use web browser that is available on Linux but not on FreeBSD – like Opera or Brave for example – you had quite convenient way to do it – using linux-browser-installer script.

I use it since … I do not remember when – and it always worked like a charm … until recently.

Problem

After I wanted to try and test the upcoming FreeBSD 14.0 version – I started fresh with new installation in a separate ZFS Boot Environment – and then after copying my configs wanted to also enable and add Google Chrome to be able to watch DRM locked media … but this time the linux-browser-installer failed.


desktop % git clone https://github.com/mrclksr/linux-browser-installer.git
Cloning into 'linux-browser-installer'...
remote: Enumerating objects: 210, done.
remote: Counting objects: 100% (100/100), done.
remote: Compressing objects: 100% (31/31), done.
remote: Total 210 (delta 80), reused 76 (delta 69), pack-reused 110
Receiving objects: 100% (210/210), 31.55 KiB | 1.58 MiB/s, done.
Resolving deltas: 100% (125/125), done.

desktop % cd linux-browser-installer

desktop % su

desktop # ./linux-browser-installer chroot create
linux_enable: NO -> NO
ubuntu_enable:  -> YES
compat.linux.emul_path: /compat/ubuntu -> /compat/ubuntu
Updating FreeBSD repository catalogue...
FreeBSD repository is up to date.
All repositories are up to date.

No packages are required to be fetched.
Integrity check was successful.
tar: Removing leading '/' from member names
I: Retrieving InRelease 
I: Retrieving Packages 
I: Validating Packages 
I: Resolving dependencies of required packages...
I: Resolving dependencies of base packages...
I: Checking component main on http://archive.ubuntu.com/ubuntu...
I: Retrieving adduser 3.118ubuntu2
I: Validating adduser 3.118ubuntu2
I: Retrieving apt 2.0.2
I: Validating apt 2.0.2
(...)
I: Configuring libc-bin...
I: Configuring systemd...
I: Configuring ca-certificates...
I: Base system installed successfully.
mkdir: /compat/ubuntu/etc/localtime: File exists
cp: /compat/ubuntu/etc/localtime is not a directory
/bin/bash: warning: setlocale: LC_ALL: cannot change locale (en_US.UTF-8)
perl: warning: Setting locale failed.
perl: warning: Please check that your locale settings:
        LANGUAGE = (unset),
        LC_ALL = "en_US.UTF-8",
        LC_COLLATE = "C",
        LANG = "C.UTF-8"
    are supported and installed on your system.
perl: warning: Falling back to a fallback locale ("C.UTF-8").
locale: Cannot set LC_CTYPE to default locale: No such file or directory
locale: Cannot set LC_MESSAGES to default locale: No such file or directory
locale: Cannot set LC_ALL to default locale: No such file or directory

Current default time zone: 'Europe/Warsaw'
Local time is now:      Wed Oct 11 10:33:24 CEST 2023.
Universal Time is now:  Wed Oct 11 08:33:24 UTC 2023.


compat.linux.emul_path: /compat/ubuntu -> /compat/ubuntu
/bin/bash: warning: setlocale: LC_ALL: cannot change locale (en_US.UTF-8)
Get:1 http://archive.ubuntu.com/ubuntu focal InRelease [265 kB]
Get:2 http://archive.ubuntu.com/ubuntu focal-updates InRelease [114 kB]
Get:3 http://archive.ubuntu.com/ubuntu focal-security InRelease [114 kB]
Err:1 http://archive.ubuntu.com/ubuntu focal InRelease
  At least one invalid signature was encountered.
Err:2 http://archive.ubuntu.com/ubuntu focal-updates InRelease
  At least one invalid signature was encountered.
Err:3 http://archive.ubuntu.com/ubuntu focal-security InRelease
  At least one invalid signature was encountered.
Reading package lists... Done
W: GPG error: http://archive.ubuntu.com/ubuntu focal InRelease: At least one invalid signature was encountered.
E: The repository 'http://archive.ubuntu.com/ubuntu focal InRelease' is not signed.
N: Updating from such a repository can't be done securely, and is therefore disabled by default.
N: See apt-secure(8) manpage for repository creation and user configuration details.
W: GPG error: http://archive.ubuntu.com/ubuntu focal-updates InRelease: At least one invalid signature was encountered.
E: The repository 'http://archive.ubuntu.com/ubuntu focal-updates InRelease' is not signed.
N: Updating from such a repository can't be done securely, and is therefore disabled by default.
N: See apt-secure(8) manpage for repository creation and user configuration details.
W: GPG error: http://archive.ubuntu.com/ubuntu focal-security InRelease: At least one invalid signature was encountered.
E: The repository 'http://archive.ubuntu.com/ubuntu focal-security InRelease' is not signed.
N: Updating from such a repository can't be done securely, and is therefore disabled by default.
N: See apt-secure(8) manpage for repository creation and user configuration details.
/bin/bash: warning: setlocale: LC_ALL: cannot change locale (en_US.UTF-8)
Reading package lists... Done
Building dependency tree... Done
The following packages will be REMOVED:
  rsyslog
0 upgraded, 0 newly installed, 1 to remove and 0 not upgraded.
After this operation, 1695 kB disk space will be freed.
perl: warning: Setting locale failed.
perl: warning: Please check that your locale settings:
        LANGUAGE = (unset),
        LC_ALL = "en_US.UTF-8",
        LC_COLLATE = "C",
        LANG = "C.UTF-8"
    are supported and installed on your system.
perl: warning: Falling back to a fallback locale ("C.UTF-8").
locale: Cannot set LC_CTYPE to default locale: No such file or directory
locale: Cannot set LC_MESSAGES to default locale: No such file or directory
locale: Cannot set LC_ALL to default locale: No such file or directory
(Reading database ... 11356 files and directories currently installed.)
Removing rsyslog (8.2001.0-1ubuntu1) ...
invoke-rc.d: could not determine current runlevel
 * Stopping enhanced syslogd rsyslogd                                                                                                                                                                                                                              [ OK ] 
/bin/bash: warning: setlocale: LC_ALL: cannot change locale (en_US.UTF-8)
Reading package lists... Done
Building dependency tree       
Reading state information... Done
Package gnupg is not available, but is referred to by another package.
This may mean that the package is missing, has been obsoleted, or
is only available from another source

E: Package 'gnupg' has no installation candidate
linux-browser-installer: Error: 'apt install -y gnupg' failed

I even keep old FreeBSD 13.1 ZFS Boot Environment where I could still watch DRM locked content … but after some time I was able to nail what the issue with linux-browser-installer is … something (again) changed in the Linux universe and suddenly all packages sources that were trusted yesterday are not trusted anymore … and that is the reason why the installer fails.

Solution

After some digging I found several ways to fix the issue. One of them is to add --allow-insecure-repositories and/or --allow-unauthenticated flags to the apt(8) command. The other one is to add [trusted=yes] to all apt(8) packages sources. I will use the latter as it takes less places to modify and seems simpler.

Example difference before and after modification:

BEFORE:
deb http://www.deb-multimedia.org jessie main

AFTER:
deb [trusted=yes] http://www.deb-multimedia.org jessie main

This is how linux-browser-installer looks after adding [trusted=yes] to all apt(8) packages sources.

desktop % grep -o '\"deb .*\"' linux-browser-installer | tr -d \"
deb [arch=amd64] http://dl.google.com/linux/chrome/deb/ 
deb [arch=amd64] https://brave-browser-apt-release.s3.brave.com/ stable main
deb [arch=amd64] https://repo.vivaldi.com/archive/deb/ 
deb [arch=amd64] https://packages.microsoft.com/repos/edge stable main
deb https://deb.opera.com/opera-stable/ stable non-free
deb http://archive.ubuntu.com/ubuntu/ ${ubuntu_version} 
deb http://archive.ubuntu.com/ubuntu/ ${ubuntu_version}-updates 
deb http://archive.ubuntu.com/ubuntu/ ${ubuntu_version}-security 

desktop % grep -o '\"deb .*\"' linux-browser-installer.VERMADEN | tr -d \"
deb [trusted=yes arch=amd64] http://dl.google.com/linux/chrome/deb/ 
deb [trusted=yes arch=amd64] https://brave-browser-apt-release.s3.brave.com/ stable main
deb [trusted=yes arch=amd64] https://repo.vivaldi.com/archive/deb/ 
deb [trusted=yes arch=amd64] https://packages.microsoft.com/repos/edge stable main
deb [trusted=yes] https://deb.opera.com/opera-stable/ stable non-free
deb [trusted=yes] http://archive.ubuntu.com/ubuntu/ ${ubuntu_version} 
deb [trusted=yes] http://archive.ubuntu.com/ubuntu/ ${ubuntu_version}-updates 
deb [trusted=yes] http://archive.ubuntu.com/ubuntu/ ${ubuntu_version}-security 

Instructions

The current working procedure looks like that one below.

desktop % git clone https://github.com/mrclksr/linux-browser-installer.git

desktop % cd linux-browser-installer

desktop % fetch https://raw.githubusercontent.com/vermaden/scripts/master/linux-browser-installer.PATCH

desktop % patch < linux-browser-installer.PATCH 

desktop % su

desktop # ./linux-browser-installer chroot delete

desktop # ./linux-browser-installer chroot create

desktop # ./linux-browser-installer install chrome

This is how the properly applied patch(1) looks like.

desktop % patch < linux-browser-installer.PATCH 
Hmm...  Looks like a unified diff to me...
The text leading up to this was:
--------------------------
|--- linux-browser-installer.BCK        2023-10-11 08:59:18.296949000 +0200
|+++ linux-browser-installer    2023-10-11 09:51:53.672677000 +0200
--------------------------
Patching file linux-browser-installer using Plan A...
Hunk #1 succeeded at 127.
Hunk #2 succeeded at 166.
Hunk #3 succeeded at 191.
Hunk #4 succeeded at 230.
Hunk #5 succeeded at 262.
Hunk #6 succeeded at 336.
done

The DRM locked content seems to play fine in the Linux version of Google Chrome.

google-chrome-DRM

Hope that helps.

UPDATE 1 – Broken 13.2-RELEASE

It seams that the FreeBSD 13.2-RELEASE is the most problematic as either DRM content does not work at all now or there are sound issues.

From the good news – the upcoming FreeBSD 14.0-RELEASE does not have these issues.

UPDATE 2 – Certificate Verification Failed

I just wanted to update the chroot and faced this issue shown below.

laptop % doas ./linux-browser-installer chroot upgrade
/bin/bash: warning: setlocale: LC_ALL: cannot change locale (en_US.UTF-8)
Hit:1 http://archive.ubuntu.com/ubuntu focal InRelease
Ign:2 https://dl.google.com/linux/chrome/deb stable InRelease
Hit:3 http://archive.ubuntu.com/ubuntu focal-updates InRelease
Hit:4 http://archive.ubuntu.com/ubuntu focal-security InRelease
Err:5 https://dl.google.com/linux/chrome/deb stable Release
  Certificate verification failed: The certificate is NOT trusted. The certificate issuer is unknown.  Could not handshake: Error in the certificate verification. [IP: 142.251.36.46 443]
Reading package lists... Done                  
W: https://dl.google.com/linux/chrome/deb/dists/stable/InRelease: No system certificates available. Try installing ca-certificates.
W: https://dl.google.com/linux/chrome/deb/dists/stable/Release: No system certificates available. Try installing ca-certificates.
E: The repository 'https://dl.google.com/linux/chrome/deb stable Release' no longer has a Release file.
N: Updating from such a repository can't be done securely, and is therefore disabled by default.
N: See apt-secure(8) manpage for repository creation and user configuration details.
laptop % 

The solutions seems to be forcefully removing current ca-certificates package and then adding the newest one.

Here are the steps that solved the problem for me.

Go here – http://security.ubuntu.com/ubuntu/pool/main/c/ca-certificates/ – and copy link for the most up to date ca-certificates package. Just hit the Last Modified on the top to make searching faster.

Then issue these commands with the link you copied earlier.

laptop % doas chroot /compat/ubuntu /bin/bash
chroot # wget --no-check-certificate http://security.ubuntu.com/ubuntu/pool/main/c/ca-certificates/ca-certificates_20230311ubuntu0.23.04.1_all.deb
chroot # dpkg -r --force-depends ca-certificates
chroot # dpkg -i ca-certificates_20230311ubuntu0.23.04.1_all.deb 
chroot # apt update

Now you can run chroot upgrade as usual.

laptop % doas ./linux-browser-installer chroot upgrade

Issue is submitted here: https://github.com/mrclksr/linux-browser-installer/issues/49

EOF

Quick DBUS Fix

Recently I again started to have some DBUS issues. Like GIMP opening a new instance everytime instead of just opening next file as a tab. After some investigation it seems that because DBUS got broken – example output from terminal for Caja file manager from Mate.

W520 % caja 

(caja:82154): dconf-WARNING **: 12:56:27.600: failed to commit changes to dconf:
Cannot spawn a message bus without a machine-id:
Unable to load /var/local/lib/dbus/machine-id or /etc/machine-id:
Failed to open file β€œ/var/local/lib/dbus/machine-id”: No such file or directory

(caja:82154): dconf-WARNING **: 12:56:27.600: failed to commit changes to dconf:
Cannot spawn a message bus without a machine-id:
Unable to load /var/local/lib/dbus/machine-id or /etc/machine-id:
Failed to open file β€œ/var/local/lib/dbus/machine-id”: No such file or directory

(caja:82154): dconf-WARNING **: 12:56:27.741: failed to commit changes to dconf:
Cannot spawn a message bus without a machine-id:
Unable to load /var/local/lib/dbus/machine-id or /etc/machine-id:
Failed to open file β€œ/var/local/lib/dbus/machine-id”: No such file or directory

(caja:82154): dconf-WARNING **: 12:56:27.741: failed to commit changes to dconf:
Cannot spawn a message bus without a machine-id:
Unable to load /var/local/lib/dbus/machine-id or /etc/machine-id:
Failed to open file β€œ/var/local/lib/dbus/machine-id”: No such file or directory

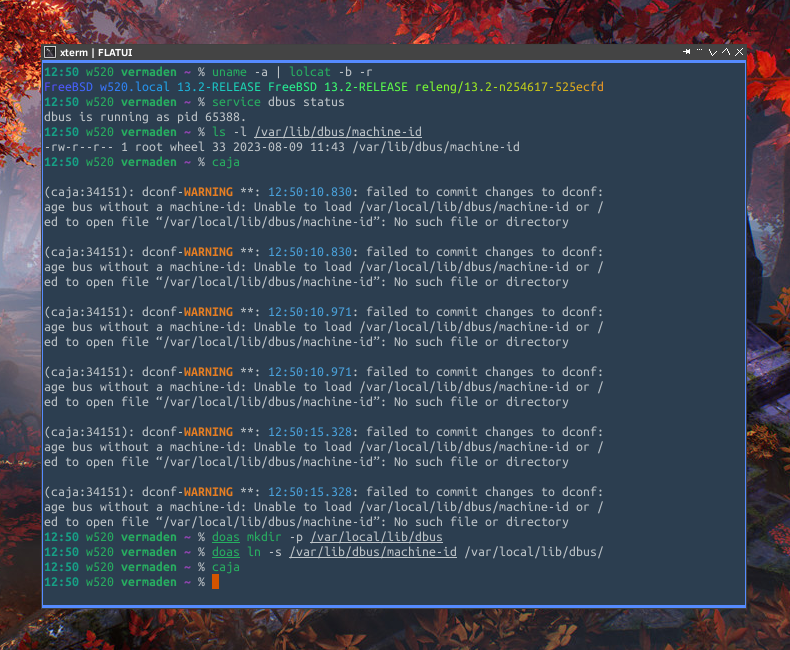
So I went to check if DBUS is actually running … or that machine-id is present.

w520 % service dbus status
dbus is running as pid 65388.

w520 % ls -l /var/lib/dbus/machine-id
-rw-r--r-- 1 root wheel 33 2023-08-09 11:43 /var/lib/dbus/machine-id

w520 % cat /var/lib/dbus/machine-id
283c584cbd447903eef501ca64d35fb9


Yep. Everything is in there. So I went back to caja(1) output … spot the difference below.

/var/lib/dbus/machine-id
/var/local/lib/dbus/machine-id

[FACEPALM]

For some reason authors of DBUS decided that /var/lib/dbus/machine-id is not good anymore and that from now on – they will use new /var/local/lib/dbus/machine-id place. “This is such a crock of shit.” as Lt. Col. Frank Slade would say.

Lets fix it with some oldschool ln(1) symlink.

w520 % doas mkdir -p /var/local/lib/dbus
w520 % doas ln -s /var/lib/dbus/machine-id /var/local/lib/dbus/machine-id

Lets check it works.

w520 % caja
w520 % 

No errors … and also finally all new images open in the same GIMP instance again.

dbus-fix

How not to love these Linuxisms on the daily FreeBSD desktop …

freebsd-porters-hanbook

EOF

AMD Based FreeBSD Desktop

While I started to use and learn FreeBSD on an oldschool Gigabyte-GA-7DPXDW motherboard (more about that here My FreeBSD Story page) that could handle two AMD AthlonXP CPUs in SMP configuration I got used to work on the laptops in the last 10+ years or so. I did not had a desktop PC for more then a decade … and that changed recently. My buddy showed me how much fun can be to ride Dirt Rally 2.0 game on a wheel controller. I really enjoyed that so I though that I will make my own cheap gaming rig and also got some old Logitech wheel and Dirt Rally 2.0 on some Steam sale. I do not like Windows systems so I picked one that is really stripped to the core – and also preconfigured for gaming – the Windows 10 Atlas edition – https://atlasos.net/ – available here.

While the gaming rig works really nice … I rarely have time to ride that rally stages – so while hardware was already there – I thought that I will make it a FreeBSD lab box while I do not play the games (which would be 99% of the time).

logo-freebsd

Also – having various Intel based ThinkPads in past years I also wanted to check how FreeBSD copes with AMD only based hardware – on all aspects such as motherboard/CPU/GPU subsystems.

Hardware

Many years ago – somewhere about 2010 – I got SilverStone SG05 Mini ITX case for my ZFS mirror setup – yes – the one that had only 512 MB RAM and run without a problem from one power outage to another πŸ™‚

While I changed my backup solutions multiple times:

That Silverstone SG05 Mini ITX case remained unused … till recently πŸ™‚

The case is quite small for a gaming PC with less then 11 L of volume and 22.2 x 17.6 x 27.6 cm in dimensions.

case-outside-1

The attached USB dongles are used for wireless mouse and keyboard.

case-outside-2

The hardware used here is as follows:

CASE: Silverstone SG05
 PSU: Sharkoon Silent Storm SFX 500 Gold 500W
MOBO: ASUS PRIME A320I-K Mini ITX
 CPU: AMD Ryzen 3 1200 4C/4T 3.1GHz
 GPU: Sapphire AMD Radeon RX 5500 XT 8GB GDDR6
 RAM: 16 GB DDR4
DISK: SSD NVMe M.2 Intel 660p 512GB
SCRN: HP E221c FullHD Monitor

Its nice that Sharkoon Silent Storm SFX 500 Gold PSU does have detachable cables – but even with that feature the inside of the Silverstone SG05 looks quite busy.

case-inside
The another SSD that is stripped from its case is Crucial MX300 525GB SATA drive – this is the drive that hosts the Windows 10 Atlas installation. I got it for about $15 so lack of case was not a problem :p The FreeBSD is installed on the SSD NVMe M.2 Intel 660p 512GB drive.

Daily the system works vertically on a ‘side’ to take less space.

case-shelf

Dual Boot

I use the most convenient known boot loader ever invented – the [F8] key on system startup – to enter the BIOS Boot Menu πŸ™‚

FreeBSD Setup

Below I will share the setup that will allow accelerated graphics desktop along with Direct Rendering at Xorg/X11 level.

The FreeBSD version I used was 13.2-RELEASE.

CPU

To read/show CPU temperatures we will need amdtemp.ko kernel module. We will load it and enable its automatic load after each reboot.

# kldload amdtemp

# sysrc kld_list+=amdtemp

# sysctl -a | grep temperature
dev.cpu.3.temperature: 32.1C
dev.cpu.2.temperature: 32.1C
dev.cpu.1.temperature: 32.1C
dev.cpu.0.temperature: 32.1C

One thing to note here – the amdtemp.ko is used only to read/show the CPU cores temperatures. It has nothing to do with frequency scaling for which the powerd(8) is used. If you do not intent to display these temps on some infobar or use them in scripts – then you may omit this step. I was just curious what the temperatures at idle and at load were. The powerd(8) is able to choose from three frequencies on that AMD Ryzen 3 1200 CPU.

# sysctl dev.cpu.0
dev.cpu.0.temperature: 32.0C
dev.cpu.0.cx_method: C1/hlt C2/io
dev.cpu.0.cx_usage_counters: 0 0
dev.cpu.0.cx_usage: 0.00% 0.00% last 1000000us
dev.cpu.0.cx_lowest: C8
dev.cpu.0.cx_supported: C1/1/1 C2/2/400
dev.cpu.0.freq_levels: 3100/3681 2800/2940 1550/1331
dev.cpu.0.freq: 1550
dev.cpu.0.%parent: acpi0
dev.cpu.0.%pnpinfo: _HID=none _UID=0 _CID=none
dev.cpu.0.%location: handle=\_PR_.C000
dev.cpu.0.%driver: cpu
dev.cpu.0.%desc: ACPI CPU

One may got one step further and use mine sensors.sh script. Example below is with disabled powerd(8) daemon and CPU frequency set to 1.5GHz manually.

# sensors.sh

            BATTERY/AC/TIME/FAN/SPEED 
 ------------------------------------ 
               dev.cpu.0.cx_supported: C1/1/1 C2/2/400
                   dev.cpu.0.cx_usage: 0.00% 0.00% last 1000000us
                       dev.cpu.0.freq: 1550 
                hw.acpi.cpu.cx_lowest: C8 
                powerd(8)/powerdxx(8): disabled

                  SYSTEM/TEMPERATURES 
 ------------------------------------ 
                dev.cpu.0.temperature: 44.1C
                dev.cpu.1.temperature: 44.1C
                dev.cpu.2.temperature: 44.1C
                dev.cpu.3.temperature: 44.1C

                   DISKS/TEMPERATURES 
 ------------------------------------ 
       smart.ada0.temperature_celsius: 46.0C
              smart.nvme0.temperature: 43.0C

GPU

Now we will need to install the graphics/drm-kmod packages. We will just use the latest repository to have most fresh packages.

# sed -i '' -e 's|quarterly|latest|g' /etc/pkg/FreeBSD.conf

# pkg install -y drm-kmod

While the above sed(1) command works properly – the proper and official way to do that is shown below.

# mkdir -p /usr/local/etc/pkg/repos

# sed -e 's|quarterly|latest|g' /etc/pkg/FreeBSD.conf > /usr/local/etc/pkg/repos/FreeBSD.conf

The final effect is the same.

We will now check what is our GPU – as seen by the FreeBSD operating system.

# pciconf -lv vgapci0
vgapci0@pci0:10:0:0:    class=0x030000 rev=0xc5 hdr=0x00 vendor=0x1002 device=0x7340 subvendor=0x1da2 subdevice=0xe423
    vendor     = 'Advanced Micro Devices, Inc. [AMD/ATI]'
    device     = 'Navi 14 [Radeon RX 5500/5500M / Pro 5500M]'
    class      = display
    subclass   = VGA

Accurately its AMD Radeon RX 5500 with NAVI 14 codename.

We can check if we need the radeonkms.ko module or amdgpu.ko module in following way.

# pkg search navi14
gpu-firmware-amd-kmod-navi14-20230210_1 Firmware modules for navi14 AMD GPUs

# pkg info -l gpu-firmware-amd-kmod-navi14-20230210_1
gpu-firmware-amd-kmod-navi14-20230210_1:
        /boot/modules/amdgpu_navi14_asd_bin.ko
        /boot/modules/amdgpu_navi14_ce_bin.ko
        /boot/modules/amdgpu_navi14_ce_wks_bin.ko
        /boot/modules/amdgpu_navi14_gpu_info_bin.ko
        /boot/modules/amdgpu_navi14_me_bin.ko
        /boot/modules/amdgpu_navi14_me_wks_bin.ko
        /boot/modules/amdgpu_navi14_mec2_bin.ko
        /boot/modules/amdgpu_navi14_mec2_wks_bin.ko
        /boot/modules/amdgpu_navi14_mec_bin.ko
        /boot/modules/amdgpu_navi14_mec_wks_bin.ko
        /boot/modules/amdgpu_navi14_pfp_bin.ko
        /boot/modules/amdgpu_navi14_pfp_wks_bin.ko
        /boot/modules/amdgpu_navi14_rlc_bin.ko
        /boot/modules/amdgpu_navi14_sdma1_bin.ko
        /boot/modules/amdgpu_navi14_sdma_bin.ko
        /boot/modules/amdgpu_navi14_smc_bin.ko
        /boot/modules/amdgpu_navi14_sos_bin.ko
        /boot/modules/amdgpu_navi14_ta_bin.ko
        /boot/modules/amdgpu_navi14_vcn_bin.ko
        /usr/local/share/licenses/gpu-firmware-amd-kmod-navi14-20230210_1/AMD
        /usr/local/share/licenses/gpu-firmware-amd-kmod-navi14-20230210_1/LICENSE
        /usr/local/share/licenses/gpu-firmware-amd-kmod-navi14-20230210_1/catalog.mk

As we can see the NAVI 14 is supported by amdgpu.ko kernel module – so we will enable its loading after each reboot and we will also load it now.

# kldload amdgpu

# sysrc kld_list+=amdgpu

# kldstat 
Id Refs Address                Size Name
 1  105 0xffffffff80200000  1f3e2d0 kernel
 2    1 0xffffffff8213f000   59dfa8 zfs.ko
 3    1 0xffffffff826dd000     a4a0 cryptodev.ko
 4    1 0xffffffff82e10000     3378 acpi_wmi.ko
 5    1 0xffffffff82e14000     3218 intpm.ko
 6    1 0xffffffff82e18000     2180 smbus.ko
 7    1 0xffffffff82e1b000     3340 uhid.ko
 8    1 0xffffffff82e1f000     4350 ums.ko
 9    1 0xffffffff82e24000     3380 usbhid.ko
10    1 0xffffffff82e28000     31f8 hidbus.ko
11    1 0xffffffff82e2c000     3320 wmt.ko
12    1 0xffffffff82e30000     3160 amdtemp.ko
13    1 0xffffffff82e34000     2138 amdsmn.ko
14    1 0xffffffff83000000   418220 amdgpu.ko
15    2 0xffffffff82e37000    739e0 drm.ko
16    3 0xffffffff82eab000     5220 linuxkpi_gplv2.ko
17    4 0xffffffff82eb1000     62d8 dmabuf.ko
18    1 0xffffffff82eb8000     c758 ttm.ko
19    1 0xffffffff82ec5000    2f048 amdgpu_navi14_sos_bin.ko
20    1 0xffffffff82ef5000    2c2d8 amdgpu_navi14_asd_bin.ko
21    1 0xffffffff82f22000     a3d8 amdgpu_navi14_ta_bin.ko
22    1 0xffffffff82f2d000    42a68 amdgpu_navi14_smc_bin.ko
23    1 0xffffffff82f70000    425d8 amdgpu_navi14_pfp_bin.ko
24    1 0xffffffff82fb3000    425d8 amdgpu_navi14_me_bin.ko
25    1 0xffffffff83419000    42558 amdgpu_navi14_ce_bin.ko
26    1 0xffffffff8345c000     c840 amdgpu_navi14_rlc_bin.ko
27    1 0xffffffff83469000    43a08 amdgpu_navi14_mec_bin.ko
28    1 0xffffffff834ad000    43a08 amdgpu_navi14_mec2_bin.ko
29    1 0xffffffff834f1000     a4d8 amdgpu_navi14_sdma_bin.ko
30    1 0xffffffff834fc000     a4d8 amdgpu_navi14_sdma1_bin.ko
31    1 0xffffffff83507000    64398 amdgpu_navi14_vcn_bin.ko

This is what will appear on your screen after the kldload(8) command.

amdgpu

To properly use GPU hardware we will need to add our user to the video group.

# pw groupmod video -m vermaden

We will now add some basic X11 tools along with Xorg to test our setup.

# pkg install -y xorg openbox xterm xinit mesa-demos scrot radeontop

While my desktop/laptop setup is well described in the FreeBSD Desktop page – I will only configure basic X11 setup to make sure everything works.

% echo openbox > ~/.xinitrc

% xinit

The X11 loaded Openbox properly and we can indeed verify that hardware GPU acceleration works properly.

openbox-mesa-demos

While the above image is quite small the important part is you want to see the direct rendering: Yes message from the glxinfo | grep direct command.

% glxinfo | grep direct
direct rendering: Yes

You can also check the full resolution screenshot HERE.

AUDIO

By default the audio goes out to the Mini Jack output on the motherboard.

My DisplayPort attached monitor has builtin speakers so I will switch the audio to them instead.

# cat /dev/sndstat   
Installed devices:
pcm0:  (play)
pcm1:  (play)
pcm2:  (play)
pcm3:  (play)
pcm4:  (play)
pcm5:  (play/rec) default
pcm6:  (play/rec)
No devices installed from userspace.

# sysctl hw.snd.default_unit=1

# cat /dev/sndstat
Installed devices:
pcm0:  (play)
pcm1:  (play) default
pcm2:  (play)
pcm3:  (play)
pcm4:  (play)
pcm5:  (play/rec)
pcm6:  (play/rec)
No devices installed from userspace.

To make that permanent I have added below lines to /etc/sysctl.conf file.

# cat /etc/sysctl.conf 

# AUDIO @ DisplayPort
  hw.snd.default_unit=1

While the /dev/sndstat states the output as HDMI the AMD Radeon 5500 XT has two DisplayPort outputs and two HDMI outputs.

The fifth HDMI output will be from the motherboard.

OTHER

This is how the FreeBSD main /etc/rc.conf file looks like.

# cat /etc/rc.conf
# NETWORK
  hostname=games.lab.org
  ifconfig_re0="inet 10.0.0.4/24 up"
  defaultrouter="10.0.0.1"
  gateway_enable=YES

# DAEMONS
  sshd_enable=YES
  powerd_enable=YES
  zfs_enable=YES
  ntpdate_enable=YES
  syslogd_flags="-ss"

# MODULES
  kld_list="amdgpu amdtemp"

# OTHER
  clear_tmp_enable=YES
  keymap=pl.kbd
  dumpdev=AUTO
  rc_startmsgs=NO
  rc_info=NO

# POWER
  performance_cx_lowest="Cmax"
  economy_cx_lowest="Cmax"

No other additional configuration is need.

I also uploaded the hardware probe to the bsd-hardware.info page and its available HERE.

Summary

I will use the box to test some things that I always wanted to – like Bhyve for example – or its sysutils/vm-bhyve manager. Expect some posts on this topic in the future πŸ™‚

Regards.

EOF

FreeBSD 13.2 on ThinkPad T14 (GEN1)

I used to run FreeBSD on older laptops – some more then a decade old – like my favorite ThinkPad W520 daily driver or ThinkPad X220 mobile companion. Today I will share with you my experiences of running latest production ready FreeBSD 13.2-RELEASE system on a quite modern ThinkPad T14 (GEN1) from 2021/2022 (depending on the source of the information) – which is quite new I would say.

… do not interpret this article wrong – The W520 and X220 (sometimes T420s) are still my daily/mobile/… drivers and my points explained in the Epitaph to Laptops article remain the same. I just had an opportunity to use ThinkPad T14 for several days so I thought it would be a good idea to check and document FreeBSD behavior on it.

In many parts this article will be a copy cat of the earlier FreeBSD 13.1 on ThinkPad W520 article – as the topic and configs are mostly the same – you have been warned πŸ™‚

ThinkPad T14 (GEN1)

As the ThinkPad T490 was released Lenovo needed to rethink their naming convention as the next one could have been ThinkPad T4100 (like 100 is after 90) or something different as T500 was already taken by older model … their new naming scheme is not bad – definitely better then their idea of newer keyboard layout after ditching the 7-row keyboard from 2011 and earlier models.

The model I was able to test on had quad core Intel i5-10210U model CPU which is somewhere between 25-35% faster (according to benchmarks) then the Intel i7-2860QM CPU from my ThinkPad W520. Not bad – especially knowing that the time span between their releases is 9 years … but to be honest – in real usage I do not feel that 25-35% more speed.

T14 % lscpu
Architecture:            amd64
Byte Order:              Little Endian
Total CPU(s):            8
Thread(s) per core:      2
Core(s) per socket:      4
Socket(s):               1
Vendor:                  GenuineIntel
CPU family:              6
Model:                   142
Model name:              Intel(R) Core(TM) i5-10210U CPU @ 1.60GHz
Stepping:                12
L1d cache:               32K
L1i cache:               32K
L2 cache:                256K
L3 cache:                6M
Flags:                   fpu vme de pse tsc msr pae mce cx8 apic sep mtrr pge mca cmov pat pse36
                         cflsh ds acpi mmx fxsr sse sse2 ss htt tm pbe sse3 pclmulqdq dtes64
                         monitor ds_cpl vmx est tm2 ssse3 sdbg fma cx16 xtpr pdcm pcid sse4_1
                         sse4_2 x2apic movbe popcnt tsc_deadline aes xsave osxsave avx f16c rdrnd
                         fsgsbase tsc_adjust sgx bmi1 avx2 smep bmi2 erms invpcid fpcsds mpx rdseed
                         adx smap clflushopt intel_pt syscall nx pdpe1gb rdtscp lm lahf_lm lzcnt

Below you can see how ThinkPad T14 (GEN1) looks like.

thinkpad-t14

To be honest I would even prefer to use ThinkPad SK-8855 USB keyboard as showed here below.

T14s-keyboard-upgraded

Specifications

Below You will find specs of this machine.

CPU: Intel Core i5-10210U (4C/8T) 14nm
RAM: 16 GB (2 * 8GB DDR4)
HDD0: 256GB WD Black SN750 M.2 [nvd(4)]
GFX0: Intel UHD Graphics (integrated) [graphics/drm-kmod]
SCR: 14.1 1920x1080 Touch Screen
USB: 2 x USB-A 3.0 + 1 x USB-C 3.0 [ehci(4) + xhci(4)]
AUDIO: Realtek ALC257 [snd_hda(4)]
PORTS: 1 x HDMI
SD: microSD Card Reader [sdhci(4)]
LAN: 10/100/1000 Intel I219-V Gigabit [em(4)]
WIFI: Intel Comet Lake PCH-LP CNVi WiFi 802.11ax [iwlwifi(4)]
CAM: Webcam 720p [multimedia/webcamd]

I have uploaded the https://bsd-hardware.info/ probe of that ThinkPad T14 to their database and its available – https://bsd-hardware.info/?probe=8aede62ca8 – here.

After messing with this laptop for a while I can tell you that in most areas its on par with mine ThinkPad W520 laptop. The battery time is similar (about 5 hours). The suspend/resume works when you use X11 with graphics/drm-kmod package. Even the touch screen works like a charm – the same as my other ThinkPad X220t (tablet) … and even no additional configuration was needed – I just used the configuration that I use daily on my ThinkPad W520 laptop. But … the WiFi does not work πŸ™‚ While iwlwifi(4) properly attaches to this card the wpa_supplicant(8) is just not able to connect to the Access Point. There are at least several ways on how to Cope with WiFi Fuckup on FreeBSD – feel free to check them out. I used my favorite fallback solution – Realtek RTL8188CUS USB dongle and that one worked really well with rtwn(4) driver.

FreeBSD System Configuration

From many things that I really like about FreeBSD (more here – Quare FreeBSD? – in separate article) is that it can be entirely configured using just 3 files. This configuration already features all power management settings that I described in the The Power to Serve – FreeBSD Power Management article.

I installed FreeBSD in a pretty standard way with GELI encryption enabled and with ZFS as the filesystem. When in doubt the installation procedure is described in the FreeBSD Desktop – Part 2.1 – Install FreeBSD 12 article.

Main FreeBSD configuration files.

  • /etc/rc.conf – to system services
  • /etc/sysctl.conf – for runtime parameters
  • /boot/loader.conf – for parameters configurable at boot

I will also include these as their are also crucial for the configuration:

  • /etc/devfs.rules – devices configuration/li>
  • /etc/fstab – filesystems configuration
  • /etc/ttys – terminal initialization configuration
  • /etc/wpa_supplicant.conf – WiFi configuration
  • /usr/local/etc/automount.confautomount(8) configuration
  • /usr/local/etc/doas.confdoas(1) configuration
  • Groups membership.

First the main /etc/rc.conf configuration file.

% cat /etc/rc.conf
# SILENCE # ------------------------------------------------------------------
  rc_startmsgs=NO

# NETWORK # ------------------------------------------------------------------
  hostname=t14.local
  background_dhclient=YES
  extra_netfs_types=NFS
  wlans_rtwn0=wlan0
  create_args_wlan0="country PL regdomain FCC4"
  ifconfig_wlan0="WPA SYNCDHCP"
  defaultroute_delay=3
  defaultroute_carrier_delay=3
  gateway_enable=YES
  harvest_mask=351
  rtsol_flags="-i"
  rtsold_flags="-a -i"

# MODULES/COMMON/BASE # ------------------------------------------------------
  kld_list="${kld_list} /boot/modules/i915kms.ko"
  kld_list="${kld_list} fusefs coretemp sem cpuctl ichsmb cuse"
  kld_list="${kld_list} libiconv cd9660_iconv msdosfs_iconv udf_iconv"

# MODULES/VIRTUALBOX # -------------------------------------------------------
  vboxnet_enable=YES
  kld_list="${kld_list} vboxdrv vboxnetadp vboxnetflt"

# POWER
  performance_cx_lowest=C1
  economy_cx_lowest=Cmax
  powerd_enable=YES
  powerd_flags="-n adaptive -a hiadaptive -b adaptive -m 800 -M 2000"

# DAEMONS | yes # ------------------------------------------------------------
  zfs_enable=YES
  xdm_enable=YES
  xdm_tty=ttyv4
  nfs_client_enable=YES
  ubuntu_enable=YES
  moused_enable=YES
  syslogd_flags='-s -s'
  sshd_enable=YES
  local_unbound_enable=YES
  webcamd_enable=YES
  rctl_enable=YES

# DAEMONS | no # -------------------------------------------------------------
  linux_enable=NO
  sendmail_enable=NONE
  sendmail_submit_enable=NO
  sendmail_outbound_enable=NO
  sendmail_msp_queue_enable=NO

# FS # -----------------------------------------------------------------------
  fsck_y_enable=YES
  clear_tmp_enable=YES
  clear_tmp_X=YES
  growfs_enable=YES

# OTHER # --------------------------------------------------------------------
  keyrate=fast
  keymap=pl.kbd
  virecover_enable=NO
  update_motd=NO
  devfs_system_ruleset=desktop
  hostid_enable=NO
  savecore_enable=NO

Now the runtime parameters /etc/sysctl.conf file.

% cat /etc/sysctl.conf
# SECURITY
  security.bsd.see_jail_proc=0
  security.bsd.unprivileged_proc_debug=0

# SECURITY/RANDOM PID
  kern.randompid=1

# ANNOYING THINGS
  vfs.usermount=1
  kern.coredump=0
  hw.syscons.bell=0
  kern.vt.enable_bell=0

# ZFS DELETE FUCKUP TRIM (DEFAULT: 64)
  vfs.zfs.vdev.trim_max_active=1

# ZFS ARC TUNING
  vfs.zfs.arc.min=134217728
  vfs.zfs.arc.max=536870912

# ZFS ARC FREE ENFORCE @ 1024 \* 1024 \* 3
  vfs.zfs.arc_free_target=3145728

# JAILS/ALLOW UPGRADES IN JAILS
  security.jail.chflags_allowed=1

# JAILS/ALLOW RAW SOCKETS
  security.jail.allow_raw_sockets=1

# DESKTOP/INTERACTIVITY
  kern.sched.preempt_thresh=224

# DESKTOP QUANTUM FOR TIMESHARE THREADS IN stathz TICKS (12) NomadBSD
  kern.sched.slice=3

# DESKTOP/IRIDIUM/CHROMIUM
  kern.ipc.shm_allow_removed=1

# SAMPLE RATE CONVERTER QUALITY (0=low .. 4=high) (1) NomadBSD
  hw.snd.feeder_rate_quality=3

# PERFORMANCE/ALL SHARED MEMORY SEGMENTS WILL BE MAPPED TO UNPAGEABLE RAM
  kern.ipc.shm_use_phys=1

# VIRTUALBOX aio(4) SETTINGS
  vfs.aio.max_buf_aio=8192
  vfs.aio.max_aio_queue_per_proc=65536
  vfs.aio.max_aio_per_proc=8192
  vfs.aio.max_aio_queue=65536

# POWER CONSUMPTION / SILENT FANS Intel 6th GEN+ / ONE LINE FOR EACH TH
# DETAILS IN THE hwpstate_intel(4) MAN PAGE
  dev.hwpstate_intel.0.epp=100
  dev.hwpstate_intel.1.epp=100
  dev.hwpstate_intel.2.epp=100
  dev.hwpstate_intel.3.epp=100
  dev.hwpstate_intel.4.epp=100
  dev.hwpstate_intel.5.epp=100
  dev.hwpstate_intel.6.epp=100
  dev.hwpstate_intel.7.epp=100

# NETWORK/DO NOT SEND RST ON SEGMENTS TO CLOSED PORTS
  net.inet.tcp.blackhole=2

# NETWORK/DO NOT SEND PORT UNREACHABLES FOR REFUSED CONNECTS
  net.inet.udp.blackhole=1

# NETWORK/LIMIT ON SYN/ACK RETRANSMISSIONS (3)
  net.inet.tcp.syncache.rexmtlimit=0

# NETWORK/USE TCP SYN COOKIES IF THE SYNCACHE OVERFLOWS (1)
  net.inet.tcp.syncookies=0

# NETWORK/ASSIGN RANDOM ip_id VALUES (0)
  net.inet.ip.random_id=1

# NETWORK/ENABLE SENDING IP REDIRECTS (1)
  net.inet.ip.redirect=0

# NETWORK/IGNORE ICMP REDIRECTS (0)
  net.inet.icmp.drop_redirect=1

# NETWORK/DROP TCP PACKETS WITH SYN+FIN SET (0)
  net.inet.tcp.drop_synfin=1

# NETWORK/RECYCLE CLOSED FIN_WAIT_2 CONNECTIONS FASTER (0)
  net.inet.tcp.fast_finwait2_recycle=1

# NETWORK/CERTAIN ICMP UNREACHABLE MESSAGES MAY ABORT CONNECTIONS IN SYN_SENT (1)
  net.inet.tcp.icmp_may_rst=0

The biggest difference for ThinkPad T14 against the ThinkPad W520 is this part below.

# POWER CONSUMPTION / SILENT FANS Intel 6th GEN+ / ONE LINE FOR EACH TH
# DETAILS IN THE hwpstate_intel(4) MAN PAGE
  dev.hwpstate_intel.0.epp=100
  dev.hwpstate_intel.1.epp=100
  dev.hwpstate_intel.2.epp=100
  dev.hwpstate_intel.3.epp=100
  dev.hwpstate_intel.4.epp=100
  dev.hwpstate_intel.5.epp=100
  dev.hwpstate_intel.6.epp=100
  dev.hwpstate_intel.7.epp=100

It was not needed/non existent on the ThinkPad W520 hardware.

Now the boot parameters /boot/loader.conf file.

% cat /boot/loader.conf
# CONSOLE COMMON
  autoboot_delay=2       # OPT. '-1' => NO WAIT | OPT. 'NO' => INFINITE WAIT
  hw.usb.no_boot_wait=1  # DO NOT WAIT FOR USB DEVICES FOR ROOT (/) FILESYSTEM
  boot_mute=YES          # LIKE '-m' IN LOADER - MUTE CONSOLE WITH FreeBSD LOGO
  loader_logo=none       # DESIRED LOGO OPTIONS: fbsdbw beastiebw beastie none
  loader_menu_frame="none"
  screen.font="6x12"

# CONSOLE RESOLUTION
  kern.vt.fb.default.mode="1920x1080"
  efi_max_resolution="1920x1080"

# WINE FIX
  machdep.max_ldt_segment=2048

# MODULES - BOOT
  aesni_load=YES
  geom_eli_load=YES
  cryptodev_load=YES
  zfs_load=YES

# drm-kmod PACKAGE - USE SEMAPHORES FOR INTER-RING SYNC
  compat.linuxkpi.semaphores=1

# drm-kmod PACKAGE - ENABLE POWER-SAVING RENDER C-STATE 6
  compat.linuxkpi.enable_rc6=7

# drm-kmod PACKAGE - ENABLE POWER-SAVING DISPLAY C-STATES
  compat.linuxkpi.enable_dc=2

# drm-kmod PACKAGE - ENABLE FRAME BUFFER COMPRESSION FOR POWER SAVINGS
  compat.linuxkpi.enable_fbc=1

# ENABLE SYNAPTICS
  hw.psm.synaptics_support=1

# DISABLE /dev/diskid/* ENTRIES FOR DISKS
  kern.geom.label.disk_ident.enable=0

# DISABLE /dev/gptid/* ENTRIES FOR DISKS
  kern.geom.label.gptid.enable=0

# TERMINAL vt(4) COLORS
  kern.vt.color.0.rgb="#000000"
  kern.vt.color.1.rgb="#dc322f"
  kern.vt.color.2.rgb="#859900"
  kern.vt.color.3.rgb="#b58900"
  kern.vt.color.4.rgb="#268bd2"
  kern.vt.color.5.rgb="#ec0048"
  kern.vt.color.6.rgb="#2aa198"
  kern.vt.color.7.rgb="#94a3a5"
  kern.vt.color.8.rgb="#586e75"
  kern.vt.color.9.rgb="#cb4b16"
  kern.vt.color.10.rgb="#859900"
  kern.vt.color.11.rgb="#b58900"
  kern.vt.color.12.rgb="#268bd2"
  kern.vt.color.13.rgb="#d33682"
  kern.vt.color.14.rgb="#2aa198"
  kern.vt.color.15.rgb="#6c71c4"

# RACCT/RCTL RESOURCE LIMITS
  kern.racct.enable=1

# DISABLE ZFS PREFETCH
  vfs.zfs.prefetch_disable=1

# POWER MGMT / POWER OFF DEVICES WITHOUT ATTACHED DRIVER
  hw.pci.do_power_nodriver=3

# POWER MANAGEMENT FOR EVERY USED AHCI CHANNEL (ahcich 0-7)
  hint.ahcich.0.pm_level=5
  hint.ahcich.1.pm_level=5
  hint.ahcich.2.pm_level=5
  hint.ahcich.3.pm_level=5
  hint.ahcich.4.pm_level=5
  hint.ahcich.5.pm_level=5
  hint.ahcich.6.pm_level=5
  hint.ahcich.7.pm_level=5

# GELI THREADS
  kern.geom.eli.threads=4

Now the mentioned /etc/devfs.rules file.

% cat /etc/devfs.rules
[desktop=10]
add path 'acd*'      mode 0660 group operator
add path 'cd*'       mode 0660 group operator
add path 'da*'       mode 0660 group operator
add path 'pass*'     mode 0660 group operator
add path 'xpt*'      mode 0660 group operator
add path 'fd*'       mode 0660 group operator
add path 'md*'       mode 0660 group operator
add path 'uscanner*' mode 0660 group operator
add path 'lpt*'      mode 0660 group cups
add path 'ulpt*'     mode 0660 group cups
add path 'unlpt*'    mode 0660 group cups
add path 'ugen*'     mode 0660 group operator
add path 'usb/*'     mode 0660 group operator
add path 'video*'    mode 0660 group operator
add path 'cuse*'     mode 0660 group operator

Filesystems and SWAP configuration.

% cat /etc/fstab
# SWAP
  /dev/gpt/swap0  none  swap  sw  0 0

# FreeBSD PSEUDO - NEEDED BY wine(1)
  procfs  /proc  procfs  rw  0 0

# Ubuntu Linux PSEUDO
  linprocfs  /compat/ubuntu/proc     linprocfs  rw,late                    0 0
  linsysfs   /compat/ubuntu/sys      linsysfs   rw,late                    0 0
  devfs      /compat/ubuntu/dev      devfs      rw,late                    0 0
  fdescfs    /compat/ubuntu/dev/fd   fdescfs    rw,late,linrdlnk           0 0
  tmpfs      /compat/ubuntu/dev/shm  tmpfs      rw,late,size=1g,mode=1777  0 0
  /home      /compat/ubuntu/home     nullfs     rw,late                    0 0
  /tmp       /compat/ubuntu/tmp      nullfs     rw,late                    0 0

Terminals configuration under /etc/ttys file. Important part is the ttyv4 entry to match the xdm_tty=ttyv4 value from /etc/rc.conf file.

% grep '^[^#]' /etc/ttys | cat
console none                            unknown off insecure
ttyv0   "/usr/libexec/getty Pc"         xterm   onifexists secure
ttyv1   "/usr/libexec/getty Pc"         xterm   onifexists secure
ttyv2   "/usr/libexec/getty Pc"         xterm   onifexists secure
ttyv3   "/usr/libexec/getty Pc"         xterm   onifexists secure
ttyv4   "/usr/libexec/getty Pc"         xterm   off secure
ttyv5   "/usr/libexec/getty Pc"         xterm   off secure
ttyv6   "/usr/libexec/getty Pc"         xterm   off secure
ttyv7   "/usr/libexec/getty Pc"         xterm   off secure
ttyv4   "/usr/local/bin/xdm -nodaemon"  xterm   off secure
ttyu0   "/usr/libexec/getty 3wire"      vt100   onifconsole secure
ttyu1   "/usr/libexec/getty 3wire"      vt100   onifconsole secure
ttyu2   "/usr/libexec/getty 3wire"      vt100   onifconsole secure
ttyu3   "/usr/libexec/getty 3wire"      vt100   onifconsole secure
dcons   "/usr/libexec/getty std.9600"   vt100   off secure
xc0     "/usr/libexec/getty Pc"         xterm   onifconsole secure
rcons   "/usr/libexec/getty std.9600"   vt100   onifconsole secure

I kept wireless config in /etc/rc.conf file this time – it does conflicts with my own network.sh solution to connect to various both wire and wireless networks – FreeBSD Network Management with network.sh Script – described in details here.

# cat /etc/wpa_supplicant.conf
# GENERAL
eapol_version=2
ap_scan=1
fast_reauth=1

# OPEN NETWORKS
network={
  key_mgmt=NONE
  priority=0
}

# NETWORK WITH HIDDEN SSID
network={
  scan_ssid=1
  ssid="hidden-network"
  psk="12341234"
  priority=0
}

# NAMED OPEN NETWORK
network={
  ssid="Free_Internet"
  key_mgmt=NONE
  priority=0
}

# NORMAL WPA/WPA2 SECURED NETWORK
network={
  ssid="SECURED"
  psk="12345678"
}

The automount(8) config.

% cat /usr/local/etc/automount.conf
  USERUMOUNT=YES
  USER=vermaden
  FM='caja --no-desktop'
  NICENAMES=YES

The doas(1) configuration.

# cat /usr/local/etc/doas.conf
# CORE
  permit nopass keepenv root     as root
  permit nopass keepenv vermaden as root

# THE network.sh SCRIPT
  # pw groupmod network -m YOURUSERNAME
  # cat /usr/local/etc/doas.conf
  permit nopass :network as root cmd /etc/rc.d/netif args onerestart
  permit nopass :network as root cmd /usr/sbin/service args squid onerestart
  permit nopass :network as root cmd dhclient
  permit nopass :network as root cmd ifconfig
  permit nopass :network as root cmd killall args -9 dhclient
  permit nopass :network as root cmd killall args -9 ppp
  permit nopass :network as root cmd killall args -9 wpa_supplicant
  permit nopass :network as root cmd ppp
  permit nopass :network as root cmd route
  permit nopass :network as root cmd tee args -a /etc/resolv.conf
  permit nopass :network as root cmd tee args /etc/resolv.conf
  permit nopass :network as root cmd umount
  permit nopass :network as root cmd wpa_supplicant

Groups I am member of.

% id vermaden | tr ' ' '\n' | tr ',' '\n'
uid=1000(vermaden)
gid=1000(vermaden)
groups=1000(vermaden)
0(wheel)
5(operator)
44(video)
69(network)
145(webcamd)
920(vboxusers)

I also do not rely on ‘stock’ fan speeds and set my own speeds according to CPU temperature with acpi-thinkpad-fan.sh script.

X11

While X11 did not need any custom configuration and it worked out of the box – I have done two things to make it work slightly differently.

First one is to allow CTRL+ALT+BACKSPACE fast way to restart X11.

t14 % cat /usr/local/etc/X11/xorg.conf.d/flags.conf
Section "ServerFlags"
  Option "DontZap" "off"
EndSection

The other one is to enable Tap to Click and Natural Scrolling on a Synaptics touchpad.

t14 % cat /usr/local/etc/X11/xorg.conf.d/touchpad.conf
Section "InputClass"
  Identifier "touchpad"
  MatchIsTouchpad "on"
  Driver "libinput"
  Option "Tapping" "on"
  Option "NaturalScrolling" "on"
EndSection

Comparison to ThinkPad W520

I compared the two laptops. While ThinkPad W520 is heavy and bulky the ThinkPad T14 (GEN1) is light and slim. They both have similar 5 hours battery time on FreeBSD.

You can see the screen brightness comparison between these two below.

LARGE-compare-screen-brightness

The ThinkPad T14 (GEN1) has several flavors of the FullHD screen – check reviews and specs for details. For the record – ThinkPad W520 is on the left.

Below you will find size comparisons.

The view from the top.

LARGE-compare-top

View from the side.

LARGE-compare-side

… and from the side one over another.

LARGE-compare-over

Desktop Environment

Openbox

As for the ‘desktop environment’ that I use – its my custom setup with Openbox along with tools like Tint2 and Dzen2 – for the most basic setup. The screenshot is from FreeBSD 11.1 but it looks exactly the same today.

freebsd-desktop-2019-04

I described this setup in details in the entire FreeBSD Desktop series.

XFCE

I have also tried XFCE – I liked it especially with the Global Menu appmenu plugin. You go this way with this XFCE Cupertino Way handy guide.

xfce-ghostbsd

GNOME

I also tried GNOME for a test – it did not suit me well so I went back to my Openbox setup – but You may find it more comfortable to use. Here is the FreeBSD GNOME 3 Fast Track article that will help you with that.

gnome-8-fixed

Temperatures

I used mine sensors.sh script for that – results below.

t14 # sensors.sh

            BATTERY/AC/TIME/FAN/SPEED
 ------------------------------------
             dev.acpi_ibm.0.fan_level: 1
             dev.acpi_ibm.0.fan_speed: 65535
                   dev.acpi_ibm.0.fan: 0
               dev.cpu.0.cx_supported: C1/1/1 C2/2/151 C3/3/1034
                   dev.cpu.0.cx_usage: 9.02% 35.95% 55.02% last 35us
                       dev.cpu.0.freq: 802
                       hw.acpi.acline: 0
                 hw.acpi.battery.life: 99
                 hw.acpi.battery.time: 275
                hw.acpi.cpu.cx_lowest: C8
                            powerd(8): running

                  SYSTEM/TEMPERATURES
 ------------------------------------
                dev.cpu.0.temperature: 38.0C (max: 100.0C)
                dev.cpu.1.temperature: 39.0C (max: 100.0C)
                dev.cpu.2.temperature: 39.0C (max: 100.0C)
                dev.cpu.3.temperature: 39.0C (max: 100.0C)
                dev.cpu.4.temperature: 40.0C (max: 100.0C)
                dev.cpu.5.temperature: 41.0C (max: 100.0C)
                dev.cpu.6.temperature: 38.0C (max: 100.0C)
                dev.cpu.7.temperature: 38.0C (max: 100.0C)
           dev.pchtherm.0.temperature: 46.0C
      hw.acpi.thermal.tz0.temperature: 46.1C (max: 128.1C)

                   DISKS/TEMPERATURES
 ------------------------------------
             smart.nvme0.temperature:: 44.0C

Accessories

There are some accessories that are very handy with the ThinkPad T14 laptop – I will describe them below.

Power Supply

You can use the default ThinkPad T14 power supply and you can also use any USB-C power delivery charger – that is nice addition.

Mouse Companion

After checking many mouse models – as described in the UNIX Mouse Shootout article – I finally settled with Logitech Triathlon M720 mouse. I have plugged the Lenovo USB Receiver into the back ‘powered’ USB port. While I use that mouse over the USB receiver you can also connect it using Bluetooth – also to other computers. This mouse has a special dedicated button to switch between 3 different computers. Unfortunately the copy-paste between them does not work πŸ™‚

mouse-M720

Battery

Some battery details below.

t14 % acpiconf -i 0
Design capacity:        50450 mWh
Last full capacity:     45760 mWh
Technology:             secondary (rechargeable)
Battery Swappable Capability:   Non-swappable
Design voltage:         11520 mV
Capacity (warn):        2288 mWh
Capacity (low):         200 mWh
Cycle Count:            204
Mesurement Accuracy:    95 %
Max Average Interval:   1000 ms
Min Average Interval:   500 ms
Low/warn granularity:   -1 mWh
Warn/full granularity:  -1 mWh
Model number:           5B10W13906
Serial number:           1071
Type:                   LiP
OEM info:               SMP
State:                  discharging
Remaining capacity:     99%
Remaining time:         4:31
Present rate:           10094 mW
Present voltage:        12681 mV

Experience

Today I ‘recognize’ three laptop keyboard layouts.

  • Best in class 7-row keyboards with INS/DEL and HOME/END and PGUP/PGDN keys block on the right top side.
  • Least PITA ThinkPad T14 like keyboards where PGUP/PGDN keys are in the ARROWS area and HOME/END/INS/DEL block is provided on the top right part.
  • Everything else that I treat like shit.

My fingers do not remember this HOME/END/INS/DEL block that much well – but at its still several ways of magnitude better then any Macbook keyboard layout.

Summary

I will still use mine ThinkPad W520 daily – I still do not need to move to other/less old laptop.

As you can see FreeBSD works quite well with modern laptops – hope someone can find that article useful.

UPDATE 1 – WiFi Works with FreeBSD 14.0-BETA1

As the FreeBSD 14.0-RELEASE is approaching completion I checked again the ThinkPad T14 WiFi with newer FreeBSD version. I am happy to report that now – with 14.0-BETA1 version of FreeBSD – the WiFi works. The iwlwifi(4) driver now successfully works. There is only one downside – its very slow – usable for browsing the Internet and stuff – but slow.

My ThinkPad W520 has Intel Centrino Ultimate-N 6300 WiFi card supported by the iwn(4) driver. This card was introduced in 2011 – 12 years ago. With that old Intel 6300 card I am able to reach 12 MB/s speed both for upload and download speeds on FreeBSD – using 802.11g mode as 802.11n is not (yet) supported on FreeBSD.

The Intel Comet Lake CNVi WiFi card from 2019 on ThinkPad T14 with current state of iwlwifi(4) driver allows about 500 KB/s for upload and 2.5 MB/s for download.

Still better then attaching the additional USB WiFi adapter or device passthru to Bhyve hypervisor for wifibox workaround πŸ™‚

EOF

Print on FreeBSD

Nothing compares more to the sense of power UNIX sysadmin experiences when being able to print from a command line on its UNIX system :p

I kinda omitted this topic (printing) for quite a lot of time – when I was using FreeBSD in the corporate environment I still printed from Windows VM on a network printers. Then they forced me to use Windows anyway. At home my wife always had a printer configured (as she uses it more) and the other printer also had USB port – so you could just copy the PDF or JPG file to a USB pendrive – attach it the printer and hit print button for the selected files. No configuration needed.

I was also disappointed when I tried several years ago to configure USB printer on FreeBSD … and failed.

Recently I though that its about fucking time to dig into that topic and have at least one working printer on FreeBSD.

cups
This guide will focus on using two printers with CUPS on FreeBSD:

  • HP Color LaserJet 200 M251nw Printer (attached over TCP/IP network)
  • Samsung Black/White ML-1915 Printer (local USB attached)

There will be two different prompt types used for the commands:

  • starting with % for commands that can be executed as regular user or root
  • starting with # for commands that must be executed as root user

The Table of Contents for this article is shown below.

  • CUPS Packages and Service Configuration
  • Network Printer – HP M251nw
  • Try to Print Some Document
  • USB Printer – Samsung ML-1915
  • Choose Default Printer
  • CUPS Printers Config
  • Command Line Printing
  • Last Chance Fancy Pants
  • Summary

CUPS Packages and Service Configuration

There are only three pkg(8) packages needed for my printers – these are:

# pkg install cups cups-filters splix

We will also need to add some lines to the /etc/devfs.rules file.

These lines are important for printing with CUPS:

add path 'lpt*'      mode 0660 group cups
add path 'ulpt*'     mode 0660 group cups
add path 'unlpt*'    mode 0660 group cups

The rest of the config is just the rest of my desktop config and can be omitted for printing.

The entire /etc/devfs.rules file looks as follows.

% cat /etc/devfs.rules
[desktop=10]
add path 'lpt*'      mode 0660 group cups
add path 'ulpt*'     mode 0660 group cups
add path 'unlpt*'    mode 0660 group cups
add path 'acd*'      mode 0660 group operator
add path 'cd*'       mode 0660 group operator
add path 'da*'       mode 0660 group operator
add path 'pass*'     mode 0660 group operator
add path 'xpt*'      mode 0660 group operator
add path 'fd*'       mode 0660 group operator
add path 'md*'       mode 0660 group operator
add path 'uscanner*' mode 0660 group operator
add path 'ugen*'     mode 0660 group operator
add path 'usb/*'     mode 0660 group operator
add path 'video*'    mode 0660 group operator
add path 'cuse*'     mode 0660 group operator

We will also need to add devfs_system_ruleset=desktop to the /etc/rc.conf file.

% grep desktop /etc/rc.conf
  devfs_system_ruleset=desktop

Now we need to restart the devfs daemon to read new config.

# service devfs restart

We can also make sure that devfs(8) know our ruleset config.

# devfs rule -s 10 show | column -t
100   path  acd*       group  operator  mode  660
200   path  cd*        group  operator  mode  660
300   path  da*        group  operator  mode  660
400   path  pass*      group  operator  mode  660
500   path  xpt*       group  operator  mode  660
600   path  fd*        group  operator  mode  660
700   path  md*        group  operator  mode  660
800   path  uscanner*  group  operator  mode  660
900   path  lpt*       group  cups      mode  660
1000  path  ulpt*      group  cups      mode  660
1100  path  unlpt*     group  cups      mode  660
1200  path  ugen*      group  operator  mode  660
1300  path  usb/*      group  operator  mode  660
1400  path  video*     group  operator  mode  660
1500  path  cuse*      group  operator  mode  660

The column(1) is not needed here – I used it only to format the output.

What amaze me to this day that column(1) command is still not available on such enterprise (and overpriced also) IBM AIX system πŸ™‚

Here are the contents of fresh CUPS installation at /usr/local/etc/cups dir.

# tree -F --dirsfirst /usr/local/etc/cups
/usr/local/etc/cups
β”œβ”€β”€ ppd/
β”œβ”€β”€ ssl/
β”œβ”€β”€ cups-files.conf
β”œβ”€β”€ cups-files.conf.sample
β”œβ”€β”€ cupsd.conf
β”œβ”€β”€ cupsd.conf.sample
β”œβ”€β”€ snmp.conf
└── snmp.conf.sample

3 directories, 6 files

You will need to add cupsd_enable=YES to the /etc/rc.conf file.

% grep cups /etc/rc.conf
  cupsd_enable=YES

Make sure that cupsd service is started and running.

# service cupsd start
Starting cupsd.

# service cupsd status
cupsd is running as pid 44515.

# sockstat -l4 | grep -e ADDRESS -e 631
USER     COMMAND    PID   FD PROTO  LOCAL ADDRESS         FOREIGN ADDRESS
root     cupsd      44515 6  tcp4   127.0.0.1:631         *:*

Just in case – here are the groups in which my vermaden user is:

% id | tr ',' '\n'
uid=1000(vermaden) gid=1000(vermaden) groups=1000(vermaden)
0(wheel)
5(operator)
44(video)
69(network)
145(webcamd)
920(vboxusers)

It was not needed to add my vermaden user to the cups group to print – but feel free to also test that if you face any problems.

Network Printer – HP M251nw

First I will go with the TCP/IP attached network printer – HP M251nw.

printer-HP-M251nw
Before doing any steps or configuration on FreeBSD part we first need to connect that printer to the TCP/IP network. As the HP M251nw printer has WiFi – I decided to connect it to my wireless WiFi router instead of using RJ45 cable. I will not document that part as HP already provides decent guide on how to achieve that – https://youtu.be/jLDzQBAtKyQ – on YouTube service.

In my case I used the 10.0.0.9 IP address and I configured my WiFi router to always attach that MAC address to that IP address.

printer-HP-M251nw-www

Next step is to open http://localhost:631/ page in your browser. You will see default CUPS web interface.

cups-page-01

Hit the Administration tab on the top. Then click the Add Printer button in the middle of the page – you will be asked for username and password – use your username and your password here.

cups-page-03-admin-01-ADD-PRINTER

The HP M251nw network attached browser has already been detected by CUPS. Select it and click Continue button.

cups-page-03-admin-03-ADD-PRINTER

CUPS will suggest some long names and description as showed below.

cups-page-03-admin-04-ADD-PRINTER

… but we will use simpler and shorter name instead.

cups-page-03-admin-05-ADD-PRINTER

Next we need to choose which driver to use.

We will not find a HP M251nw driver on the CUPS list but there are two drivers that will work here:

  • HP LaserJet Series PCL 6 CUPS (en)
  • HP Color LaserJet Series PCL 6 CUPS (en)

As HP M251nw is color printer we will choose HP Color LaserJet Series PCL 6 CUPS here.

cups-page-03-admin-06-ADD-PRINTER-driver

After a moment we will see a message that HP M251nw printer has been successfully added to CUPS.

cups-page-03-admin-07-ADD-PRINTER

You can notice that new PPD file appeared at CUPS dir named exactly like the printer name.

% ls -l /usr/local/etc/cups/ppd
total 9K
-rw-r----- 1 root cups 9721 2023-02-06 11:24 HP-M251nw.ppd
-rw-r----- 1 root cups 9736 2023-02-06 11:23 HP-M251nw.ppd.O

This is how our HP M251nw printer status page looks like.

cups-page-03-admin-08-ADD-PRINTER

We should now setup the default printing options. From the Administration drop down menu select Set Default Options option. The only things I selected/set that are different from the CUPS defaults are A4 paper size and 1200 DPI resolution.

cups-page-03-admin-09-ADD-PRINTER-prefs

Try to Print Some Document

I will now use Atril PDF viewer to test how the printing on the HP M251nw works – I used a small one page PDF file with one of my old guides – the ZFS Madness one from 2014. From the File menu select Print… option – or just hit [CTRL]+[P] shortcut.

PDF-print-01

Then select HP-M251nw printer from the list and hit the Print button below.

PDF-print-02

After some noises and time (not much later) the printer dropped a printed page. Seems to work properly.

real-printed-page

Looks good.

Lets now add USB printer.

USB Printer – Samsung ML-1915

To get needed PPD driver for the Samsung ML-1915 printer we installed the print/splix package.

printer-SAMSUNG-ML-1915

Here is the exact driver we will use.

% pkg info -l splix | grep 1915
        /usr/local/share/cups/model/samsung/ml1915.ppd

Before attaching the Samsung ML-1915 printer to your computer you may check what devices devd(8) will create.

First power on the Samsung ML-1915 printer.

Then attach the USB cable from the printer to your FreeBSD box (assuming that printer has AC power and is powered on).

You should see something similar from devd(8) daemon.

# nc -U /var/run/devd.pipe
!system=DEVFS subsystem=CDEV type=CREATE cdev=usb/0.3.0
!system=DEVFS subsystem=CDEV type=CREATE cdev=ugen0.3
!system=DEVFS subsystem=CDEV type=CREATE cdev=usb/0.3.2
!system=DEVFS subsystem=CDEV type=CREATE cdev=usb/0.3.3
!system=USB subsystem=DEVICE type=ATTACH ugen=ugen0.3 cdev=ugen0.3 vendor=0x04e8 product=0x3297 devclass=0x00 devsubclass=0x00 sernum="Z2L9BACSC00641K." release=0x0100 mode=host port=2 parent=ugen0.2
!system=USB subsystem=INTERFACE type=ATTACH ugen=ugen0.3 cdev=ugen0.3 vendor=0x04e8 product=0x3297 devclass=0x00 devsubclass=0x00 sernum="Z2L9BACSC00641K." release=0x0100 mode=host interface=0 endpoints=2 intclass=0x07 intsubclass=0x01 intprotocol=0x02
!system=DEVFS subsystem=CDEV type=CREATE cdev=ulpt0
!system=DEVFS subsystem=CDEV type=CREATE cdev=unlpt0
+ulpt0 at bus=0 hubaddr=2 port=2 devaddr=3 interface=0 ugen=ugen0.3 vendor=0x04e8 product=0x3297 devclass=0x00 devsubclass=0x00 devproto=0x00 sernum="Z2L9BACSC00641K." release=0x0100 mode=host intclass=0x07 intsubclass=0x01 intprotocol=0x02 on uhub4

These are the created devices.

% ls -ltra /dev | tail -3
lrw-rw----  1 root     operator      9 2023-02-06 11:38 ugen0.3 -> usb/0.3.0
crw-rw----  1 root     cups     2, 113 2023-02-06 11:38 ulpt0
crw-rw----  1 root     cups     2, 114 2023-02-06 11:38 unlpt0

They are created with proper cups group.

Now we will go to the CUPS web page at http://localhost:631/ again to add the Samsung ML-1915 printer.

Go again to the Administration tab and click Add Printer button.

cups-page-03-admin-01-ADD-PRINTER

The Samsung ML-1915 should be already detected as local printer as shown below.

cups-samsung-01-ADD-PRINTER

Select it and hit Continue button.

As earlier we will use shorter more reasonable name.

cups-samsung-03-ADD-PRINTER

We will then select Samsung ML-1915, 2.0.0 (en, en) driver for this printer.

cups-samsung-04-ADD-PRINTER

… and Samsung ML-1915 black/white printer has been added.

cups-samsung-06-ADD-PRINTER

Same as earlier the PPD file is copied to the /usr/local/etc/cups/ppd CUPS dir.

% ls -l /usr/local/etc/cups/ppd
total 14K
-rw-r----- 1 root cups  9721 2023-02-06 11:24 HP-M251nw.ppd
-rw-r----- 1 root cups  9736 2023-02-06 11:23 HP-M251nw.ppd.O
-rw-r----- 1 root cups 12391 2023-02-06 11:58 Samsung-ML-1915.ppd

You now have two printers configured in CUPS.

cups-samsung-07-ADD-PRINTER

Choose Default Printer

I will now choose the HP M251nw printer as the default for two reasons. First – its always available as its attached over WiFi. Second – its more powerful and provides color at the same time.

To do that I went to the Printers and clicked the HP M251nw printer.

cups-samsung-08-ADD-PRINTER

Next from the Administration drop down menu I have chosen Set As Server Default option.

cups-samsung-09-ADD-PRINTER

From now on – if not explicitly specified – all the print jobs will land on the HP M251nw printer.

cups-samsung-10-ADD-PRINTER

CUPS Printers Config

After our actions CUPS stored two printers configuration in its /usr/local/etc/cups/printers.conf config file.

# cat /usr/local/etc/cups/printers.conf
# Printer configuration file for CUPS v2.4.2
# Written by cupsd
# DO NOT EDIT THIS FILE WHEN CUPSD IS RUNNING
NextPrinterId 3
<DefaultPrinter HP-M251nw>
PrinterId 1
UUID urn:uuid:b760d323-5f46-36cd-4ca0-d9015c9fb7ca
Info 
Location 
MakeModel HP Color LaserJet Series PCL 6 CUPS
DeviceURI socket://10.0.0.9
State Idle
StateTime 1675683146
ConfigTime 1675679066
Type 8400972
Accepting Yes
Shared No
JobSheets none none
QuotaPeriod 0
PageLimit 0
KLimit 0
OpPolicy default
ErrorPolicy stop-printer
Attribute marker-colors \#000000,#00FFFF,#FF00FF,#FFFF00
Attribute marker-levels 99,98,98,99
Attribute marker-names Black Cartridge HP CF210X,Cyan Cartridge HP CF211A,Magenta Cartridge HP CF213A,Yellow Cartridge HP CF212A
Attribute marker-types toner,toner,toner,toner
Attribute marker-change-time 1675683146
</DefaultPrinter>
<Printer Samsung-ML-1915>
PrinterId 2
UUID urn:uuid:4434851b-5516-3b73-702a-286dabf630b0
Info 
Location 
MakeModel Samsung ML-1915, 2.0.0
DeviceURI usb://Samsung/ML-191x%20252x%20Series?serial=Z2L9BACSC00641K.
State Idle
StateTime 1675681099
ConfigTime 1675681099
Type 12372
Accepting Yes
Shared No
JobSheets none none
QuotaPeriod 0
PageLimit 0
KLimit 0
OpPolicy default
ErrorPolicy stop-printer
</Printer>

Command Line Printing

Besides being able to print from graphical applications that support CUPS we can also print directly from the command line if needed.

Use lpstat(1) command to see all available printers – including the default one.

% lpstat -p -d
printer HP-M251nw is idle.  enabled since Mon Feb  6 12:02:39 2023
printer Samsung-ML-1915 is idle.  enabled since Mon Feb  6 11:58:19 2023
system default destination: HP-M251nw

You can check more information about the default printer with lpoptions(1) command.

% lpoptions -l
PageSize/Media Size: Letter Legal Executive Tabloid A3 *A4 A5 B5 EnvISOB5 Env10 EnvC5 EnvDL EnvMonarch
InputSlot/Media Source: *Default Auto MultiPurpose Upper Lower LargeCapacity Manual Envelope
ColorModel/Output Mode: *RGB Gray
Resolution/Output Resolution: 150dpi 300dpi 600dpi *1200dpi
Duplex/Double-Sided Printing: *None DuplexNoTumble DuplexTumble
OptionDuplex/Duplexer: True *False

… or even more details and information when executed without arguments.

I have used tr(1) tool to make the output more readable as by default all this information is separated only by spaces.

% lpoptions | tr ' ' '\n'
copies=1
device-uri=socket://10.0.0.9
finishings=3
job-cancel-after=10800
job-hold-until=no-hold
job-priority=50
job-sheets=none,none
marker-change-time=1675681359
marker-colors=#000000,#00FFFF,#FF00FF,#FFFF00
marker-levels=99,98,98,99
marker-names='Black\
Cartridge\
HP\
CF210X,Cyan\
Cartridge\
HP\
CF211A,Magenta\
Cartridge\
HP\
CF213A,Yellow\
Cartridge\
HP\
CF212A'
marker-types=toner,toner,toner,toner
number-up=1
print-color-mode=color
printer-commands=AutoConfigure,Clean,PrintSelfTestPage
printer-info
printer-is-accepting-jobs=true
printer-is-shared=false
printer-is-temporary=false
printer-location
printer-make-and-model='HP
Color
LaserJet
Series
PCL
6
CUPS'
printer-state=3
printer-state-change-time=1675681359
printer-state-reasons=none
printer-type=10629196
printer-uri-supported=ipp://localhost/printers/HP-M251nw

We will now print the same PDF document using command line with lp(1) command.

% lp ZFS-Madness-2014.pdf
request id is HP-M251nw-02 (1 file(s))

Believe me or not – that PDF document got printed exactly the same as when invoked from Atril PDF browser.

Last Chance Fancy Pants

There is of course a chance that your printer will not be detected – or it will not print – or the driver will not attach to it properly … life happens.

What then? Fuck it. There is even more fun way to print … even without any drivers or configuration … directly with nc(1) command πŸ™‚

First lets check of your printer listens on 9100 port – this is called HP JetDirect.

% grep 9100 /etc/services
jetdirect       9100/tcp   #HP JetDirect card
pdl-datastream  9100/tcp   #Printer PDL Data Stream
pdl-datastream  9100/udp   #Printer PDL Data Stream

% nmap -A 10.0.0.9
Starting Nmap 7.93 ( https://nmap.org ) at 2023-02-06 23:41 CET
Nmap scan report for 10.0.0.9
Host is up (0.0072s latency).
Not shown: 988 closed tcp ports (conn-refused)
PORT     STATE SERVICE        VERSION
21/tcp   open  ftp            oftpd
| ftp-anon: Anonymous FTP login allowed (FTP code 230)
|_.
|_ftp-bounce: bounce working!
| ftp-syst:
|_  SYST: .
23/tcp   open  telnet         HP LaserJet printer telnetd (busy)
80/tcp   open  soap           gSOAP 2.7
| http-server-header:
|   Virata-EmWeb/R6_2_1
|_  gSOAP/2.7
81/tcp   open  tcpwrapped
82/tcp   open  tcpwrapped
83/tcp   open  tcpwrapped
443/tcp  open  ssl/tcpwrapped
| ssl-cert: Subject: commonName=NPI04344D/organizationName=Hewlett-Packard Co.
| Not valid before: 2012-09-01T00:00:00
|_Not valid after:  2022-09-01T00:00:00
|_http-server-header: gSOAP/2.7
|_ssl-date: TLS randomness does not represent time
515/tcp  open  printer
631/tcp  open  soap           gSOAP 2.7
| http-server-header:
|   Virata-EmWeb/R6_2_1
|_  gSOAP/2.7
5222/tcp open  tcpwrapped
| xmpp-info:
|   STARTTLS Failed
|   info:
|     features:
|     auth_mechanisms:
|     xmpp:
|     unknown:
|     compression_methods:
|     errors:
|       (timeout)
|_    capabilities:
8080/tcp open  soap           gSOAP 2.7
| http-server-header:
|   Virata-EmWeb/R6_2_1
|_  gSOAP/2.7
9100/tcp open  jetdirect?
Service Info: OS: Unix; Device: printer

Service detection performed. Please report any incorrect results at https://nmap.org/submit/ .
Nmap done: 1 IP address (1 host up) scanned in 20.37 seconds

Lets try to connect to it with nc(1) tool.

% nc -v 10.9 9100
Connection to 10.9 9100 port [tcp/jetdirect] succeeded!

… and yes you do not have to always type that whole 10.0.0.9 address as the middle zeroes can be omitted and 10.9 will be interpretted as 10.0.0.9 address.

Something basic for a start – a plain text print.

% lsblk | nc 10.9 9100

In a moment you should have the output of lsblk(8) command printed on a page.

Lets try something more fancy like a PDF file then.

% nc 10.9 9100 < ZFS-Madness-2014.pdf

Yep. Printed. No CUPS configuration needed here.

Maybe I should start the article with that instead πŸ™‚

Summary

Not sure what I can add here as I am definitely not printing expert.

Hope these instructions will help you to setup your printer on FreeBSD (or any other CUPS supported) system.

EOF

Keep FreeBSD Desktop Updated

While its relatively easy (or brain dead easy with GhostBSD or NomadBSD distributions) to install and configure a FreeBSD Desktop – one have to keep in mind that its also important to keep that system updated and secure.

There are many aspects about FreeBSD to keep it updates and secured.

The Table of Contents for this article is shown below:

  • FreeBSD Base System
  • Packages
  • FreeBSD Linux Browser Installer
  • WINE
  • Cargo Packages
  • FreeBSD Ports Tree
  • Summary

Lets now discuss each section one by one.

FreeBSD Base System

First is the FreeBSD Base System which is updated by the frebsd-update(8) utility. It is not often you need to do this – from my experience its once a month need usually.

The list of needed commands are shown below.

# freebsd-version
# frebsd-update fetch
# frebsd-update install

While the freebsd-version(1) will tell you what version you are currently running the freebsd-update(8) will help you to update your FreeBSD system to have latest patches installed.

… but when to update the FreeBSD Base System anyway? Well – its quite simple – check the FreeBSD Security Advisories page – and if something posted there affects you – then you should move your ass and update it πŸ™‚

Packages

After you have taken care of the FreeBSD Base System the next one to make sure you are not too much far behind are the FreeBSD packages.

You can of course check if any of your installed packages have any reported security holes as shown below.

# pkg audit -F
vulnxml file up-to-date
0 problem(s) in 0 installed package(s) found.

The above message shows that your installed packages are safe – but its not the message you see the most of the time πŸ™‚

Below are the commands that you would use to update your FreeBSD desktop system.

# pkg upgrade
# pkg autoremove
# pkg clean -y --all

… and yes it does include some extra steps to remove cached packages – and probably now not needed as the are already installed anyway.

I do not think that anything more should be added here – maybe a short mention about the packages branch you are using. The default one is the quarterly branch that has packages build every quarter.

Maybe its sometimes reasonable for the server like environments – but I prefer to have the latest versions of what FreeBSD maintainers do offer in their hard and often underestimated work.

This is why I always use – both on desktop and servers – the latest packages branch.

This means that packages are (re)built once a week or faster and you get what is latest and fresh.

I will not convince you what is better – you will have to decide for yourself.

FreeBSD Linux Browser Installer

The Linux Browser Installer helps a lot on FreeBSD systems. It provides browsers (via the Linux Compatibility Layer) that are not natively available on FreeBSD – but with DRM sh!t needed to access for example Netflix content.

The Linux Browser Installer is easy to install – but its also easy to update.

Below you will find commands that will keep your Linux Browser Installer updated and secure.

EDIT: You will need small patch to make it work currently – patch fetch and apply added in this color below – check Fix linux-browser-installer(8) on FreeBSD for details.

# git clone https://github.com/mrclksr/linux-browser-installer.git
# cd linux-browser-installer
# fetch https://raw.githubusercontent.com/vermaden/scripts/master/linux-browser-installer.PATCH
# patch < linux-browser-installer.PATCH
# ./linux-browser-installer chroot upgrade
# cd ../
# rm -rf linux-browser-installer

WINE

One may think that WINE is just another package and that it was already updated during the # pkg upgrade cycle – it depends – the default WINE package is for 64bit excusables … but its also possible to run (and often needed) the older 32bit executables.

The problem is that the 32bit environment has its own separate root with its own packages set.

To be honest its not a big deal – you just need to remember to update it along with other things you update periodically πŸ™‚

Below is the command that updates the 32bit WINE binaries/packages.

% /usr/local/share/wine/pkg32.sh upgrade
% /usr/local/share/wine/pkg32.sh autoremove
% /usr/local/share/wine/pkg32.sh pkg clean -y --all

One of the things you need to keep in mind that it is done by you (user) and not the root user of the machine.

Cargo Packages

While 95% of this topic is covered above – no one prevents you from using the additional Cargo packages – and I do it myself also.

Its just that some software is not yet available by the official FreeBSD packages – but its already official by using the Cargo packages.

I personally use about 10 different Cargo packages that are still not available on the FreeBSD packages.

update

Here are the instructions to keep these Cargo packages updated.

First and most important – you need to install the cargo-update package to be able to update installed Cargo packages.

Then you may just use the other command to have Cargo packages updated.

# cargo install cargo-update
# cargo install-update -a

FreeBSD Ports Tree

Last but not least – the FreeBSD Ports Tree – which even if you only use binary packages – can often come handy in some exceptions.

We all know the ‘default’ rule that mixing Packages and Ports is a bad idea in the FreeBSD world – and I generally agree – its a bad idea if you do not know what you are doing.

If you do know what you are doing – you may mix anything with everything – just do not spam the FreeBSD Forums for help later πŸ™‚

The tool to update the local FreeBSD Ports Tree on your machine is still portsnap(8) and the auto argument is usually more then enough.

# portsnap auto

From the other things – you may want to setup the WRKDIRPREFIX variable to have everything built in the /usr/ports/obj directory – to have everything in one place.

# grep WRKDIRPREFIX /etc/make.conf
WRKDIRPREFIX=${PORTSDIR}/obj
# rm -rf \
    /usr/ports/obj \
    /usr/ports/distfiles

I often also clean the /usr/ports/obj and /usr/ports/distfiles directories.

Summary

Besides the things that I have wrote above I also sometimes save some binaries to the ~/scripts/bin path. There is not upgrade path for them besides manually checking the provider page.

Some examples of such software on my system are doso or cpuc ones.

As I do not have anything more to add here – please feel free to comment what is missing in keeping your workstation updated and secure.

EOF

Native Urban Terror on FreeBSD

Welcome to 2023 and let me start a first article of this new year with a … guest post by @NeoMoevius from Twitter. That is right. I did not invented it. I did not created it. I only partially wrote it – treat me as a ghost writer here. ll the thanks and welcomes goes directly to @NeoMoevius – I am just a messenger here πŸ™‚

This post will be about playing (and first building – of course) the Urban Terror game on FreeBSD system. It is about how to build and install Urban Terror 4.3 on FreeBSD without Linux emulation or using WINE. Natively. This will be on the latest and supported FreeBSD 13.1-RELEASE system.

There are not many steps to make it happen. First – just download the official Urban Terror ZIP file.

% mkdir _UT
% cd _UT
% fetch http://cdn.urbanterror.info/urt/43/releases/zips/UrbanTerror434_full.zip
UrbanTerror434_full.zip                         3% of 1403 MB 1836 kBps 11m38s
% unzip UrbanTerror434_full.zip
% cd UrbanTerror43
% pwd
/home/vermaden/_UT/UrbanTerror43

Lets leave that alone for now πŸ™‚

We will also need to install some dependencies.

# pkg install -y \
    devel/sdl20 \
    devel/pkgconf \
    devel/gmake \
    ftp/curl \
    graphics/sdl2_image \
    graphics/sdl2_ttf \
    audio/sdl2_mixer \
    audio/openal-soft

We will now need to download and compile source code of ioquake 3 for Urban Terror.

% mkdir _IOQ3
% cd _IOQ3
% git clone https://github.com/mickael9/ioq3.git
Cloning into 'ioq3'...
remote: Enumerating objects: 28169, done.
Receiving objects:  19% (5353/28169), 6.77 MiB | 2.24 MiB/s
% cd ioq3
% gmake
% echo ${?}
0
% cd build/release-freebsd-x86_64
% ls -l
total 2773K
drwxr-xr-x 2 vermaden vermaden       2 2023-01-20 20:11 autoupdater/
drwxr-xr-x 4 vermaden vermaden     228 2023-01-20 20:12 client/
drwxr-xr-x 2 vermaden vermaden     154 2023-01-20 20:11 ded/
drwxr-xr-x 2 vermaden vermaden     166 2023-01-20 20:12 renderergl1/
drwxr-xr-x 3 vermaden vermaden      77 2023-01-20 20:12 renderergl2/
-rwxr-xr-x 1 vermaden vermaden  862712 2023-01-20 20:12 renderer_opengl1_x86_64.so
-rwxr-xr-x 1 vermaden vermaden 1143552 2023-01-20 20:12 renderer_opengl2_x86_64.so
-rwxr-xr-x 1 vermaden vermaden 2133400 2023-01-20 20:12 urbanterror-m9.x86_64
-rwxr-xr-x 1 vermaden vermaden  970368 2023-01-20 20:11 urbanterror-server-m9.x86_64

The files that are interesting for us are listed below:

  • renderer_opengl1_x86_64.so
  • renderer_opengl2_x86_64.so
  • urbanterror-m9.x86_64
  • urbanterror-server-m9.x86_64

… and now you will need to copy these four files into the Urban Terror folder when you have uncompressed the game.

% cp \
    renderer_opengl1_x86_64.so   \
    renderer_opengl2_x86_64.so   \
    urbanterror-m9.x86_64        \
    urbanterror-server-m9.x86_64 \
    /home/vermaden/_UT/UrbanTerror43

% cd /home/vermaden/_UT/UrbanTerror43

% pwd
/home/vermaden/_UT/UrbanTerror43

% ls -l
total 8495K
drwxr-xr-x 2 vermaden vermaden      30 2023-01-20 20:19 q3ut4/
drwxr-xr-x 3 vermaden vermaden       3 2023-01-20 20:19 Quake3-UrT.app/
-rw-r--r-- 1 vermaden vermaden 1082800 2018-06-21 22:08 Quake3-UrT-Ded.exe
-rwxr-xr-x 1 vermaden vermaden  816002 2018-06-21 22:08 Quake3-UrT-Ded.i386
-rwxr-xr-x 1 vermaden vermaden  961958 2018-06-21 22:08 Quake3-UrT-Ded.x86_64
-rw-r--r-- 1 vermaden vermaden 2634689 2018-06-21 22:08 Quake3-UrT.exe
-rwxr-xr-x 1 vermaden vermaden 1702624 2018-06-21 22:08 Quake3-UrT.i386
-rwxr-xr-x 1 vermaden vermaden 1940280 2018-06-21 22:08 Quake3-UrT.x86_64
-rwxr-xr-x 1 vermaden vermaden  862712 2023-01-20 20:20 renderer_opengl1_x86_64.so
-rwxr-xr-x 1 vermaden vermaden 1143552 2023-01-20 20:20 renderer_opengl2_x86_64.so
-rwxr-xr-x 1 vermaden vermaden 2133400 2023-01-20 20:20 urbanterror-m9.x86_64
-rwxr-xr-x 1 vermaden vermaden  970368 2023-01-20 20:20 urbanterror-server-m9.x86_64

We will now try to start that Urban Terror game.

% pwd
/home/vermaden/_UT/UrbanTerror43

% ./urbanterror-m9.x86_64
ioq3-UrT m9-builds/31 freebsd-x86_64 Jan 20 2023
SSE instruction set enabled
----- FS_Startup -----
We are looking in the current search path:
/home/vermaden/.q3a/q3ut4
./q3ut4
./q3ut4/zUrT43_qvm.pk3 (4 files)
./q3ut4/zUrT43_021.pk3 (85 files)
./q3ut4/zUrT43_020.pk3 (295 files)
./q3ut4/zUrT43_019.pk3 (342 files)
./q3ut4/zUrT43_018.pk3 (801 files)
(...)

Seems to start and work properly.

Here are several shots of what I tried to play it for some single online event.

urban-terror-01

urban-terror-02

urban-terror-03

urban-terror-04

All the screens above are in the windowed more but you can switch between window and full screen with [ALT]+[ENTER] shortcut at anytime. It was just easier for me to catch several shots for this article πŸ™‚

Seems I am definitely not the best at this game :p

urban-terror-05

The Urban Terror game run smooth on my Intel HD Graphics 3000 card.

Fortunately I did not need to switch BIOS settings to start my decade old Nvidia Quadro 2000M monster :p

Not sure what I can add here – definitely a kind thank You for @NeoMoevius for his offer of making this content available for You πŸ™‚

Regards.