After playing/working with computers for more then 25 years I started to appreciate small but handy valuable stuff – like adapters or handlers or … yeah – all kind of stuff. With many of them I did not even knew they existed until I find out about them – mostly accidentally or after long searching for some problem solution. Today I will share them with You – so maybe they will end up handy also for You.
… and while they make my life easier – they are mostly very cheap too.
The Table of Contents is below.
- RJ45 Angle Adapters
- RJ45 Angle Cable Adapters
- RJ45 Join Adapters
- SATA to USB-C or USB-A Adapters
- Angle USB-C and USB-A Adapters
- USB-A <=> USB-C Adapters
- Tiny USB WiFi or Bluetooth Dongle
- USB-C <=> Micro USB Adapter
- USB-C <=> Laptops/Routers/5.5mmx2.5mm Adapters
- Creative BT-W2 USB-A Bluetooth Adapter
- External Microphone for SONY Headphones
- Headphones Handle
- Dual USB-C and USB-A Pendrive (SanDisk)
- Tiny USB-A Hub
- Quad USB-C / USB-A / Lightning / Micro USB Adapter with MicroSD Card Slot
- Angle Power Adapters
- C13/C14 Power Adapters with Additional C1/C2 or C5/C6 Sockets
- HDMI 3in1 Switch with Remote Control
- Cable Organizers
- Mouse Jigger
- FM Transmitter
- Summary
The whole article can ‘feel’ like a sponsored entry for the https://aliexpress.com portal – but it is not – its just the most cheap place I was able to find these gems. Feel free to share even cheaper one if You have one.
~
RJ45 Angle Adapters
I mostly use laptops to do various tasks and cables sticking out on the sides perpendicularly does not help. Not many laptops today have the RJ45 LAN socket – but if they do – they are mostly on the side of the laptop.

Thanks to such angle RJ45 adapters it is no longer a problem.
You can find them for about $2 – for example – on https://aliexpress.com page – with the RJ45 ANGLE ADAPTER keywords in their search.
~
RJ45 Angle Cable Adapters
The mentioned earlier RJ45 Angle Adapters are quite bulky – but as an alternative its possible to get a short 40cm cable with smaller plug.
Not sure if its noticeable on the picture below – but I also cut the top ‘cover’ with knife of the plug – so its easier to detach.
There are of course all four angles to choose from.

One may also use the end of that 40cm cable-adapter as a ‘stopper’ to not fall inside the desk hole as shown on the image below.

You can find them for about $2 – for example – on https://aliexpress.com – with the RJ45 ANGLE ADAPTER CABLE keywords in their search.
~
RJ45 Join Adapters
Often I found myself in a situation that the currently available LAN cable was too short to reach and it needed a lot of work to plot another – longer one.

With these simple ‘join’ adapters it is no longer a problem. You would not use them in a serious Data Center with 10+ GE speeds – but for home 1.0-2.5 GE speeds its more then enough.
You can find them for about $1-$2 – for example – on https://aliexpress.com – with the RJ45 JOIN ADAPTER keywords in their search.
~
SATA to USB-C or USB-A Adapters
Multiple times I needed to clone some old disk to new SSD – just to make an old system faster.

I usually boot from some USB drive with FreeBSD and while new SSD is attached with these adapters – I then execute dd(8) command to clone the old HDD disk to new SSD drive … and then just swap them out.
You can find them for about $1-$5 – for example – on https://aliexpress.com – with the SATA USB ADAPTER keywords in their search.
~
Angle USB-C and USB-A Adapters
As we already talked about RJ45 angle adapters … there are also USB-C and USB-A angle adapters.

The do the same good job with cables to not stick out on a side of a laptop.


You can find them for about $1-$3 – for example – on https://aliexpress.com – with the ANGLE USB ADAPTER keywords in their search.
~
USB-A <=> USB-C Adapters
In the progressing and always changing world yesterday the USB-A was king and tomorrow the USB-C will be.

There are multiple cases in which you will need these – from simple USB headphones to USB pendrives and other stuff.
You can find them for about $1-$3 – for example – on https://aliexpress.com – with the USB-C USB-A ADAPTER keywords in their search.
~
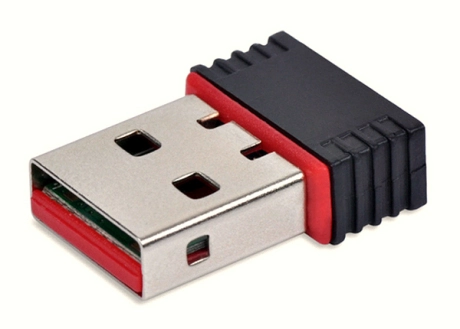
Tiny USB WiFi or Bluetooth Dongle
Multiple times I have found myself in a situation where it was very convenient to just add some WiFi or Bluetooth chip over USB port and do the job instead of trying to achieve the same without such chips.

While I usually omit Bluetooth I can not say the same about WiFi … and as FreeBSD lacks a little in that department – using a very tiny chip such as Realtek RTL8188CUS often does the job done.
You can find them for about $1-$3 – for example – on https://aliexpress.com – with the WIFI USB or BLUETOOTH USB keywords in their search.
~
USB-C <=> Micro USB Adapter
In the past – in the USB Micro times – I remember using an adapter to be able to charge – then new and uncommon – USB-C devices.
Fast forward several years and now the situation is the other way around (as expected). The USB-C is the standard and USB Micro devices are less and less common … but there are still here. To not have to keep separate dedicated USB Micro cables I use a small USB-C to USB Micro adapters.

Such adapter takes USB-C as input power and is able to charge USB Micro devices.
You can find them for about $1-$2 – for example – on https://aliexpress.com – with the USB-C USB MICRO ADAPTER keywords in their search.
~
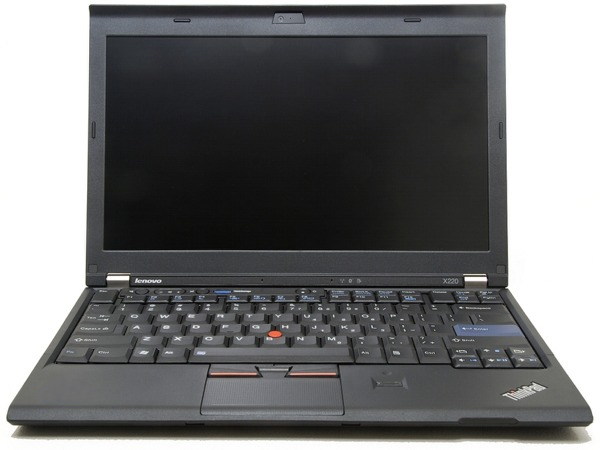
USB-C <=> Laptops/Routers/5.5mmx2.5mm Adapters
When it comes to delivering power to my (and not only) laptops – the new standard seems to be the USB-C connector with ‘requirement’ of 45W or more (it depends).
Not that long ago I discovered that even laptops as old as 13 years – ThinkPad X220/T420s/W520 – can be powered the same – but with simple and very cheap adapter cables – such as these below. From the left there is 5.5mm/2.5mm typical router socket – then more modern ThinkPad X270/T470s (and many more) – then oldschool models from 2011 year – ThinkPads such as X220/T420s/W520 models.
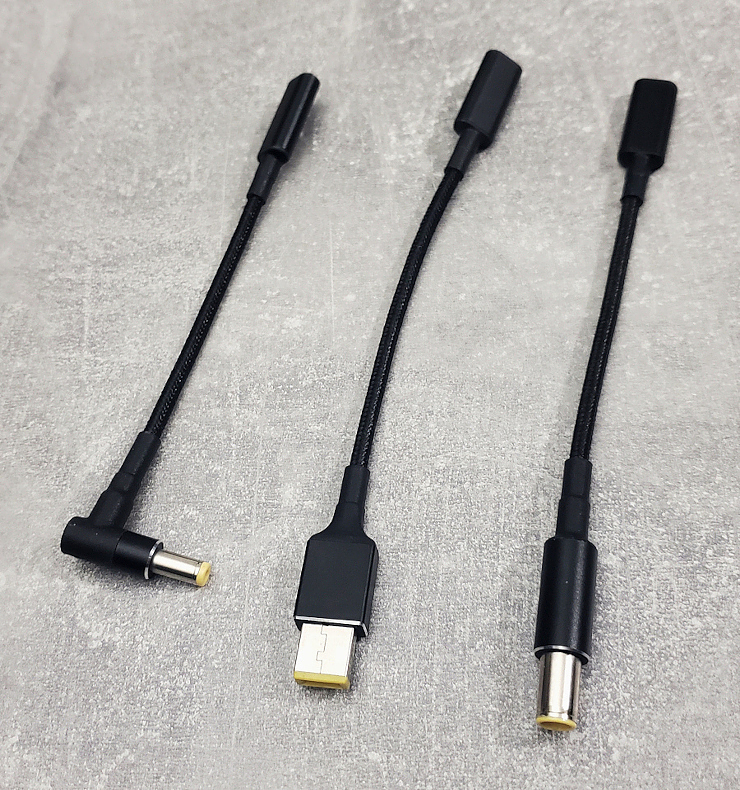
All they need is a USB-C power input.

You need to only meet two requirements – the USB charger that will make enough power for example 20V at 3.25A for 65W that would power ThinkPad X220/T420s or 20V at 6.75A for 135W that would power ThinkPad W520. While the official power supply for ThinkPad W520 is 170W – its perfectly fine to use the 135W power adapter from ThinkPad W510 to power ThinkPad W520 laptop.
This makes organizing cables (and chargers) a lot easier – for example – I would not be able to fit 3 ‘dedicated’ ThinkPad chargers in that white cable organizer behind laptops – but I will fir there two powerful 65W and 85W USB-C chargers perfectly fine.


You can find these power adapters for about $1-$3 – for example – on https://aliexpress.com – with the USB-C ADAPTER LAPTOP ROUTER keywords in their search.
~
Creative BT-W2 USB-A Bluetooth Adapter
When I have to cope with Bluetooth technology – its ‘tolerable’ on Android devices such as phones/tablets and mostly nowhere else. After bad audio (just not working) Bluetooth possibilities on FreeBSD I decided to try the hardware solution instead. The audio related Bluetooth on FreeBSD have failed me too many times – to the point called enough is enough – that also means I do not want to waste any more time trying to figure the way using FreeBSD Bluetooth stack devices anymore – at least for audio related devices.
Not so long ago I got the Sony WH1000XM4 headphones. I am/was a big fan of the Technics RP-F290 cable headphones (Jack or Mini Jack based). They have so much BASS and ‘power’ that I could not ask for more … and their cost is very low – like $24 or less. The only ‘downside’ of the Technics RP-F290 headphones is that they are audio only – they do not have any microphone at all – they are dedicated for music only – and that is OK – they do GREAT in that role.
I have tried some Bluetooth based headphones in the past – and they were SHIT to say the least. Not enough ‘power’ – not enough BASS etc. After reading multiple reviews I decided to give Sony WH1000XM4 headphones a chance … and I was not disappointed. Its the first time after Technics RP-F290 cable headphones that ANY Bluetooth based headphone delivered. I was (and I still am) really satisfied with them.
This is where the USB powered Creative BT-W2 comes handy. Its also relatively cheap as the cost of used unit is less then $20 – at least that is the price I payed for mine in Poland. The Creative BT-W2 allows to connect Bluetooth audio devices everywhere – even on OpenBSD – on the system that cut off Bluetooth stack entirely – and it works well on FreeBSD too. The ‘downside’ of the Sony WH1000XM4 headphones is that they do have microphone – but only in Bluetooth node – they have Mini Jack connector – but for audio only …

This is also only downside of the Creative BT-W2 solution – it transmits only audio – but w/o microphone. Its more then OK for listening music – but if You have to do live conferencing/meetings on FreeBSD as I do – its a dead end.
I have tried to find a solution to this problem – to the point that I wanted to abandon Sony WH1000XM4 headphones entirely and find some Mini Jack (or Jack) based BASS oriented headphones that will also have a working microphone.
On my journey I have found a solution that I did not expected at all – and that was the solution that solved all my problems – and allowed me to enjoy the Sony WH1000XM4 headphones – but more about that in the next ‘subsection’.
~
External Microphone for SONY Headphones
You already know the downsides of the Sony WH1000XM4 headphones that were giving me headaches. Now its time to address them.
After many hours of searching the Internet I have found a very ‘usable’ Mini Jack cable. A cable that came with microphone and a one that perfectly integrated with Sony WH1000XM4 headphones … and FreeBSD as well.
Its available to buy for $22 on amazon.de (and possible other locations) and its called Boom Microphone Cable. Thanks to the knowledge that Sony WH1000XM4 headphones have Mini Jack port with microphone part – the Boom Microphone Cable cable even comes with volume controls and even come with physical kill switch for microphone.

After You attach this Boom Microphone Cable to the Sony WH1000XM4 headphones it looks (and works) like a natural solution.
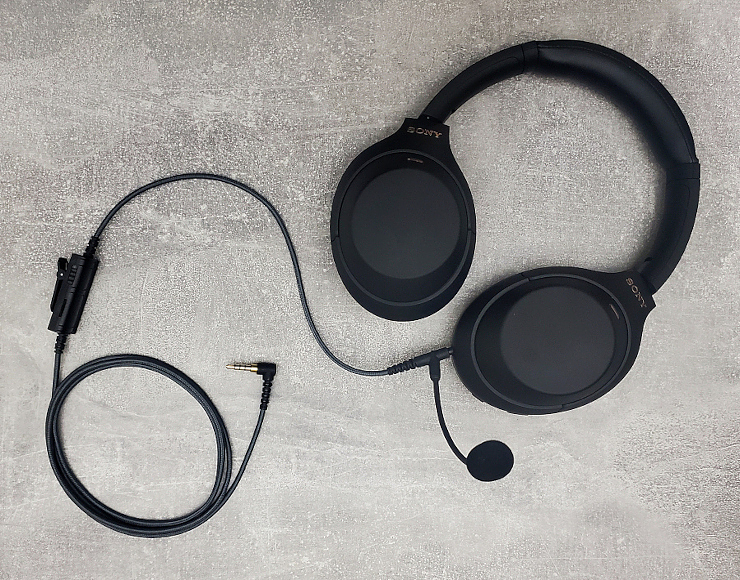
The only ‘downside’ is generally the downside of the Sony WH1000XM4 headphones – that You CAN NOT disable their silencing while you speak – so using them in ‘passive’ mode with Boom Microphone Cable is preferred to meet all needs.
EDIT: After reading comments to this article I learned that this ‘silencing’ is called Speak to Chat and it can be disabled in the SONY Android app or by holding two fingers on the right earcup until the headphones say “Speak to Chat disabled.” Thank You for that.
~
Headphones Handle
I got used to the fact that I just put my headphones on the desk … but I wanted something more useful – after some searching it was obvious to me that I needed just some headphones handle that I could attach somewhere.
After another several hours of browsing I have found a ‘part’ that would fit perfectly – a $4-5 part from https://aliexpress.com that I could find with the HEADPHONES HOLDER keywords in their search.

Here is how it works on my desk.

… and its 360 degrees adjustable as well.

Above the headphones handle You can see the ‘hero’ of the AMD Based FreeBSD Desktop article.
~
Dual USB-C and USB-A Pendrive (SanDisk)
With all my ‘bad’ experiences with PTP connections for Android based devices (and other places) I really liked the SanDisk Ultra Dual Drive.

Its really handy for many transfers … and its more fast then slow as well.
~
Tiny USB-A Hub
When You need to connect several USB-A devices the USB ports count often come short fast – this is where this tiny USB-A hub comes handy.

With its dirt cheap $1-2 price (at https://aliexpress.com with USB HUB keywords) its a ‘steal’ … and it is a 3 port hub – there is another USB-A port at the end of it – the one that is not visible.
~
Quad USB-C / USB-A / Lightning / Micro USB Adapter with MicroSD Card Slot
… as we are talking various USB-A or USB-C solutions I could not mention this quad port adapter with MicroSD card slot.

I do not even remember how many times I have used it to copy/backup contents of my phone(s) and/or tablet(s).
Nowadays I believe I use the Dual USB-C / USB-A Pendrive more … but not always.
For $8-9 on its not a bad solution to have.
Batteries … I mean SD card – not included 🙂
~
Angle Power Adapters
I have often found that the angle with which the power cord sticks out of a PC is definitely not ideal – this is where angle power adapters come handy.

Here is how it looks (being used) on my PC.

They are available for about $1-2 on https://aliexpress.com with ANGLE C13 CABLE keywords on the search box.
C13/C14 Power Adapters with Additional C1/C2 or C5/C6 Sockets
After You have spent some time to lay down the C13/C14 power cables just to power your PC its really annoying to do the same for another set of C1/C2 or C5/C6 cables/sockets … but not anymore.
Now with single cable adapter You are able to power more then one computer – depending on the needs with additional connectors.
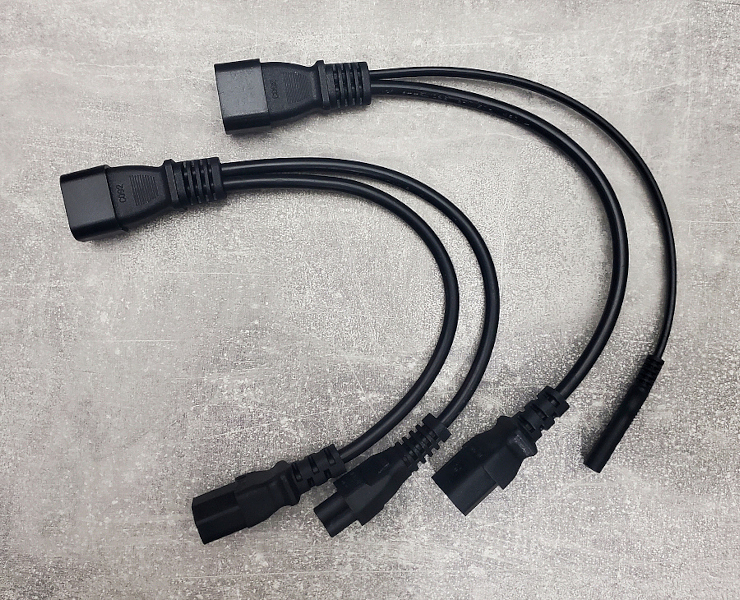
They are available for $1-2 on https://aliexpress.com with DUAL C13 CABLE keywords on the search box.
~
HDMI 3in1 Switch with Remote Control
I happen to have a 2010 FullHD 50 Inch TV that has ONLY ONE port of HDMI kind … and it was pretty annoying to say the least … up to the time I added a HDMI switch/hub to it.

The HDMI switch along with its remote below.

For the record – I have used the UGreen 3in1 HDMI Switch with 4K @ 30Hz Capability and Remote and I was able to get one for $16.
~
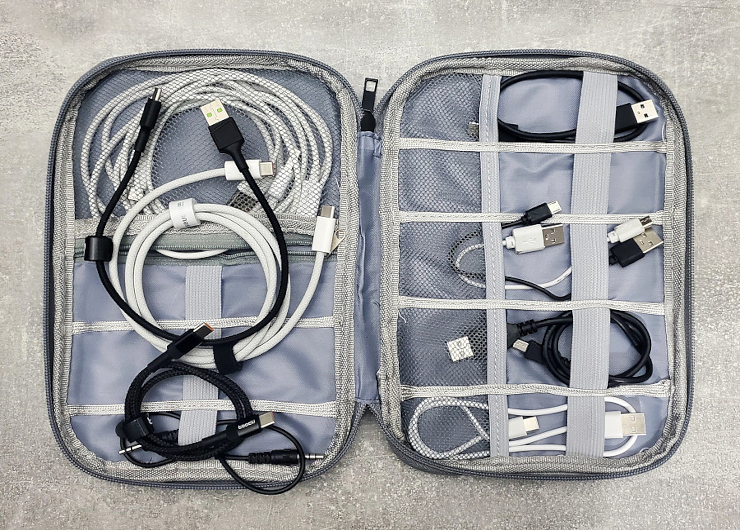
Cable Organizers
To not have a mess in the cables its useful to have them organized in some way.
I use multiple solutions for that.
Lets start with simple organizers.
… and a larger/taller one for more capacity/possibilities.

They are available for $3-9 on https://aliexpress.com with CABLE ORGANIZER keywords on the search box.
I also use some IKEA containers …

… and smaller boxes in which I keep the tiny things.

I do not even remember after what product these boxes are … and that does not even matter I think.
~
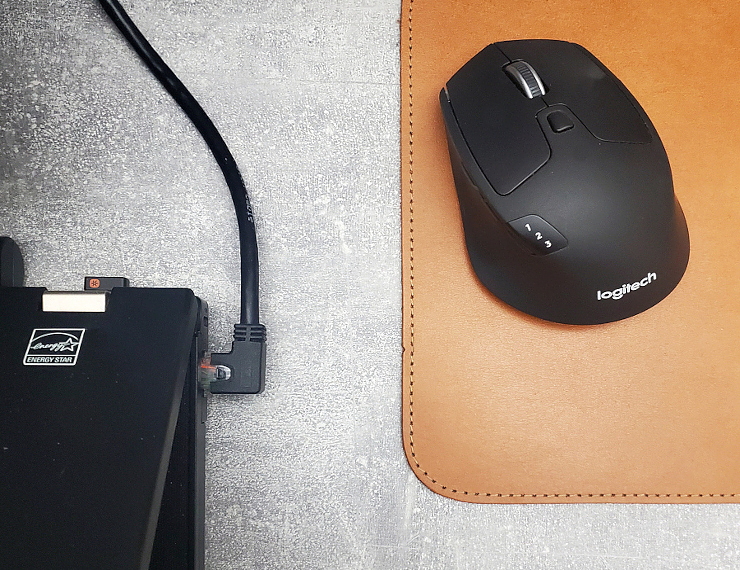
Mouse Jigger
While there are many software settings or solutions to prevent screen from locking up – there is one bulletproof solution what just always works – a hardware USB mouse jigger.

I use a very simple one with 3 modes – but its more then enough for me needs.
Feel free to check other offers with USB MOUSE JIGGER at https://aliexpress.com search box.
~
FM Transmitter
Last but not least – the car FM transmitter.
My daily ‘real’ driver (I mean on the real road outside) is the 2006 Dodge Magnum car. I really love it for the simplicity and calm that it provides during the ride – but on the audio side it only has an old FM/AM radio and a CD slot … and not MP3 support in that one.
This is where the FM transmitter such as mine Blow comes really handy.

It supports two modes. One is being a Bluetooth slave of your phone – it just plays on the car speakers anything you are currently playing on your phone – it also has microphone builtin – so You can also use it as a ‘loud’ phone talking device.

I use it in a more simple mode – I just attach a tiny Lexar S47 32GB pendrive to it – and play a random song of it.
Besides these features it also has additional USB-A port available to attach a cable to it and charge some device.
I was able to get one a new one for about $19.
~
Summary
The mentioned devices above are probably not the only ones that make my life easier – but definitely the most crucial ones.
Feel free to share your ‘helper’ hardware in the comments.
Regards.