Tag Archives: alma

Connect FreeBSD 14.0-STABLE to FreeIPA/IDM

In the open source world everything lives/evolves/changes. This is why the new version of connecting latest FreeBSD 14.0-STABLE system to the FreeIPA/IDM is needed. One of the things that changed is that security/sssd is now deprecated and security/sssd2 is its successor. Also new version of ports-mgmt/poudriere-devel is available – with needed fixes already merged – and also with new restyled web interface.

FreeIPA-logo

I already messed with that topic several times in the past:

This article will try to address and contain all steps needed – including setting up the FreeIPA/IDM server and including the Poudriere setup. Below You will find Table of Contents for this article. All of these systems will be Bhyve virtual machines.

  • FreeIPA/IDM Server – Installation
  • FreeIPA/IDM Server – Configuration
  • Poudriere Server – Setup
  • Poudriere Server – Build FreeIPA/IDM Client Packages
  • Poudriere Server – Update Repo/Packages
  • FreeBSD 14.0-STABLE Client – Setup
  • FreeBSD 14.0-STABLE Client – Debug Commands
  • Summary

The FreeBSD project recently started to provide ZFS based VM images … but unfortunately only for 14.0-RELEASE and they are not created for 14.0-STABLE or 15-CURRENT versions – so we will use the UFS based ones for both Poudriere server and FreeBSD FreeIPA/IDM client. For the record – https://download.freebsd.org/snapshots/VM-IMAGES/14.0-STABLE/amd64/Latest/ – they are available here.

Some note about commands run in this article – different colors for various hosts.

host # top -ba -o res 3                                  // executed on the host system
[root@idm ~]# yum update -y                              // executed on IDM server
root@freebsd:~ # geom disk list                          // executed on Poudriere server
root@poudriere-devel-14-stable:~ # poudriere ports -l   Β // executed on Poudriere server
root@idm-client:~ # hostname idm-client.lab.org          // executed on IDM client (FreeBSD)
  important information                                  // marked as GREEN color

For the FreeIPA/IDM server I have used Alma Linux RHEL clone – but we know that Rocky Linux or Oracle Linux would also work well. We will use three systems in this article.

FreeIPA/IDM server – with idm.lab.org hostname.

      OS: Alma Linux
      IP: 10.0.0.200/24
      GW: 10.0.0.1
  domain: lab.org
   realm: LAB.ORG
hostname: idm.lab.org

Poudriere builder system – with poudriere-devel-14-stable.lab.org hostname.

      OS: FreeBSD 14.0-STABLE
      IP: 10.0.0.124/24
      GW: 10.0.0.1
     DNS: 1.1.1.1
  domain: -
   realm: -
hostname: poudriere-devel-14-stable.lab.org

FreeBSD client for FreeIPA/IDM system – with idm-client.lab.org hostname.

      OS: FreeBSD 14.0-STABLE
      IP: 10.0.0.233/24
      GW: 10.0.0.1
     DNS: 10.0.0.200
  domain: lab.org
   realm: LAB.ORG
hostname: idm-client.lab.org

I really like the FreeBSD Bhyve memory ballooning – which means the guest VMs only take as much RAM as guest OS allocated and not 12 GB RAM as is configured.

host # vm list | grep -e STATE -e Running
NAME                       DATASTORE  LOADER     CPU  MEMORY  VNC           AUTO     STATE
idm                        default    uefi       2    4g      0.0.0.0:5900  No       Running (25284)
idm-client-14-stable       default    bhyveload  2    1g      -             No       Running (29517)
poudriere-devel-14-stable  default    bhyveload  8    12g     -             Yes [1]  Running (23419)

host # top -ba -o res 3
last pid:  1290;  load averages:  0.09,  0.09,  0.08  up 0+00:47:08    07:05:20
32 processes:  1 running, 31 sleeping
CPU:  0.0% user,  0.0% nice,  0.6% system,  0.0% interrupt, 99.4% idle
Mem: 2983M Active, 463M Inact, 1060M Wired, 56K Buf, 27G Free
ARC: 619M Total, 115M MFU, 497M MRU, 32K Anon, 2346K Header, 4231K Other
     551M Compressed, 1080M Uncompressed, 1.96:1 Ratio
Swap: 4096M Total, 4096M Free

  PID USERNAME    THR PRI NICE   SIZE    RES STATE    C   TIME    WCPU COMMAND
25284 root         13  20    0  4159M  1168M kqread  13   3:12   1.27% bhyve: idm (bhyve)
23419 root         19  20    0    12G   109M kqread  15   0:27   0.00% bhyve: poudriere-devel-14-stable (bhyve)
29517 root         13  20    0  1075M    77M kqread   5   0:20   0.00% bhyve: idm-client-14-stable (bhyve)

As you can see I am using sysutils/vm-bhyve-devel for the Bhyve management – but You may as well use bare /usr/share/examples/bhyve/vmrun.sh instead … or even entirely different hypervisor like KVM on Linux or VirtualBox on Windows – it does not matter as long as machines have access to the Internet and they see each other in the same LAN network.

FreeIPA/IDM Server – Installation

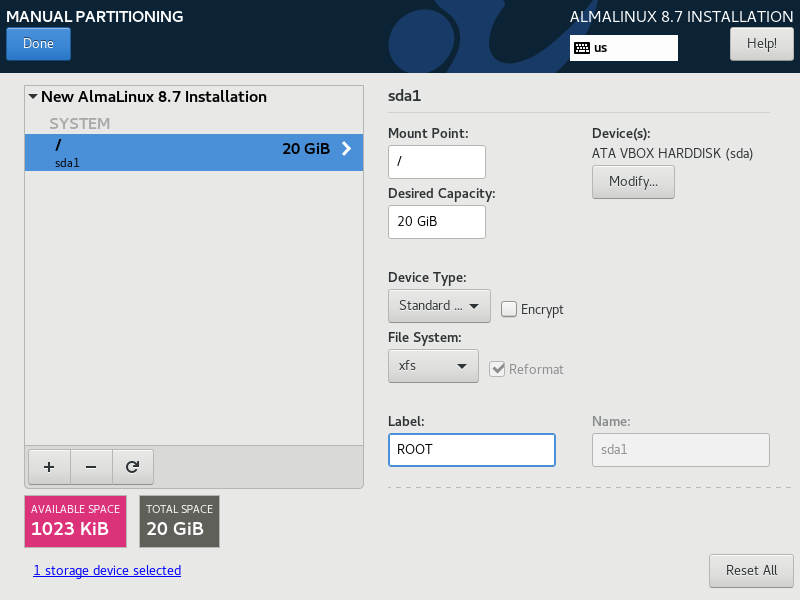
I installed the Alma Linux some time ago – so the screenshot shows older 8.7 version.

LAB.IDM.Server.ROOT

After reboot its network is configured as shown below.

[root@idm ~]# cat /etc/sysconfig/network-scripts/ifcfg-enp0s3
TYPE=Ethernet
PROXY_METHOD=none
BROWSER_ONLY=no
BOOTPROTO=none
DEFROUTE=yes
IPV4_FAILURE_FATAL=no
IPV6INIT=no
IPV6_DEFROUTE=yes
IPV6_FAILURE_FATAL=no
IPV6_ADDR_GEN_MODE=eui64
NAME=enp0s3
UUID=120efe1f-3cb6-40cf-8aad-b17066c08543
DEVICE=enp0s3
ONBOOT=yes
IPADDR=10.0.0.200
PREFIX=24
GATEWAY=10.0.0.1
DNS1=1.1.1.1
IPV6_DISABLED=yes

Some more basic setup commands below.


[root@idm ~]# echo 10.0.0.200 idm.lab.org idm >> /etc/hosts

[root@idm ~]# cat << EOF >> /etc/sysctl.conf
# DISABLE IPv6 FOR MAIN enp0s3 INTERFACE
net.ipv6.conf.enp0s3.disable_ipv6=1
EOF

[root@idm ~]# hostnamectl set-hostname idm.lab.org

[root@idm ~]# timedatectl set-timezone Europe/Warsaw

[root@idm ~]# timedatectl set-local-rtc 0

[root@idm ~]# yum update -y

[root@idm ~]# reboot

Continuation after reboot.

[root@idm ~]# yum module enable idm:DL1 -y

[root@idm ~]# yum distro-sync -y

[root@idm ~]# yum install -y bind-utils chrony nc

[root@idm ~]# ipa-server-install                        \
                    --domain lab.org                    \
                    --realm LAB.ORG                     \
                    --reverse-zone=0.0.10.in-addr.arpa. \
                    --allow-zone-overlap                \
                    --no-forwarders                     \
                    --ntp-pool pool.ntp.org             \
                    --setup-dns                         \
                    --ds-password    password           \
                    --admin-password password           \
                    --unattended

[root@idm ~]# ipactl status
Directory Service: RUNNING
krb5kdc Service: RUNNING
kadmin Service: RUNNING
named Service: RUNNING
httpd Service: RUNNING
ipa-custodia Service: RUNNING
pki-tomcatd Service: RUNNING
ipa-otpd Service: RUNNING
ipa-dnskeysyncd Service: RUNNING
ipa: INFO: The ipactl command was successful

[root@idm ~]# systemctl list-unit-files | grep ipa | grep service
ipa-ccache-sweep.service                   static   
ipa-custodia.service                       disabled 
ipa-dnskeysyncd.service                    disabled 
ipa-healthcheck.service                    disabled 
ipa-ods-exporter.service                   disabled 
ipa-otpd@.service                          static   
ipa.service                                enabled

[root@idm ~]# systemctl enable --now httpd

[root@idm ~]# systemctl list-unit-files | grep httpd.service
httpd.service                              enabled  

[root@idm ~]# systemctl disable firewalld

[root@idm ~]# systemctl stop    firewalld

[root@idm ~]# cat /etc/sssd/sssd.conf
[domain/lab.org]
  ipa_server_mode                = True
  ipa_server                     = idm.lab.org
  ipa_hostname                   = idm.lab.org
  ipa_domain                     = lab.org
  id_provider                    = ipa
  auth_provider                  = ipa
  chpass_provider                = ipa
  access_provider                = ipa
  cache_credentials              = True
  ldap_tls_cacert                = /etc/ipa/ca.crt
  krb5_store_password_if_offline = True

[sssd]
  services = nss, pam, ifp, ssh, sudo
  domains  = lab.org

[nss]
  homedir_substring = /home
  memcache_timeout  = 600

[pam]

[sudo]

[autofs]

[ssh]

[pac]

[ifp]
  allowed_uids = ipaapi, root

[session_recording]

If you would like to see what a successful ipa-server-install(8) looks like – you can take a look HERE.

We have our FreeIPA/IDM server installed.

You will need to add 10.0.0.200 as idm.lab.org to your /etc/hosts on the system where you will be using the browser (or to your local DNS).

host # grep idm /etc/hosts
10.0.0.200  idm.lab.org  idm

You can login to it typing https://10.0.0.200 at your local browser – you will be redirected to https://idm.lab.org/ipa/ui/ immediately and you will see the login page as shown below.

FreeIPA-login-1

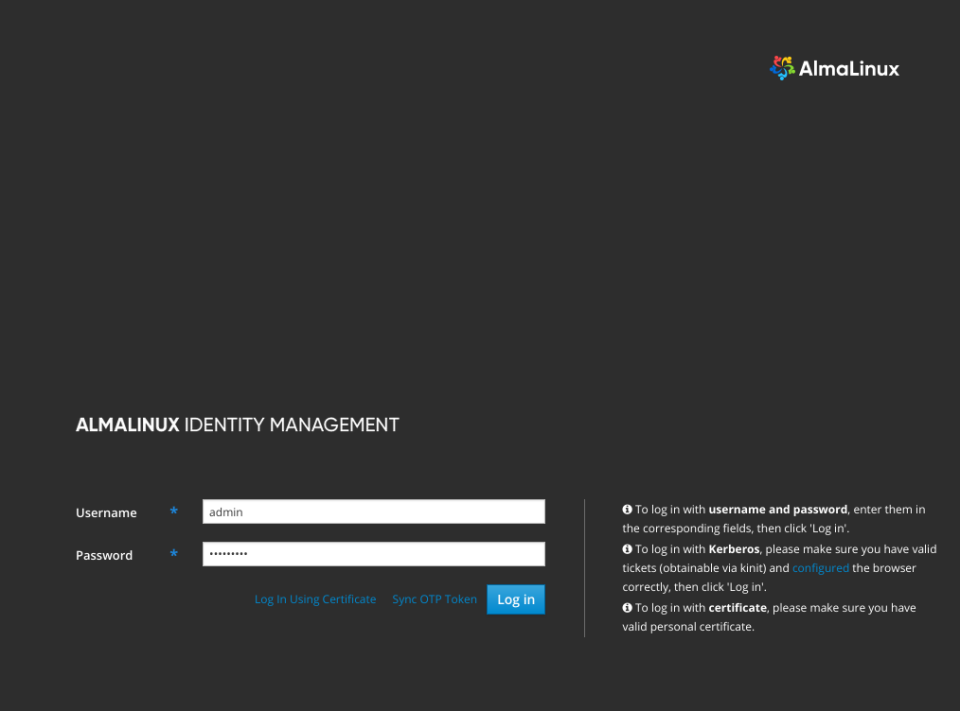
You may login with admin username and the password you specified for the ipa-server-install(8) command (or password if you just copy pasted that command πŸ™‚

FreeIPA/IDM Server – Configuration

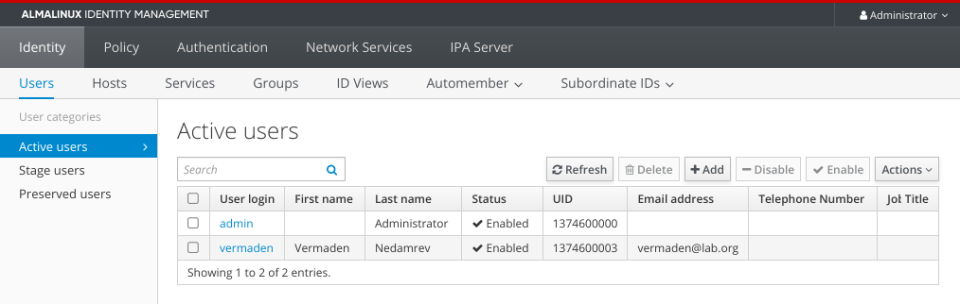
… and after logging in I created a regular vermaden user as shown below.

FreeIPA-login-2

Keep in mind to reset your password by connecting to FreeIPA/IDM server.

host # ssh -l vermaden 10.0.0.200
(vermaden@10.0.0.200) Password:
(vermaden@10.0.0.200) Password expired. Change your password now.
Current Password:
(vermaden@10.0.0.200) New password:
(vermaden@10.0.0.200) Retype new password:
Last failed login: Wed Oct 19 00:47:57 CEST 2022 from 10.0.0.33 on ssh:notty
There was 1 failed login attempt since the last successful login.

[vermaden@idm /]$ w
 12:58:50 up  6:39,  1 user,  load average: 0.02, 0.05, 0.00
USER     TTY      FROM             LOGIN@   IDLE   JCPU   PCPU WHAT
vermaden pts/0    10.0.0.4         12:58    1.00s  0.04s  0.01s w

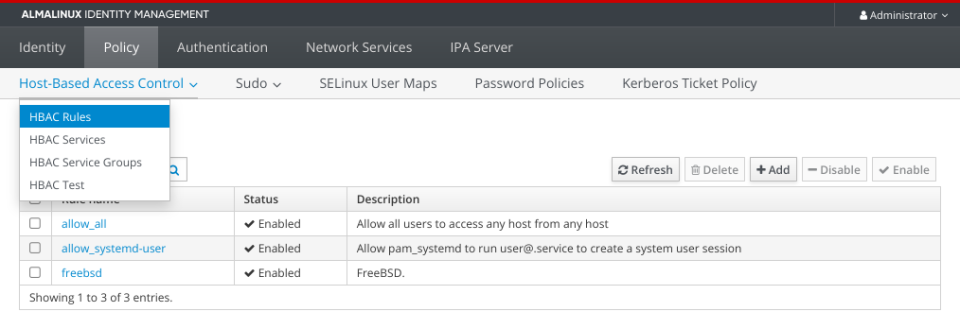
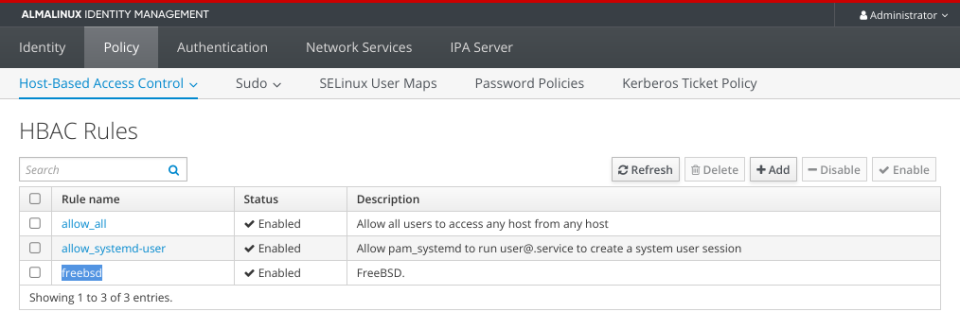
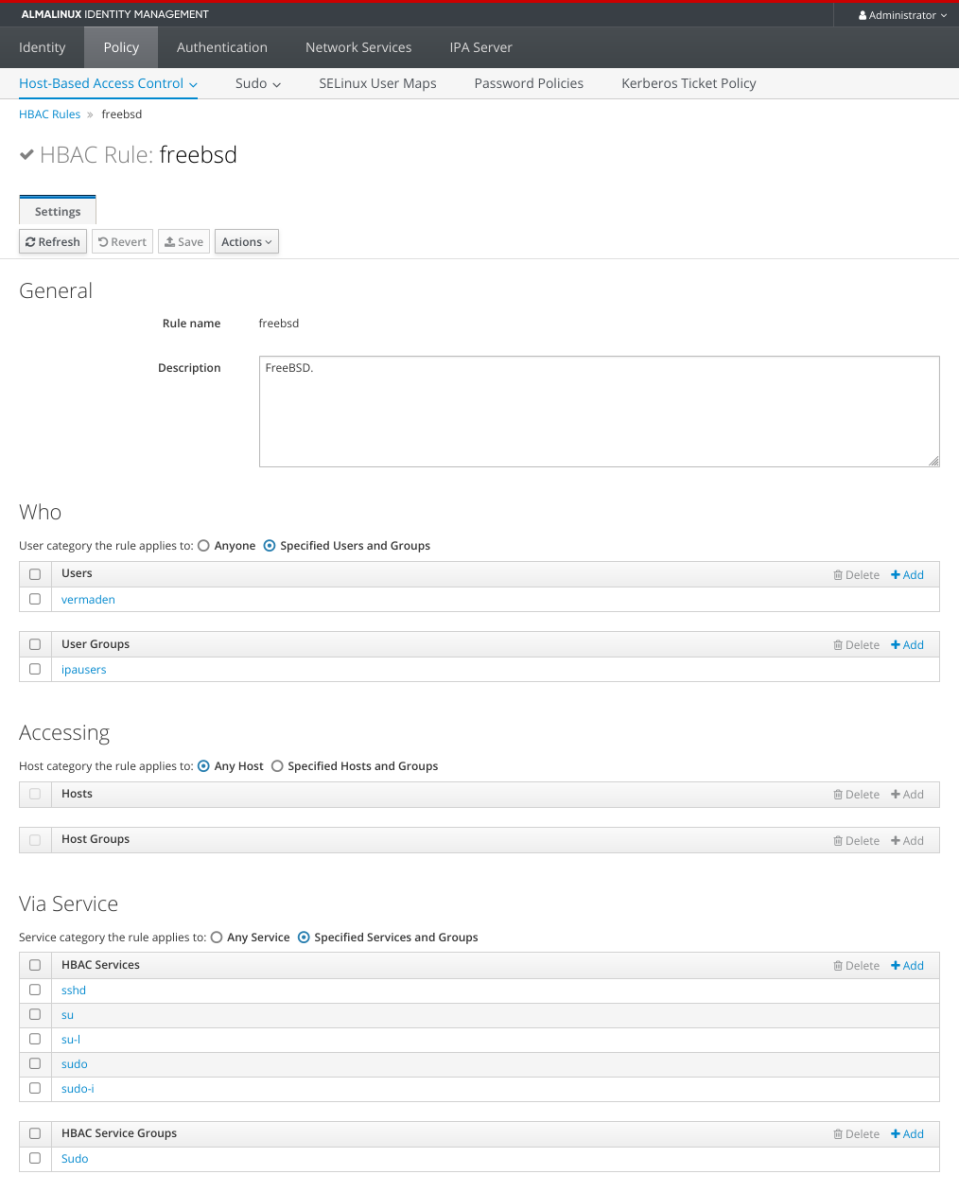
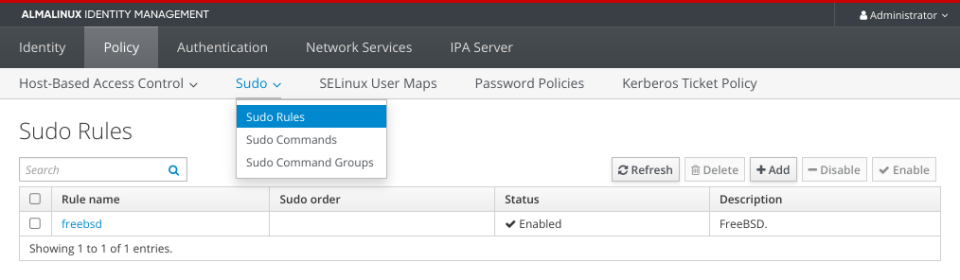
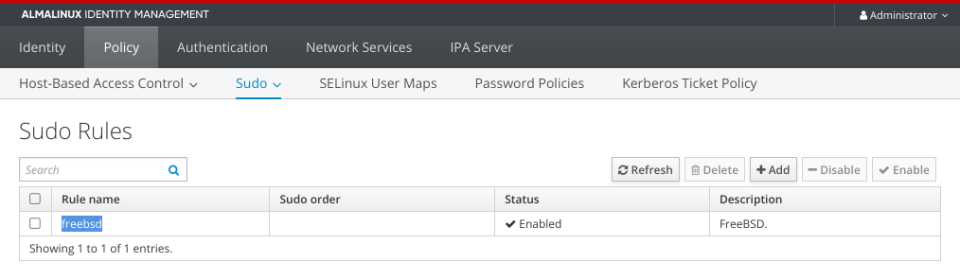
The more important configuration is in HBAC and Sudo rules.

Here are HBAC related settings.

idm-1-hbac-rules-menu

idm-2-hbac-rules-menu

idm-3-hbac-rules-freebsd-details

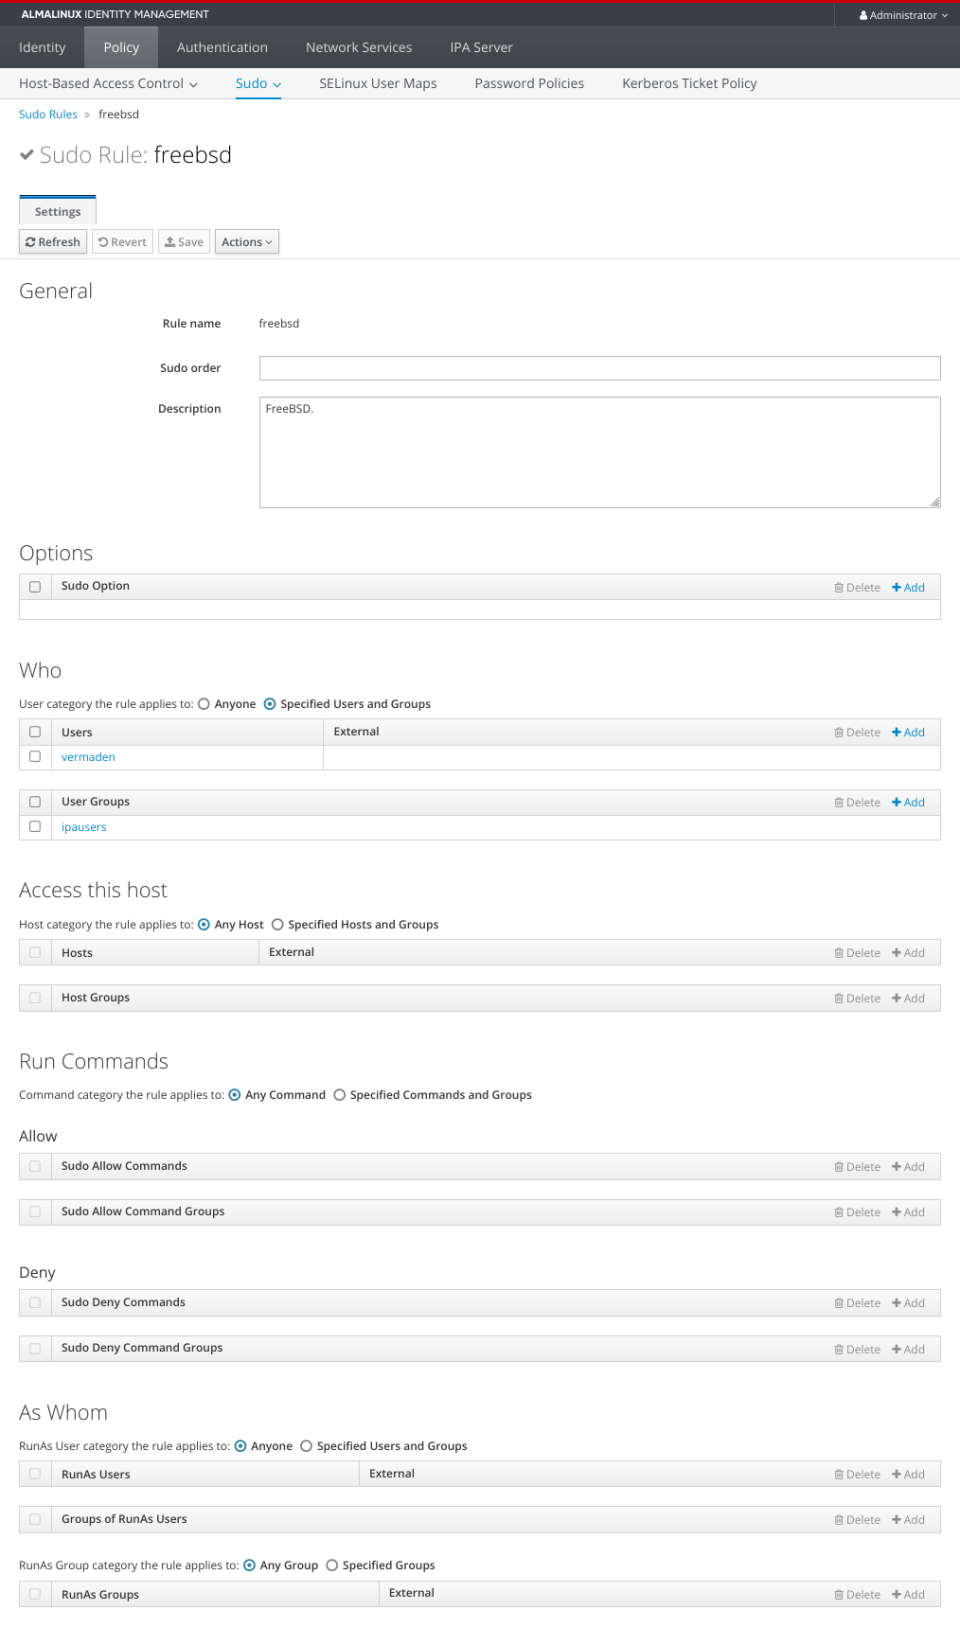
… and the Sudo part.

idm-4-sudo-rules-menu

idm-5-sudo-rules-freebsd

idm-6-sudo-rules-freebsd-details

Poudriere Server – Setup

One note for the FreeBSD setups below – please use /bin/sh shell (default for root since 14.0-RELEASE) for the commands … or zsh(1) for example … or other POSIX compatible shell. Some of these commands may not work properly on ‘C’ based shells or in fish(1) shell.

This is the template I used for Bhyve VMs.

host # cat /vm/.templates/freebsd.conf 
loader="bhyveload"
cpu=1
memory=256M
network0_type="virtio-net"
network0_switch="public"
disk0_type="nvme"
disk0_name="disk0.img"

We will now create poudriere-devel-14-stable VM for Poudriere server.

host # vm create -t freebsd -s 20g -m 12g -c 8 poudriere-devel-14-stable

host # du -sgA /vm/poudriere-devel-14-stable/*
20      /vm/poudriere-devel-14-stable/disk0.img
1       /vm/poudriere-devel-14-stable/poudriere-devel-14-stable.conf
1       /vm/poudriere-devel-14-stable/vm-bhyve.log

Now we will replace disk0.img with Latest FreeBSD 14.0-STABLE snapshot.

host # fetch -o - 'https://download.freebsd.org/snapshots/VM-IMAGES/14.0-STABLE/amd64/Latest/FreeBSD-14.0-STABLE-amd64.raw.xz' \
         | xz -d > /vm/poudriere-devel-14-stable/disk0.img

host # file -b /vm/poudriere-devel-14-stable/disk0.img 
DOS/MBR boot sector; partition 1 : ID=0xee, start-CHS (0x0,0,2), end-CHS (0x3ff,255,63), startsector 1, 12649684 sectors

host # du -sgA /vm/poudriere-devel-14-stable/*
7       /vm/poudriere-devel-14-stable/disk0.img
1       /vm/poudriere-devel-14-stable/poudriere-devel-14-stable.conf
1       /vm/poudriere-devel-14-stable/vm-bhyve.log

We now need to add additional disk1.img disk to for ZFS pool.

host # truncate -s 10G /vm/poudriere-devel-14-stable/disk0.img

host # vm add -d disk -t file -s 100g poudriere-devel-14-stable

host # vm info poudriere-devel-14-stable | grep -A 16 virtual-disk
  virtual-disk
    number: 0
    device-type: file
    emulation: nvme
    options: -
    system-path: /vm/poudriere-devel-14-stable/disk0.img
    bytes-size: 10737418240 (10.000G)
    bytes-used: 1720046592 (1.601G)

  virtual-disk
    number: 1
    device-type: file
    emulation: nvme
    options: -
    system-path: /vm/poudriere-devel-14-stable/disk1.img
    bytes-size: 107374182400 (100.000G)
    bytes-used: 1024 (1.000K)

host # du -sgA /vm/poudriere-devel-14-stable/*
10      /vm/poudriere-devel-14-stable/disk0.img
100     /vm/poudriere-devel-14-stable/disk1.img
1       /vm/poudriere-devel-14-stable/poudriere-devel-14-stable.conf
1       /vm/poudriere-devel-14-stable/vm-bhyve.log

Now internally inside VM.

host # vm start poudriere-devel-14-stable                              
Starting poudriere-devel-14-stable
  * found guest in /vm/poudriere-devel-14-stable
  * booting...

host # vm console poudriere-devel-14-stable
(...)
Starting devd.
Starting dhclient.
DHCPDISCOVER on vtnet0 to 255.255.255.255 port 67 interval 4
DHCPOFFER from 10.0.0.1
DHCPREQUEST on vtnet0 to 255.255.255.255 port 67
DHCPACK from 10.0.0.1
bound to 10.0.0.23 -- renewal in 43200 seconds.
add host 127.0.0.1: gateway lo0 fib 0: route already in table
add host ::1: gateway lo0 fib 0: route already in table
add net fe80::: gateway ::1
add net ff02::: gateway ::1
add net ::ffff:0.0.0.0: gateway ::1
add net ::0.0.0.0: gateway ::1
Updating motd:.
Updating /var/run/os-release done.
Clearing /tmp (X related).
Creating and/or trimming log files.
Starting syslogd.
Mounting late filesystems:.
Starting cron.
Starting background file system checks in 60 seconds.

Wed Mar  6 08:23:03 UTC 2024

FreeBSD/amd64 (freebsd) (ttyu0)

login: 


Use the root user with ’empty’ password – just hit [ENTER] key on password prompt.

root@freebsd:~ # :> ~/.hushlogin

root@freebsd:~ # passwd root
Changing local password for root
New Password:
Retype New Password:

root@freebsd:~ # geom disk list
Geom name: nda0
Providers:
1. Name: nda0
   Mediasize: 10737418240 (10G)
   Sectorsize: 512
   Mode: r3w3e8
   descr: bhyve-NVMe
   lunid: 589cfc2012350001
   ident: NVME-4-0
   rotationrate: 0
   fwsectors: 0
   fwheads: 0

Geom name: nda1
Providers:
1. Name: nda1
   Mediasize: 107374182400 (100G)
   Sectorsize: 512
   Mode: r0w0e0
   descr: bhyve-NVMe
   lunid: 589cfc20d2f40001
   ident: NVME-4-1
   rotationrate: 0
   fwsectors: 0
   fwheads: 0

root@freebsd:~ # zpool create zroot nda1
ZFS filesystem version: 5
ZFS storage pool version: features support (5000)

root@freebsd:~ # zfs set mountpoint=none zroot

root@freebsd:~ # zfs list
NAME    USED  AVAIL  REFER  MOUNTPOINT
zroot   100K  96.4G    24K  none

Now some basic configuration.

root@freebsd:~ # cat /etc/rc.conf
hostname="poudriere-devel-14-stable.lab.org"
ifconfig_DEFAULT="inet 10.0.0.124/24 up"
defaultrouter="10.0.0.1"
zfs_enable="YES"
sshd_enable="YES"
nginx_enable="YES"

root@freebsd:~ # cat /etc/hosts
::1         localhost  localhost.my.domain
127.0.0.1   localhost  localhost.my.domain
10.0.0.124  poudriere-devel-14-stable.lab.org  poudriere-devel-14-stable

root@freebsd:~ # service sshd start

root@freebsd:~ # mkdir -p /usr/local/etc/pkg/repos

root@freebsd:~ # sed -e s/quarterly/latest/g /etc/pkg/FreeBSD.conf \
                   > /usr/local/etc/pkg/repos/FreeBSD.conf

root@freebsd:~ # pkg install -y    \
                   beadm           \
                   lsblk           \
                   poudriere-devel \
                   nginx           \
                   git-lite        \
                   ccache4         \
                   tree            \
                   screen

root@freebsd:~ # reboot

Fortunately we do not need to patch ports-mgmt/poudriere-devel anymore as the -u flag for sort(1) is already there.

root@poudriere-devel-14-stable:~ # grep remote_all_ /usr/local/share/poudriere/common.sh | grep sort
            "${remote_all_options}" | sort -k1.2 -u | paste -s -d ' ' -)
            "${remote_all_dept}" | sort -u | paste -s -d ' ' -)

We will now setup actual Poudriere server.

root@poudriere-devel-14-stable:~ # export SSL=/usr/local/etc/ssl

root@poudriere-devel-14-stable:~ # mkdir -p \
                                     /usr/ports/distfiles \
                                     ${SSL}/keys \
                                     ${SSL}/certs

root@poudriere-devel-14-stable:~ # chmod 0600 ${SSL}/keys

root@poudriere-devel-14-stable:~ # openssl genrsa -out ${SSL}/keys/poudriere.key 4096

root@poudriere-devel-14-stable:~ # openssl rsa \
                                     -in  ${SSL}/keys/poudriere.key -pubout \
                                     -out ${SSL}/certs/poudriere.cert

root@poudriere-devel-14-stable:~ # zfs create -p -o mountpoint=/var/ccache zroot/var/ccache

root@poudriere-devel-14-stable:~ # zfs list
NAME               USED  AVAIL  REFER  MOUNTPOINT
zroot              213K  96.4G    24K  none
zroot/var           48K  96.4G    24K  none
zroot/var/ccache    24K  96.4G    24K  /var/ccache

root@poudriere-devel-14-stable:~ # export IP=10.0.0.124

root@poudriere-devel-14-stable:~ # cat << EOF > /usr/local/etc/poudriere.conf
ZPOOL=zroot
BASEFS=/usr/local/poudriere
ZROOTFS=/usr/local/poudriere
FREEBSD_HOST=ftp://ftp.freebsd.org
POUDRIERE_DATA=/usr/local/poudriere/data
CHECK_CHANGED_OPTIONS=verbose
CHECK_CHANGED_DEPS=yes
PKG_REPO_SIGNING_KEY=/usr/local/etc/ssl/keys/poudriere.key
URL_BASE=http://${IP}/
USE_TMPFS=no
TMPFS_LIMIT=12
MAX_MEMORY=12
PARALLEL_JOBS=8
PREPARE_PARALLEL_JOBS=8
MAX_FILES=4096
DISTFILES_CACHE=/usr/ports/distfiles
KEEP_OLD_PACKAGES=yes
KEEP_OLD_PACKAGES_COUNT=3
CHECK_CHANGED_OPTIONS=verbose
CHECK_CHANGED_DEPS=yes
CCACHE_DIR=/var/ccache
RESTRICT_NETWORKING=no
EOF

root@poudriere-devel-14-stable:~ # mkdir -p /usr/local/poudriere/data/logs/bulk

root@poudriere-devel-14-stable:~ # ln -s \
                                     /usr/local/etc/ssl/certs/poudriere.cert \
                                     /usr/local/poudriere/data/logs/bulk/poudriere.cert

root@poudriere-devel-14-stable:~ # service nginx enable

root@poudriere-devel-14-stable:~ # sed -i '' -E 's|text/plain[\t\ ]*txt|text/plain txt log|g' /usr/local/etc/nginx/mime.types

root@poudriere-devel-14-stable:~ # export IP=10.0.0.124

root@poudriere-devel-14-stable:~ # cat << EOF > /usr/local/etc/nginx/nginx.conf
events {
  worker_connections 1024;
}

http {
  include      mime.types;
  default_type application/octet-stream;

  server {
    listen 80 default;
    server_name ${IP};
    root /usr/local/share/poudriere/html;

    location /data {
      alias /usr/local/poudriere/data/logs/bulk;
      autoindex on;
    }

    location /packages {
      root /usr/local/poudriere/data;
      autoindex on;
    }
  }
}
EOF

root@poudriere-devel-14-stable:~ # service nginx restart

root@poudriere-devel-14-stable:~ # mkdir -p /root/.cache/ccache                                  

root@poudriere-devel-14-stable:~ # ln -sf /var/ccache /root/.cache/ccache

root@poudriere-devel-14-stable:~ # cat << EOF > /usr/local/etc/poudriere.d/make.conf
ALLOW_UNSUPPORTED_SYSTEM=yes
DISABLE_LICENSES=yes
EOF

root@poudriere-devel-14-stable:~ # cat << EOF > /var/ccache/ccache.conf
max_size = 0
cache_dir = /var/ccache
base_dir = /var/ccache
hash_dir = false
EOF

root@poudriere-devel-14-stable:~ # poudriere jail -c -j 14-0-S-amd64 -v 14.0-STABLE
(...)
[00:20:45] Jail 14-0-S-amd64 14.0-STABLE amd64 is ready to be used

root@poudriere-devel-14-stable:~ # poudriere jail -l
JAILNAME     VERSION     ARCH  METHOD TIMESTAMP           PATH
14-0-S-amd64 14.0-STABLE amd64 http   2024-03-06 09:44:27 /usr/local/poudriere/jails/14-0-S-amd64

root@poudriere-devel-14-stable:~ # poudriere ports -c -p idm
[00:00:00] Creating idm fs at /usr/local/poudriere/ports/idm... done
[00:00:00] Cloning the ports tree... done

root@poudriere-devel-14-stable:~ # poudriere ports -l
PORTSTREE METHOD    TIMESTAMP           PATH
idm       git+https 2024-03-06 10:10:53 /usr/local/poudriere/ports/idm


Poudriere Server – Build FreeIPA/IDM Client Packages

Now we will choose needed options for our FreeBSD Ports and then start the bulk process of fetching and building them.

root@poudriere-devel-14-stable:~ # poudriere options -c -n -p idm security/cyrus-sasl2-gssapi
//   SELECT: (*) GSSAPI_MIT

root@poudriere-devel-14-stable:~ # poudriere options -c -n -p idm net/openldap26-client
//   SELECT: [x] GSSAPI

root@poudriere-devel-14-stable:~ # poudriere options -c -n -p idm security/sudo
// DESELECT: [ ] PAM
//   SELECT: (*) GSSAPI_MIT
//   SELECT: (*) SSSD2

root@poudriere-devel-14-stable:~ # cat << EOF > /usr/local/etc/poudriere.d/idm
security/krb5
security/sudo
security/sssd2
security/cyrus-sasl2
security/cyrus-sasl2-gssapi
security/pam_mkhomedir
net/openldap26-client
net/samba416
EOF

root@poudriere-devel-14-stable:~ # poudriere bulk -j 14-0-S-amd64 -b latest -p idm -f /usr/local/etc/poudriere.d/idm

root@poudriere-devel-14-stable:~ # zfs list
NAME                                           USED  AVAIL  REFER  MOUNTPOINT
zroot                                         1.51G  94.9G    24K  none
zroot/usr                                     1.39G  94.9G    24K  none
zroot/usr/local                               1.39G  94.9G    24K  none
zroot/usr/local/poudriere                     1.39G  94.9G    24K  none
zroot/usr/local/poudriere/jails               1.07G  94.9G    24K  none
zroot/usr/local/poudriere/jails/14-0-S-amd64  1.07G  94.9G  1.07G  /usr/local/poudriere/jails/14-0-S-amd64
zroot/usr/local/poudriere/ports                328M  94.9G    24K  none
zroot/usr/local/poudriere/ports/idm            328M  94.9G   328M  /usr/local/poudriere/ports/idm
zroot/var                                      117M  94.9G    24K  none
zroot/var/ccache                               117M  94.9G   117M  /var/ccache


This is how the Poudriere build process looks like from the terminal … and a view for its new ZFS datasets that Poudriere created.

xterm-poudriere

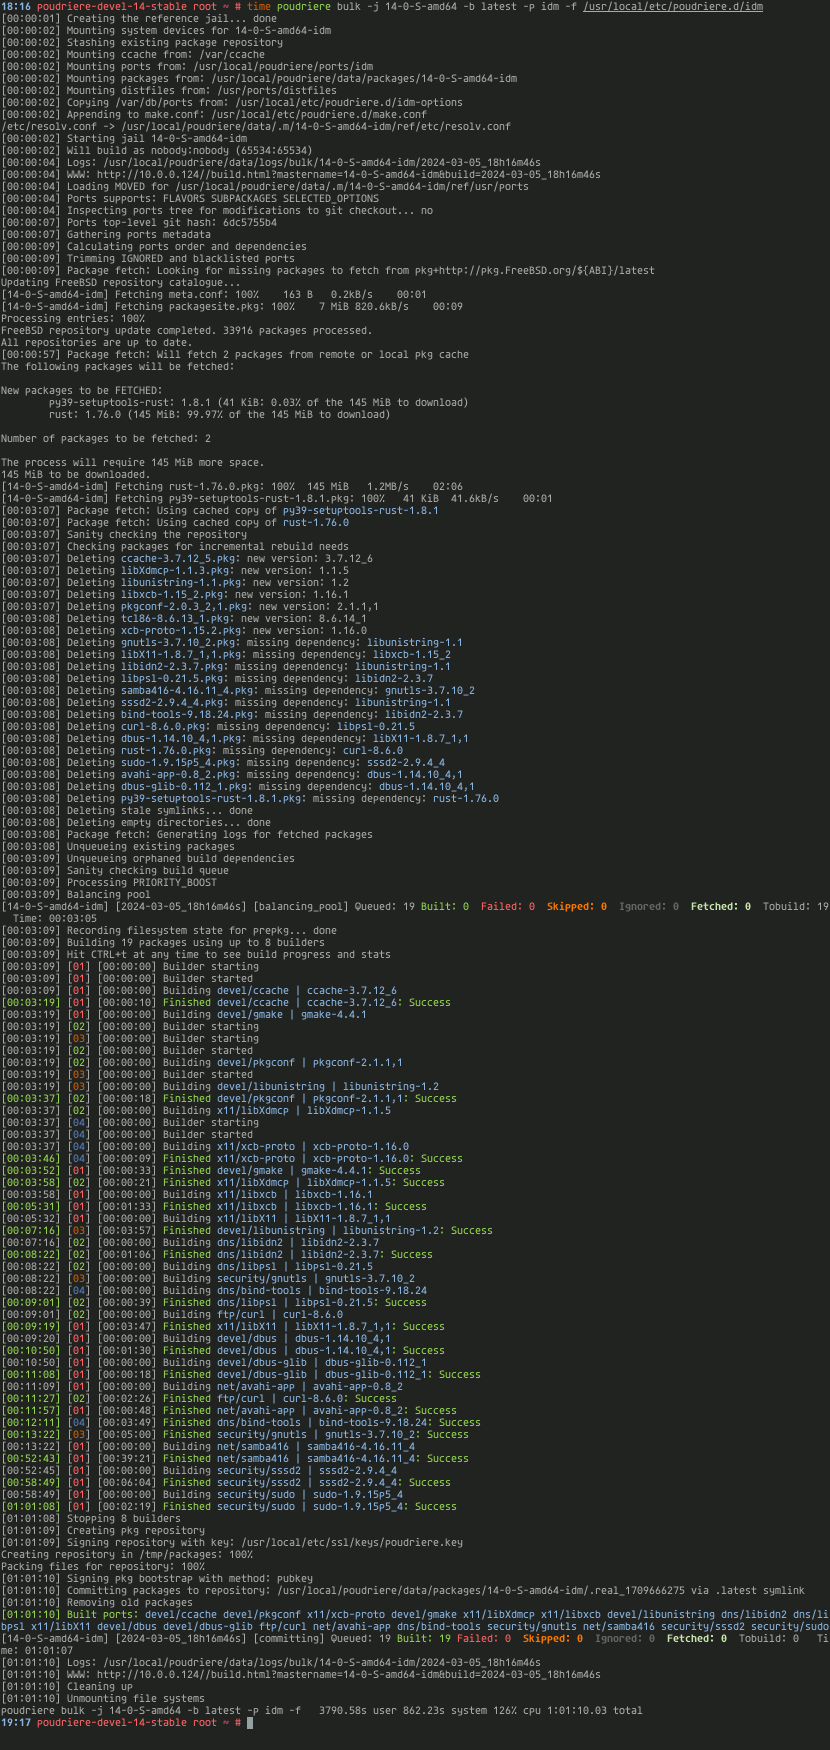
It was 2nd or 3rd run so when You first will run the bulk there will be more information about fetching packages etc.

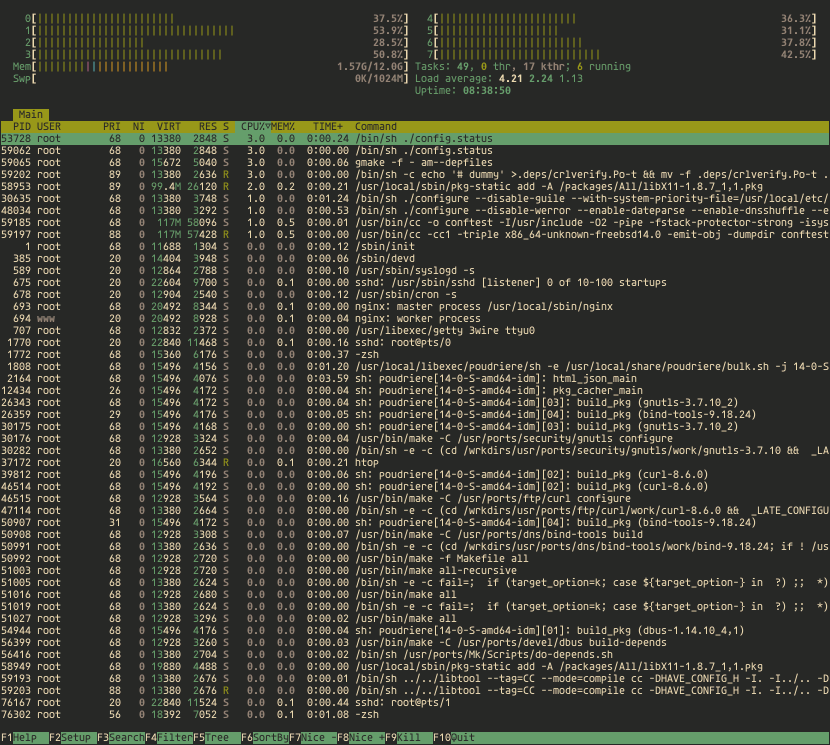
Below You can see what processes are running in htop(1) during the build.

xterm-htop

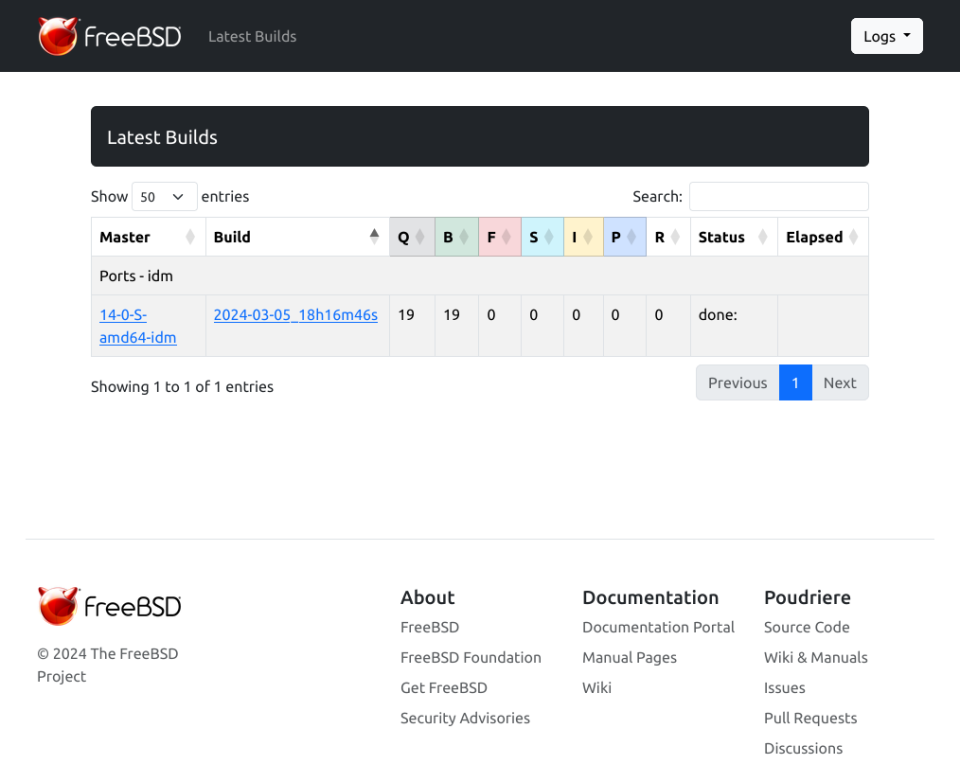
You can also follow the status of the build process in the browser at https://10.0.0.124 page.

poudriere-devel-100-latest-builds

Generally the new Poudriere interface is quite ‘large’ I would say – so I use it at 70% scale/zoom on Firefox and IMHO its more usable like that.

poudriere-devel-70-latest-builds

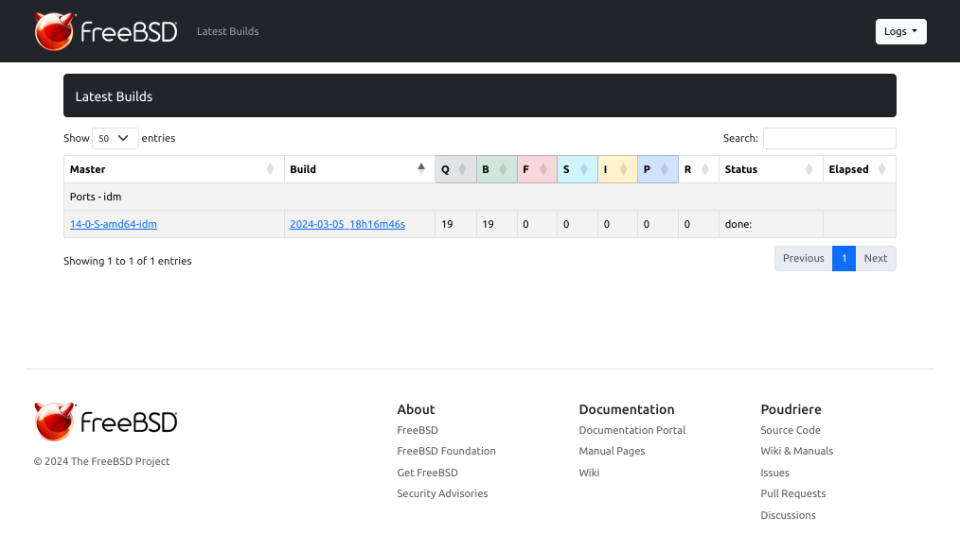
And below are the details about our build job.

poudriere-devel-70-build-complete

Poudriere Server – Update Repo/Packages

Everytime you will need to update the packages in that FreeIPA/IDM repo You will need to run these commands.

root@poudriere-devel-14-stable:~ # poudriere ports -u -p idm

root@poudriere-devel-14-stable:~ # poudriere bulk -j 14-0-S-amd64 -b latest -p idm -f /usr/local/etc/poudriere.d/idm

You may as well update the FreeBSD Jail when needed.

root@poudriere-devel-14-stable:~ # poudriere jail -u -j 14-0-S-amd64

FreeBSD 14.0-STABLE Client – Setup

I will not repeat the process – but the same as with Poudriere server – you need to create FreeBSD client – for example as Bhyve VM.

Now – the needed configuration on FreeBSD 14.0-STABLE system to connect it to FreeIPA/IDM server.

root@idm-client:~ # :> ~/.hushlogin

root@idm-client:~ # mkdir -p              \
                     /usr/local/etc/ipa   \
                     /var/log/sssd        \
                     /var/run/sss/private \
                     /var/db/sss

root@idm-client:~ # echo '10.0.0.233  idm-client.lab.org  idm-client' >> /etc/hosts

root@idm-client:~ # echo '10.0.0.200  idm.lab.org         idm'        >> /etc/hosts

root@idm-client:~ # hostname idm-client.lab.org

root@idm-client:~ # sysrc hostname=idm-client.lab.org

root@idm-client:~ # fetch -o /usr/local/etc/ipa/ca.crt http://idm.lab.org/ipa/config/ca.crt

Now we will need to add or FreeBSD client to FreeIPA/IDM. Instructions below.

[root@idm ~]# kinit admin

[root@idm ~]# ipa dnsrecord-add lab.org idm-client --a-rec=10.0.0.233 --a-create-reverse
  Record name: idm-client
  A record: 10.0.0.233

[root@idm ~]# ipa host-add idm-client.lab.org
-------------------------------
Added host "idm-client.lab.org"
-------------------------------
  Host name: idm-client.lab.org
  Principal name: host/idm-client.lab.org@LAB.ORG
  Principal alias: host/idm-client.lab.org@LAB.ORG
  Password: False
  Keytab: False
  Managed by: idm-client.lab.org

[root@idm ~]# ipa-getkeytab -s idm.lab.org -p host/idm-client.lab.org@LAB.ORG -k /root/idm-client.lab.org.keytab
Keytab successfully retrieved and stored in: /root/idm-client.lab.org.keytab

[root@idm ~]# cp /root/idm-client.lab.org.keytab /usr/share/ipa/html/

[root@idm ~]# chmod 644 /usr/share/ipa/html/idm-client.lab.org.keytab

Now lets get back to our FreeBSD client.

root@idm-client:~ # fetch -o /usr/local/etc/ipa/krb5.keytab \
                      http://idm.lab.org/ipa/config/idm-client.lab.org.keytab

root@idm-client:~ # chmod 600 /usr/local/etc/ipa/krb5.keytab

root@idm-client:~ # mkdir -p /usr/local/etc/ssl/certs

root@idm-client:~ # mkdir -p /usr/local/etc/pkg/repos

root@idm-client:~ # sed -e 's|quarterly|latest|g' /etc/pkg/FreeBSD.conf \
                      > /usr/local/etc/pkg/repos/FreeBSD.conf

root@idm-client:~ # pkg install -y beadm

root@idm-client:~ # fetch -o /usr/local/etc/ssl/certs/poudriere.cert \
                      http://poudriere-devel-14-stable.lab.org/data/poudriere.cert

root@idm-client:~ # export IP=10.0.0.124

root@idm-client:~ # cat << EOF > /usr/local/etc/pkg/repos/14-0-S-amd64.conf
14-0-S-amd64-idm: {
  url: "http://${IP}/packages/14-0-S-amd64-idm/",
  mirror_type: "http",
  signature_type: "pubkey",
  pubkey: "/usr/local/etc/ssl/certs/poudriere.cert",
  enabled: yes,
  priority: 100
}
EOF

root@idm-client:~ # pkg update -f

root@idm-client:~ # pkg install -y      \
                      krb5              \
                      sudo              \
                      sssd2             \
                      cyrus-sasl        \
                      cyrus-sasl-gssapi \
                      openldap26-client \
                      pam_mkhomedir

root@idm-client:~ # cat << EOF >> /etc/ssh/ssh_config
GSSAPIAuthentication yes
EOF

root@idm-client:~ # cat << EOF >> /etc/ssh/sshd_config
GSSAPIAuthentication yes
UsePAM yes
EOF

root@idm-client:~ # cat << EOF > /usr/local/etc/sssd/sssd.conf
[sssd]
  config_file_version      = 2
  services                 = pam, ssh, sudo, ifp, pac, nss
  domains                  = lab.org
  timeout                  = 20

[domain/lab.org]
  ipa_server               = idm.lab.org
  ipa_domain               = lab.org
  pam_gssapi_services      = sudo, sudo-i
  enumerate                = True
  cache_credentials        = True
  override_shell           = /usr/local/bin/bash
  override_homedir         = /home/%u
  default_shell            = /bin/sh
  ldap_group_nesting_level = 10
  default_ccache_template  = FILE:/tmp/krb5cc_:%U

  krb5_ccache_template     = FILE:/tmp/krb5cc_:%U
  krb5_server              = idm.lab.org:88
  krb5_realm               = LAB.ORG
  krb5_keytab              = /usr/local/etc/ipa/krb5.keytab
  krb5_auth_timeout        = 20

  id_provider              = ipa
  sudo_provider            = ipa
  access_provider          = ipa
  subdomains_provider      = ipa
  auth_provider            = ipa
  chpass_provider          = ipa
  selinux_provider         = none
EOF

root@idm-client:~ # chmod 600 /usr/local/etc/sssd/sssd.conf

root@idm-client:~ # cat << EOF > /etc/nsswitch.conf
#
# nsswitch.conf(5) - name service switch configuration file
# $FreeBSD$
#
group: files sss
group_compat: nis
hosts: files dns
networks: files
passwd: files sss
passwd_compat: nis
shells: files
services: compat
services_compat: nis
protocols: files
rpc: files
sudoers: sss files
netgroup: files
EOF

root@idm-client:~ # cat /etc/rc.conf
hostname="idm-client.lab.org"
ifconfig_vtnet0="inet 10.0.0.233/24"
defaultrouter="10.0.0.1"
syslogd_flags="-ss"
clear_tmp_enable="YES"
sshd_enable="YES"
zfs_enable="YES"
sssd_enable="YES"

root@idm-client:~ # cat << EOF > /usr/local/etc/openldap/ldap.conf
BASE        dc=org,dc=lab
URI         ldap://idm.lab.org/
SASL_MECH   GSSAPI
SASL_REALM  LAB.ORG
ssl         start_tls
TLS_CACERT  /usr/local/etc/ipa/ca.crt
EOF

root@idm-client:~ # cat << EOF > /etc/krb5.conf
[libdefaults]
  default_realm        = LAB.ORG
  default_keytab_name  = FILE:/usr/local/etc/ipa/krb5.keytab
  default_tkt_enctypes = aes256-cts des-cbc-crc aes128-cts arcfour-hmac
  default_tgs_enctypes = aes256-cts des-cbc-crc aes128-cts arcfour-hmac
  dns_lookup_realm     = false
  dns_lookup_kdc       = false
  rdns                 = false
  ticket_lifetime      = 24h
  forwardable          = yes

[realms]
  LAB.ORG = {
    kdc            = idm.lab.org:88
    master_kdc     = idm.lab.org:88
    admin_server   = idm.lab.org:749
    default_domain = lab.org
    pkinit_anchors = FILE:/usr/local/etc/ipa/ca.crt
  }

[domain_realm]
  .lab.org = LAB.ORG
   lab.org = LAB.ORG

[logging]
  kdc          = FILE:/var/log/krb5/krb5kdc.log
  admin_server = FILE:/var/log/krb5/kadmin.log
  kadmin_local = FILE:/var/log/krb5/kadmin_local.log
  default      = FILE:/var/log/krb5/krb5lib.log
EOF

root@idm-client:~ # cat << EOF > /etc/pam.d/system
#
#
# System-wide defaults
#

# AUTH
  auth      sufficient  pam_krb5.so                      no_warn try_first_pass
# auth      sufficient  pam_ssh.so                       no_warn try_first_pass
  auth      sufficient  /usr/local/lib/pam_sss.so        no_warn use_first_pass
  auth      required    pam_unix.so                      no_warn try_first_pass nullok

# ACCOUNT
# account   required    pam_krb5.so
  account   required    pam_login_access.so
  account   required    /usr/local/lib/pam_sss.so        ignore_unknown_user ignore_authinfo_unavail
  account   required    pam_unix.so

# SESSION
# session   optional    pam_ssh.so                       want_agent
  session   required    pam_lastlog.so                   no_fail
  session   required    /usr/local/lib/pam_mkhomedir.so  mode=0700

# PASSWORD
# password  sufficient  pam_krb5.so                      no_warn try_first_pass
  password  sufficient  /usr/local/lib/pam_sss.so        no_warn use_authtok
  password  required    pam_unix.so                      no_warn try_first_pass
EOF

root@idm-client:~ # cat << EOF > /etc/pam.d/sshd
#
#
# PAM configuration for the "sshd" service
#

# AUTH
  auth      sufficient  pam_krb5.so                      no_warn try_first_pass
# auth      sufficient  pam_ssh.so                       no_warn try_first_pass
  auth      sufficient  /usr/local/lib/pam_sss.so        no_warn use_first_pass
  auth      required    pam_unix.so                      no_warn try_first_pass

# ACCOUNT
  account   required    pam_nologin.so
# account   required    pam_krb5.so
  account   required    pam_login_access.so
  account   required    pam_unix.so
  account   required    /usr/local/lib/pam_sss.so        ignore_unknown_user ignore_authinfo_unavail

# SESSION
# session   optional    pam_ssh.so                       want_agent
  session   required    pam_permit.so
  session   required    /usr/local/lib/pam_mkhomedir.so  mode=0700
  session   optional    /usr/local/lib/pam_sss.so

# PASSWORD
# password  sufficient  pam_krb5.so                      no_warn try_first_pass
  password  sufficient  /usr/local/lib/pam_sss.so        no_warn use_authtok
  password  required    pam_unix.so                      no_warn try_first_pass
EOF

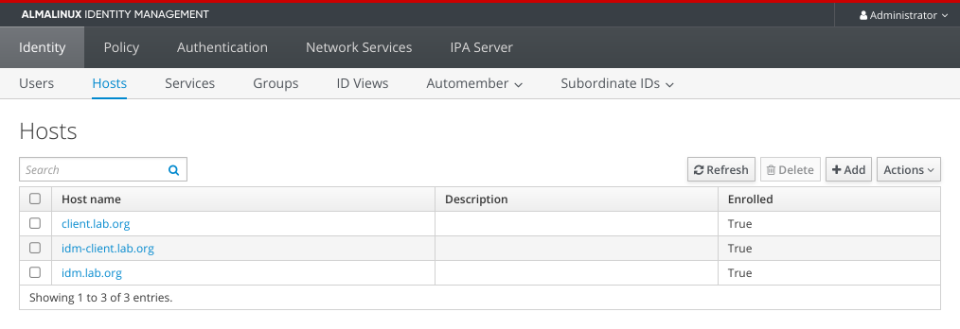
Our idm-client.lab.org in the FreeIPA/IDM below.

idm-hosts

Now reboot your idm-client.lab.org and You should be able to login to it with FreeIPA/IDM account.

host # ssh vermaden@10.0.0.233
(vermaden@10.0.0.233) Password:
Last login: Wed Mar  6 07:04:42 2024

vermaden@idm-client:~ $ id
uid=1374600003(vermaden) gid=1374600000(admins) groups=1374600000(admins)

vermaden@idm-client:~ $ klist
Credentials cache: FILE:/tmp/krb5cc_1374600003
        Principal: vermaden@LAB.ORG

  Issued                Expires               Principal
Mar  6 07:04:34 2024  Mar  7 06:19:19 2024  krbtgt/LAB.ORG@LAB.ORG

vermaden@idm-client:~ $ sudo -i
Password for vermaden@LAB.ORG:

root@idm-client:~ # id
uid=0(root) gid=0(wheel) groups=0(wheel),5(operator)

FreeBSD 14.0-STABLE Client – Debug Commands

Below are some commands that you may (or may not) find useful.

root@idm-client:~ # sssctl user-checks vermaden
user: vermaden
action: acct 
service: system-auth

SSSD nss user lookup result:
 - user name: vermaden
 - user id: 1374600003
 - group id: 1374600000
 - gecos: Vermaden Nedamrev
 - home directory: /home/vermaden
 - shell: /bin/sh
  
Unable to connect to system bus!
InfoPipe User lookup with [vermaden] failed.
testing pam_acct_mgmt   
  
pam_acct_mgmt: Success  
  
PAM Environment:
 - no env -


root@idm-client:~ # ldapsearch -H ldap://idm.lab.org -x -b "" -s base -LLL supportedSASLMechanisms
dn:
supportedSASLMechanisms: EXTERNAL
supportedSASLMechanisms: GSS-SPNEGO                      
supportedSASLMechanisms: GSSAPI
supportedSASLMechanisms: DIGEST-MD5
supportedSASLMechanisms: CRAM-MD5
supportedSASLMechanisms: LOGIN
supportedSASLMechanisms: PLAIN
supportedSASLMechanisms: ANONYMOUS


root@idm-client:~ # ldapsearch -x -v -W -D 'cn=Directory Manager' uid=vermaden
ldap_initialize(  )
Enter LDAP Password: 
filter: uid=vermaden
requesting: All userApplication attributes
# extended LDIF
#
# LDAPv3
# base  (default) with scope subtree
# filter: uid=vermaden
# requesting: ALL
#

# search result
search: 2
result: 32 No such object

# numResponses: 1


root@idm-client:~ # ldapsearch -Y GSSAPI -Omaxssf=0 -H ldaps://idm.lab.org -b dc=lab,dc=org CN=vermaden
SASL/GSSAPI authentication started
SASL username: vermaden@LAB.ORG
SASL SSF: 0
# extended LDIF
#
# LDAPv3
# base  with scope subtree
# filter: CN=vermaden
# requesting: ALL
#

# vermaden, groups, compat, lab.org
dn: cn=vermaden,cn=groups,cn=compat,dc=lab,dc=org
objectClass: posixGroup
objectClass: ipaOverrideTarget
objectClass: ipaexternalgroup
objectClass: top
gidNumber: 1374600003
ipaAnchorUUID:: OklQQTpsYWIub3JnOjcyN2FlMjM2LTMyMTktMTFlZS04OGMyLTU4OWNmYzA4MW
 QzNQ==
cn: vermaden

# vermaden, groups, accounts, lab.org
dn: cn=vermaden,cn=groups,cn=accounts,dc=lab,dc=org
objectClass: posixgroup
objectClass: ipaobject
objectClass: mepManagedEntry
objectClass: top
cn: vermaden
gidNumber: 1374600003
description: User private group for vermaden
mepManagedBy: uid=vermaden,cn=users,cn=accounts,dc=lab,dc=org
ipaUniqueID: 727ae236-3219-11ee-88c2-589cfc081d35

# search result
search: 4
result: 0 Success

# numResponses: 3
# numEntries: 2


Thats it – you have FreeBSD 14.0-STABLE connected to FreeIPA/IDM server.

Summary

Let me know in comments how it went.

EOF

Connect FreeBSD 13.2 to FreeIPA/IDM

About half a year ago I wrote about how to Connect FreeBSD to FreeIPA/Red Hat Identity Management with available then FreeBSD 13.1-RELEASE version. Time flies and we have newer FreeBSD release around the corner. FreeBSD 13.2 is currently at RC5 level and I believe we should see 13.2-RELEASE official announcement within hours – but even if it would take RC6 and RELEASE being available in weeks later – the instructions will not change for this setup.

This guide will focus only on FreeBSD part of configuring and building packages with needed options to make it connect (and work with) FreeIPA/IDM properly. To have a working FreeIPA/IDM server you need to do instructions from the FreeIPA section of the mentioned above article – up to the FreeBSD Client section. Then – when specified in the article – also the Finish Setup with Web Browser in FreeIPA/IDM Page section needs to be done from the earlier article.

In other words – this article updates the FreeBSD Client section with instructions to use latest upcoming FreeBSD 13.2-RELEASE and newer up-to-date packages versions.

One note about conventions (and colors).

% command                            // command executed on local system
[root@idm ~]# command                // command executed on FreeIPA/IDM server
# diff Makefile.OLD Makefile         // command executed on FreeBSD client system
< krb5>=1.10:security/krb5 \         // parts of configs/commands are colored for better visibility
> krb5-119>=1.10:security/krb5-119 \ // parts of configs/commands are colored for better visibility

FreeBSD Client

We will use these software versions as shown below.

# pkg info | grep -e krb -e sudo -e sssd -e openldap -e samba -e cyrus -e mkhomedir
cyrus-sasl-2.1.28           RFC 2222 SASL (Simple Authentication and Security Layer)
cyrus-sasl-gssapi-2.1.28    SASL GSSAPI authentication plugin
krb5-119-1.19.4             MIT implementation of RFC 4120 network authentication service
openldap26-client-2.6.4     Open source LDAP client implementation
pam_mkhomedir-0.2           Create HOME with a PAM module on demand
samba413-4.13.17_4          Free SMB/CIFS and AD/DC server and client for Unix
sssd-1.16.5_8               System Security Services Daemon
sudo-1.9.13p3               Allow others to run commands as root

This is the main /etc/rc.conf config file.

# cat /etc/rc.conf
  hostname="fbsd132.vercorp.org"
  ifconfig_em0="inet 10.0.0.50/24"
  defaultrouter="10.0.0.1"
  clear_tmp_enable=YES
  syslogd_flags="-ss"
  sshd_enable=YES
  dumpdev=AUTO
  zfs_enable=YES
  ntpd_enable=YES
  sssd_enable="YES"
  rc_info=NO
  rc_startmsgs=NO

FreeBSD Packages

UPDATE: Instead of building these package by hand you may use the latest FreeBSD on FreeIPA/IDM with Poudriere Repo guide instead.

We will fetch up-to-date FreeBSD Ports tree.

# portsnap auto

We will also configure make(1) to store all its compilation results under /usr/ports/obj dir.

# cat << EOF > /etc/make.conf
WRKDIRPREFIX=/usr/ports/obj
EOF

We will switch to latest branch of pkg(8) packages.

# sed -i '' s/quarterly/latest/g /etc/pkg/FreeBSD.conf

# grep latest /etc/pkg/FreeBSD.conf
  url: "pkg+http://pkg.FreeBSD.org/${ABI}/latest",

We will install packages that are needed for compilation and also essential pam_mkhomedir package.

# pkg install -y \
    autoconf \
    automake \
    bind-tools \
    c-ares \
    cmocka \
    dialog4ports \
    ding-libs \
    docbook-xsl \
    gettext-tools \
    gmake \
    ldb22 \
    libtool \
    libxslt \
    m4 \
    nss \
    pcre \
    pkgconf \
    pam_mkhomedir

Now we will install our ‘core’ packages – and delete them right after – to waste less time on compilation.

# pkg install   -y krb5-119 sudo cyrus-sasl cyrus-sasl-gssapi openldap26-client samba413

# pkg delete -f -y krb5-119 sudo cyrus-sasl cyrus-sasl-gssapi openldap26-client samba413

# pkg install   -y krb5-119

By default the security/krb5-119 package is built without LDAP option. This is what we need for this step. We will later rebuild it with LDAP option.

In case something changed between posting that article and LDAP option being included or not in the security/krb5-119 package – below are instructions to rebuild it without LDAP option.

# cd /usr/ports/security/krb5-119

# make config
[ ] LDAP

# make build deinstall install

Now we need to rebuild security/cyrus-sasl2-gssapi package with GSSAPI_MIT option enabled.

# cd /usr/ports/security/cyrus-sasl2-gssapi

# make config
(x) GSSAPI_MIT

# make build deinstall install

Next rebuild the net/openldap26-client package with GSSAPI option enabled.

# cd /usr/ports/net/openldap26-client

# make config
[x] GSSAPI

# make build deinstall install

Next we are back to security/krb5-119 package and now it needs to be rebuilt with LDAP option.

# cd /usr/ports/security/krb5-119

# make config
[x] LDAP

# make build deinstall install

Now with security/sssd we will need a small patch because without it security/sssd will try to use newer security/krb5-120 package – which does not work with FreeIPA/IDM for now.

# cd /usr/ports/security/sssd

# cp Makefile Makefile.OLD

# sed -i '' 's|krb5>=1.10:security/krb5|krb5-119>=1.10:security/krb5-119|g' Makefile

# diff Makefile.OLD Makefile
32c32
<               krb5>=1.10:security/krb5 \
---
>               krb5-119>=1.10:security/krb5-119 \


Now the rebuild instructions.

# cd /usr/ports/security/sssd

# make config
[x] SMB

# make build deinstall install

Now we need to delete security/sssd and security/sudo packages to rebuild them again … yes its stupid.

# pkg delete -f sudo sssd

We now need to build and install security/sudo without PAM option and with SSSD option and with GSSAPI_MIT option enabled.

# cd /usr/ports/security/sudo

# make config
[ ] PAM
[x] SSSD
--- Kerberos 5 Authentication
(*) GSSAPI_MIT

# make build deinstall install

FreeBSD Setup

We now move to the configuration process as we have our packages installed.

Create needed dirs.

# mkdir -p \
    /usr/local/etc/ipa \
    /var/log/sssd \
    /var/run/sss/private \
    /var/db/sss

Set system hostname.

# grep hostname /etc/rc.conf
  hostname="fbsd132.vercorp.org"

# hostname fbsd132.vercorp.org

# hostname
fbsd132.vercorp.org

# cat << EOF > /etc/hosts
::1             localhost localhost.my.domain
127.0.0.1       localhost localhost.my.domain
10.0.0.50       fbsd132.vercorp.org fbsd132
10.0.0.40       idm.vercorp.org idm
EOF

# cat /etc/hosts
::1             localhost localhost.my.domain
127.0.0.1       localhost localhost.my.domain
10.0.0.50       fbsd132.vercorp.org fbsd132
10.0.0.40       idm.vercorp.org idm

Fetch the FreeIPA/IDM certificate.

# fetch -o /usr/local/etc/ipa/ca.crt http://10.0.0.40/ipa/config/ca.crt
/usr/local/etc/ipa/ca.crt                             1635  B 8227 kBps    00s

FreeIPA/IDM Setup Part

We now need to execute instructions on /IDM to connect FreeBSD to it.

Add A and PTR DNS records for our 10.0.0.50 IP address with fbsd132.vercorp.org hostname.

We also need to generate key for fbsd132.vercorp.org system.

[root@idm ~]# kinit admin
Password for admin@VERCORP.ORG:

[root@idm ~]# ipa dnsrecord-add vercorp.org fbsd132 --a-rec=10.0.0.50 --a-create-reverse
  Record name: fbsd132
  A record: 10.0.0.50

[root@idm ~]# ipa host-add fbsd132.vercorp.org
--------------------------------
Added host "fbsd132.vercorp.org"
--------------------------------
  Host name: fbsd132.vercorp.org
  Principal name: host/fbsd132.vercorp.org@VERCORP.ORG
  Principal alias: host/fbsd132.vercorp.org@VERCORP.ORG
  Password: False
  Keytab: False
  Managed by: fbsd132.vercorp.org

[root@idm ~]# ipa-getkeytab -s idm.vercorp.org \
                            -p host/fbsd132.vercorp.org@VERCORP.ORG \
                            -k /root/fbsd132.vercorp.org.keytab
Keytab successfully retrieved and stored in: /root/fbsd132.vercorp.org.keytab

[root@idm ~]# cp \
                /root/fbsd132.vercorp.org.keytab \
                /usr/share/ipa/html/fbsd132.vercorp.org.keytab

[root@idm ~]# chmod 644 /usr/share/ipa/html/fbsd132.vercorp.org.keytab

Now we will get fbsd132.vercorp.org system key from FreeIPA/IDM server.

# fetch -o /usr/local/etc/ipa/krb5.keytab http://10.0.0.40/ipa/config/fbsd132.vercorp.org.keytab
/usr/local/etc/ipa/krb5.keytab                         176  B  975 kBps    00s

# chmod 600 /usr/local/etc/ipa/krb5.keytab

Now we will move to creating needed config files.

The /usr/local/etc/openldap/ldap.conf file.

# cat << EOF > /usr/local/etc/openldap/ldap.conf
BASE        dc=org,dc=vercorp
URI         ldap://idm.vercorp.org/
#SIZELIMIT  12
#TIMELIMIT  15
#DEREF      never
SASL_MECH   GSSAPI
SASL_REALM  VERCORP.ORG
ssl         start_tls
TLS_CACERT  /usr/local/etc/ipa/ca.crt
EOF

… and /etc/krb5.conf file.

# cat << EOF > /etc/krb5.conf
[libdefaults]
  default_realm = VERCORP.ORG
  default_keytab_name = FILE:/usr/local/etc/ipa/krb5.keytab
  default_tkt_enctypes = aes256-cts des-cbc-crc aes128-cts arcfour-hmac
  default_tgs_enctypes = aes256-cts des-cbc-crc aes128-cts arcfour-hmac
  dns_lookup_realm = false
  dns_lookup_kdc = false
  rdns = false
  ticket_lifetime = 24h
  forwardable = yes

[realms]
  VERCORP.ORG = {
    kdc = idm.vercorp.org:88
    master_kdc = idm.vercorp.org:88
    admin_server = idm.vercorp.org:749
    default_domain = vercorp.org
    pkinit_anchors = FILE:/usr/local/etc/ipa/ca.crt
}

[domain_realm]
  .vercorp.org = VERCORP.ORG
  vercorp.org = VERCORP.ORG

[logging]
  kdc = FILE:/var/log/krb5/krb5kdc.log
  admin_server = FILE:/var/log/krb5/kadmin.log
  kadmin_local = FILE:/var/log/krb5/kadmin_local.log
  default = FILE:/var/log/krb5/krb5lib.log
EOF

… and /usr/local/etc/sssd/sssd.conf file.

# cat << EOF > /usr/local/etc/sssd/sssd.conf

[domain/vercorp.org]
# debug_level = 9
cache_credentials = True
krb5_store_password_if_offline = True
krb5_realm = VERCORP.ORG
ipa_domain = vercorp.org
id_provider = ipa
auth_provider = ipa
access_provider = ipa
ipa_hostname = fbsd132.vercorp.org
chpass_provider = ipa
ipa_server = _srv_, idm.vercorp.org
ldap_tls_cacert = /usr/local/etc/ipa/ca.crt
krb5_keytab = /usr/local/etc/ipa/krb5.keytab

[sssd]
services = nss, pam, ssh, sudo
config_file_version = 2
domains = vercorp.org

[nss]
filter_users = root,toor
homedir_substring = /usr/home/%u

[pam]

[sudo]
# debug_level = 0x3ff0

[ssh]
EOF

# chmod 600 /usr/local/etc/sssd/sssd.conf

FreeBSD have user account under /usr/home to make sure /home also points there.

# ln -s /usr/home /home

Now we need modify several FreeBSD Base System files such as /etc/nsswitch.conf or PAM and SSH configuration.

# cat << EOF > /etc/nsswitch.conf
#
# nsswitch.conf(5) - name service switch configuration file
# $FreeBSD$
#
group: files sss
group_compat: nis
hosts: files dns
# netgroup: compat
networks: files
passwd: files sss
passwd_compat: nis
shells: files
services: compat
services_compat: nis
protocols: files
rpc: files
sudoers: sss files
netgroup: files
EOF

The /etc/pam.d/system file.

# cat << EOF > /etc/pam.d/system
#
# $FreeBSD$
#
# System-wide defaults
#

# auth
auth            sufficient      pam_opie.so             no_warn no_fake_prompts
auth            requisite       pam_opieaccess.so       no_warn allow_local
auth            sufficient      pam_krb5.so             no_warn try_first_pass
#auth           sufficient      pam_ssh.so              no_warn try_first_pass
auth            sufficient      /usr/local/lib/pam_sss.so       use_first_pass
auth            required        pam_unix.so             no_warn try_first_pass nullok

# account
#account        required        pam_krb5.so
account         required        pam_login_access.so
account         required        pam_unix.so
account         required        /usr/local/lib/pam_sss.so       ignore_unknown_user ignore_authinfo_unavail

# session
#session        optional        pam_ssh.so              want_agent
session         required        pam_lastlog.so          no_fail
session         required        /usr/local/lib/pam_mkhomedir.so mode=0700

# password
#password       sufficient      pam_krb5.so             no_warn try_first_pass
password        sufficient      /usr/local/lib/pam_sss.so       use_authtok
password        required        pam_unix.so             no_warn try_first_pass
EOF

The /etc/pam.d/sshd file.

# cat << EOF > /etc/pam.d/sshd
#
# $FreeBSD$
#
# PAM configuration for the "sshd" service
#

# auth
auth            sufficient      pam_opie.so             no_warn no_fake_prompts
auth            requisite       pam_opieaccess.so       no_warn allow_local
auth            sufficient      pam_krb5.so             no_warn try_first_pass
#auth           sufficient      pam_ssh.so              no_warn try_first_pass
auth            sufficient      /usr/local/lib/pam_sss.so       use_first_pass
auth            required        pam_unix.so             no_warn try_first_pass

# account
account         required        pam_nologin.so
#account        required        pam_krb5.so
account         required        pam_login_access.so
account         required        pam_unix.so
account         required        /usr/local/lib/pam_sss.so       ignore_unknown_user ignore_authinfo_unavail

# session
#session        optional        pam_ssh.so              want_agent
session         required        pam_permit.so
session         required        /usr/local/lib/pam_mkhomedir.so mode=0700

# password
#password       sufficient      pam_krb5.so             no_warn try_first_pass
password        sufficient      /usr/local/lib/pam_sss.so       use_authtok
password        required        pam_unix.so             no_warn try_first_pass
EOF

The /etc/ssh/ssh_config file.

# cat << EOF >> /etc/ssh/ssh_config
GSSAPIAuthentication yes
EOF

The /etc/ssh/sshd_config file.

# cat << EOF >> /etc/ssh/sshd_config
GSSAPIAuthentication yes
UsePAM yes
EOF

Automatic startup of sssd(8) daemon (not to confuse with sshd(8)) needs to be also configured.

# service sssd enable
# service sssd start

Now … go to the original Connect FreeBSD to FreeIPA/Red Hat Identity Management article and ‘do’ the Finish Setup with Web Browser in FreeIPA/IDM Page section instructions – all the way up to the FreeBSD FreeIPA Login Test section.

FreeBSD FreeIPA Login Test

Now we can try to login to our FreeBSD client … but first several other things.

If you just created your ‘regular’ FreeIPA/IDM user – you need to set a permanent password for it. Its not possible by first logging to the FreeBSD system. You will get following error on the FreeBSD client.

# grep sshd /var/log/messages
(...)
Mar 24 20:51:46 fbsd132 [sssd[krb5_child[779]]][779]: Password has expired
(...)

You need to change this password by logging into the FreeIPA/IDM Linux system. Here is how.

% ssh 10.0.0.40 -l vermaden
(vermaden@10.0.0.40) Password:
(vermaden@10.0.0.40) Password expired. Change your password now.
Current Password:
(vermaden@10.0.0.40) New password:
(vermaden@10.0.0.40) Retype new password:
Could not chdir to home directory /home/vermaden: No such file or directory
[vermaden@idm /]$ exit

Another thing – make sure that time is synchronized between the client and FreeIPA/IDM systems – you will get following error on the FreeBSD client if they are not in sync.

# grep sssd /var/log/messages
(...)
Mar 24 20:51:46 fbsd132 [sssd[krb5_child[779]]][779]: Clock skew too great
(...)

… or …

PAM: User account has expired for vermaden from 10.0.0.3

Here is fast way to sync their times against pool.ntp.org host.

Feel free to setup some permanent time sync solution on both of them. You can also enable NTP server on FreeIPA/IDM during its configuration and sync all FreeIPA/IDM clients against it.

# ntpdate pool.ntp.org

# date
Wed Mar 29 10:34:14 CEST 2023

[root@idm ~]# chronyd -q 'server pool.ntp.org iburst' || chronyc -a 'burst 4/4'

[root@idm ~]# date
Wed Mar 29 10:34:14 CEST 2023

Now we can finally login to our FreeBSD client.

% ssh 10.0.0.50 -l vermaden
(vermaden@10.0.0.50) Password:

vermaden@fbsd132:~ $ uname -prism
FreeBSD 13.2-RC3 amd64 amd64 GENERIC

vermaden@fbsd132:~ $ grep $( whoami ) /etc/passwd

vermaden@fbsd132:~ $ id
uid=1408200003(vermaden) gid=1408200000(admins) groups=1408200000(admins)


Done. Seems to work properly.

Latest Samba 4.16

You can also use latest Samba 4.16 version instead of the 4.13 default one.

The needed changes are below – to be executed before package building.

# cat << EOF >> /etc/make.conf
# net/samba416
DEFAULT_VERSIONS+=samba=4.16
EOF

Rebuilding process for net/samba416 package.

# cd /usr/ports/net/samba416

# make config
(*) GSSAPI_MIT

# make build deinstall install

Feel free to share your thoughts on this in the comments section.

EOF

Connect FreeBSD to FreeIPA/Red Hat Identity Management

Corporate needs are simple – one ring to rule them all place to get users from. On the open source path there are several ways to achieve that. Alongside ‘plain’ OpenLDAP there is also FreeIPA – which is open source and free version of the Red Hat Identity Management (IDM).

FreeIPA-logo

This guide will show you how to make basic FreeIPA install and connect a FreeBSD 13.1-RELEASE system to it.

logo-freebsd

The Table of Contents for this article looks as follows.

  • Connect FreeBSD to FreeIPA/Red Hat Identity Management
  • FreeIPA
    • FreeIPA Requirements
    • FreeIPA Setup
  • FreeBSD Client
    • FreeBSD Packages
    • FreeBSD Setup
    • FreeIPA/IDM Setup Part
    • Finish Setup with Web Browser in FreeIPA/IDM Page
    • FreeBSD FreeIPA Login Test
  • FreeBSD Jail as FreeIPA/IDM Client
    • Basic FreeBSD Jail Preparations
    • Configure FreeBSD Jail to Connect to FreeIPA/IDM Server
  • Linux FreeIPA/IDM Client
    • FreeIPA/IDM Setup Part
    • Linux FreeIPA/IDM Client Setup

FreeIPA

As typical CentOS is dead (yes there is CentOS Stream available but its not a RHEL clone) I have two options here. Rocky Linux and Alma Linux. I will use the latter as it seems more popular and more up to date. In this guide the FreeIPA/IDM server will hosted on the Alma Linux 8.6 system.

To make things easier I installed that Alma Linux 8.6 with single 20GB / root on the /dev/sda1 partition. No separate /boot. No LVM. Just good old plain fucking simple single raw partition for everything. Seems no one does it these days πŸ™‚

[root@idm ~]# lsblk
NAME   MAJ:MIN RM  SIZE RO TYPE MOUNTPOINT
sda      8:0    0   20G  0 disk
└─sda1   8:1    0   20G  0 part /

FreeIPA Requirements

The minimum hardware requirements for installing FreeIPA server are as follows.

RAM: 4GB
CPU: 2
HDD: 10GB
DNS: fully qualified domain name for FreeIPA
     must be resolvable from DNS server configured in system

For this installation I have used the 10.0.0.0/24 network.

The FreeIPA/IDM server will get the 10.0.0.40 IP.

The FreeIPA/IDM Linux client rhlike.vercorp.org will get the 10.0.0.41 IP.

The FreeIPA/IDM FreeBSD client fbsd.vercorp.org will get the 10.0.0.42 IP.

The FreeIPA/IDM FreeBSD client fbsdjail.vercorp.org will get the 10.0.0.43 IP.

For lack of better ideas I have used vercorp.org/VERCORP.ORG as domain/realm names and idm.vercorp.org as the FreeIPA/IDM hostname.

Details of FreeIPA/IDM idm.vercorp.org system below.

      IP: 10.0.0.40/24
      GW: 10.0.0.1
     DNS: 1.1.1.1
hostname: idm.vercorp.org
  domain: vercorp.org
   realm: VERCORP.ORG

FreeBSD fbsd.vercorp.org system.

      IP: 10.0.0.42/24
      GW: 10.0.0.1
hostname: fbsd.vercorp.org

FreeBSD Jail fbsdjail.vercorp.org system.

      IP: 10.0.0.43/24
      GW: 10.0.0.1
hostname: fbsdjail.vercorp.org

If you are curious what is hidden in the 10.0.0.42 IP – then its a typical Alma Linux that I first used to try if the FreeIPA/IDM works at all πŸ™‚

FreeIPA Setup

Because Anaconda is far from being a usable installer – this is how the only enp0s3 interface config looks like after manual intervention.

[root@idm ~]# cat /etc/sysconfig/network-scripts/ifcfg-enp0s3
NAME=enp0s3
DEVICE=enp0s3
TYPE=Ethernet
BOOTPROTO=none
UUID=b49cd1ab-d3eb-421d-b408-c052acc077da
ONBOOT=yes
IPADDR=10.0.0.40
NETMASK=255.255.255.0
GATEWAY=10.0.0.1
IPV6INIT=no
DNS1=1.1.1.1
PROXY_METHOD=none
BROWSER_ONLY=no
DEFROUTE=yes
IPV4_FAILURE_FATAL=no

Before we will go into setup procedures – we will update that Alma Linux system.

[root@idm ~]# yum update -y
[root@idm ~]# reboot

After the reboot we will disable the IPv6 stack for main interface (enp0s3) as FreeIPA installer has some problem with it. We do not need IPv6 here anyway so …

[root@idm ~]# cat << EOF >> /etc/sysctl.conf
# DISABLE IPv6 FOR MAIN enp0s3 INTERFACE
net.ipv6.conf.enp0s3.disable_ipv6=1
EOF

Lets set our FreeIPA/IDM hostname if we missed that at the Anaconda installer part. We will also setup the system time zone.

[root@idm ~]# hostnamectl set-hostname idm.vercorp.org

[root@idm ~]# hostnamectl
   Static hostname: idm.vercorp.org
         Icon name: computer-vm
           Chassis: vm
        Machine ID: b8bfb8bcc23147eb9cc7b62c72a09c32
           Boot ID: 06158ef430d9467d959076ab4396314e
    Virtualization: oracle
  Operating System: AlmaLinux 8.6 (Sky Tiger)
       CPE OS Name: cpe:/o:almalinux:almalinux:8::baseos
            Kernel: Linux 4.18.0-372.26.1.el8_6.x86_64
      Architecture: x86-64

[root@idm ~]# timedatectl set-timezone Europe/Warsaw

[root@idm ~]# timedatectl set-local-rtc 0

[root@idm ~]#Β timedatectl
               Local time: Mon 2022-10-17 15:08:28 CEST
           Universal time: Mon 2022-10-17 13:08:28 UTC
                 RTC time: Sat 2022-10-15 00:28:10
                Time zone: Europe/Warsaw (CEST, +0200)
System clock synchronized: yes
              NTP service: inactive
          RTC in local TZ: no

Lets add the system IP and name to the /etc/hosts file now.

[root@idm ~]# echo "$( hostname -i | awk '{print $NF}' )   $( hostname ) $( hostname -s )" >> /etc/hosts

[root@idm ~]# grep idm /etc/hosts
10.0.0.40   idm.vercorp.org idm

[root@idm ~]# cat /etc/hosts
127.0.0.1   localhost localhost.localdomain localhost4 localhost4.localdomain4
::1         localhost localhost.localdomain localhost6 localhost6.localdomain6
10.0.0.40   idm.vercorp.org idm

We need to enable the FreeIPA/IDM module in yum(8).

[root@idm ~]# yum module list idm
Last metadata expiration check: 0:00:31 ago on Tue 18 Oct 2022 01:02:51 PM CEST.
AlmaLinux 8 - AppStream
Name  Stream      Profiles                                  Summary
idm   DL1         adtrust, client, common [d], dns, server  The Red Hat Enterprise Linux Identity Management system module
idm   client [d]  common [d]                                RHEL IdM long term support client module

Hint: [d]efault, [e]nabled, [x]disabled, [i]nstalled

[root@idm ~]# yum module enable idm:DL1 -y
Last metadata expiration check: 0:01:06 ago on Tue 18 Oct 2022 01:02:51 PM CEST.
Dependencies resolved.
=====================================================================================================
 Package                 Architecture           Version                  Repository              Size
=====================================================================================================
Enabling module streams:
 389-ds                                         1.4
 httpd                                          2.4
 idm                                            DL1
 pki-core                                       10.6
 pki-deps                                       10.6

Transaction Summary
=====================================================================================================

Complete!

Some additional step needed.

[root@idm ~]# yum distro-sync
Last metadata expiration check: 0:10:07 ago on Mon 17 Oct 2022 03:14:32 PM CEST.
Dependencies resolved.
Nothing to do.
Complete!

We will now install FreeIPA/IDM with DNS as this setup is the most simplistic one. We focus on FreeBSD part here in that article.

[root@idm ~]# yum install -y bind-utils chrony nc
[root@idm ~]# yum module install idm:DL1/dns -y

One can use the ‘interactive’ installer and answer ‘by hand’ for all the asked questions – but to be honest I prefer to type my command once and make it ‘happen’ altogether without my time wasted.


As you probably guessed – we will use the unattended mode for the FreeIPA/IDM installer.

[root@idm ~]# ipa-server-install \
    --domain vercorp.org \
    --realm VERCORP.ORG \
    --reverse-zone=0.0.10.in-addr.arpa. \
    --no-forwarders \
    --no-ntp \
    --setup-dns \
    --ds-password    [password] \
    --admin-password [password] \
    --unattended

Checking DNS domain 0.0.10.in-addr.arpa., please wait ...

The log file for this installation can be found in /var/log/ipaserver-install.log
==============================================================================
This program will set up the IPA Server.
Version 4.9.8

This includes:
  * Configure a stand-alone CA (dogtag) for certificate management
  * Create and configure an instance of Directory Server
  * Create and configure a Kerberos Key Distribution Center (KDC)
  * Configure Apache (httpd)
  * Configure DNS (bind)
  * Configure SID generation
  * Configure the KDC to enable PKINIT

Excluded by options:
  * Configure the NTP client (chronyd)

Warning: skipping DNS resolution of host idm.vercorp.org
Checking DNS domain vercorp.org., please wait ...
Checking DNS domain 0.0.10.in-addr.arpa., please wait ...
Using reverse zone(s) 0.0.10.in-addr.arpa.
Trust is configured but no NetBIOS domain name found, setting it now.

The IPA Master Server will be configured with:
Hostname:       idm.vercorp.org
IP address(es): 10.0.0.40
Domain name:    vercorp.org
Realm name:     VERCORP.ORG

The CA will be configured with:
Subject DN:   CN=Certificate Authority,O=VERCORP.ORG
Subject base: O=VERCORP.ORG
Chaining:     self-signed

BIND DNS server will be configured to serve IPA domain with:
Forwarders:       No forwarders
Forward policy:   only
Reverse zone(s):  0.0.10.in-addr.arpa.

Disabled p11-kit-proxy
Configuring directory server (dirsrv). Estimated time: 30 seconds
  [1/41]: creating directory server instance
Validate installation settings ...
Create file system structures ...
Perform SELinux labeling ...
Create database backend: dc=vercorp,dc=org ...
Perform post-installation tasks ...
  [2/41]: tune ldbm plugin
  [3/41]: adding default schema
  [4/41]: enabling memberof plugin
  [5/41]: enabling winsync plugin
  [6/41]: configure password logging
  [7/41]: configuring replication version plugin
  [8/41]: enabling IPA enrollment plugin
  [9/41]: configuring uniqueness plugin
  [10/41]: configuring uuid plugin
  [11/41]: configuring modrdn plugin
  [12/41]: configuring DNS plugin
  [13/41]: enabling entryUSN plugin
  [14/41]: configuring lockout plugin
  [15/41]: configuring topology plugin
  [16/41]: creating indices
  [17/41]: enabling referential integrity plugin
  [18/41]: configuring certmap.conf
  [19/41]: configure new location for managed entries
  [20/41]: configure dirsrv ccache and keytab
  [21/41]: enabling SASL mapping fallback
  [22/41]: restarting directory server
  [23/41]: adding sasl mappings to the directory
  [24/41]: adding default layout
  [25/41]: adding delegation layout
  [26/41]: creating container for managed entries
  [27/41]: configuring user private groups
  [28/41]: configuring netgroups from hostgroups
  [29/41]: creating default Sudo bind user
  [30/41]: creating default Auto Member layout
  [31/41]: adding range check plugin
  [32/41]: creating default HBAC rule allow_all
  [33/41]: adding entries for topology management
  [34/41]: initializing group membership
  [35/41]: adding master entry
  [36/41]: initializing domain level
  [37/41]: configuring Posix uid/gid generation
  [38/41]: adding replication acis
  [39/41]: activating sidgen plugin
  [40/41]: activating extdom plugin
  [41/41]: configuring directory to start on boot
Done configuring directory server (dirsrv).
Configuring Kerberos KDC (krb5kdc)
  [1/10]: adding kerberos container to the directory
  [2/10]: configuring KDC
  [3/10]: initialize kerberos container
  [4/10]: adding default ACIs
  [5/10]: creating a keytab for the directory
  [6/10]: creating a keytab for the machine
  [7/10]: adding the password extension to the directory
  [8/10]: creating anonymous principal
  [9/10]: starting the KDC
  [10/10]: configuring KDC to start on boot
Done configuring Kerberos KDC (krb5kdc).
Configuring kadmin
  [1/2]: starting kadmin
  [2/2]: configuring kadmin to start on boot
Done configuring kadmin.
Configuring ipa-custodia
  [1/5]: Making sure custodia container exists
  [2/5]: Generating ipa-custodia config file
  [3/5]: Generating ipa-custodia keys
  [4/5]: starting ipa-custodia
  [5/5]: configuring ipa-custodia to start on boot
Done configuring ipa-custodia.
Configuring certificate server (pki-tomcatd). Estimated time: 3 minutes
  [1/29]: configuring certificate server instance
  [2/29]: stopping certificate server instance to update CS.cfg
  [3/29]: backing up CS.cfg
  [4/29]: Add ipa-pki-wait-running
  [5/29]: secure AJP connector
  [6/29]: reindex attributes
  [7/29]: exporting Dogtag certificate store pin
  [8/29]: disabling nonces
  [9/29]: set up CRL publishing
  [10/29]: enable PKIX certificate path discovery and validation
  [11/29]: authorizing RA to modify profiles
  [12/29]: authorizing RA to manage lightweight CAs
  [13/29]: Ensure lightweight CAs container exists
  [14/29]: Ensuring backward compatibility
  [15/29]: starting certificate server instance
  [16/29]: configure certmonger for renewals
  [17/29]: requesting RA certificate from CA
  [18/29]: publishing the CA certificate
  [19/29]: adding RA agent as a trusted user
  [20/29]: configure certificate renewals
  [21/29]: Configure HTTP to proxy connections
  [22/29]: updating IPA configuration
  [23/29]: enabling CA instance
  [24/29]: importing IPA certificate profiles
  [25/29]: migrating certificate profiles to LDAP
  [26/29]: adding default CA ACL
  [27/29]: adding 'ipa' CA entry
  [28/29]: configuring certmonger renewal for lightweight CAs
  [29/29]: deploying ACME service
Done configuring certificate server (pki-tomcatd).
Configuring directory server (dirsrv)
  [1/3]: configuring TLS for DS instance
  [2/3]: adding CA certificate entry
  [3/3]: restarting directory server
Done configuring directory server (dirsrv).
Configuring ipa-otpd
  [1/2]: starting ipa-otpd
  [2/2]: configuring ipa-otpd to start on boot
Done configuring ipa-otpd.
Configuring the web interface (httpd)
  [1/22]: stopping httpd
  [2/22]: backing up ssl.conf
  [3/22]: disabling nss.conf
  [4/22]: configuring mod_ssl certificate paths
  [5/22]: setting mod_ssl protocol list
  [6/22]: configuring mod_ssl log directory
  [7/22]: disabling mod_ssl OCSP
  [8/22]: adding URL rewriting rules
  [9/22]: configuring httpd
Nothing to do for configure_httpd_wsgi_conf
  [10/22]: setting up httpd keytab
  [11/22]: configuring Gssproxy
  [12/22]: setting up ssl
  [13/22]: configure certmonger for renewals
  [14/22]: publish CA cert
  [15/22]: clean up any existing httpd ccaches
  [16/22]: enable ccache sweep
  [17/22]: configuring SELinux for httpd
  [18/22]: create KDC proxy config
  [19/22]: enable KDC proxy
  [20/22]: starting httpd
  [21/22]: configuring httpd to start on boot
  [22/22]: enabling oddjobd
Done configuring the web interface (httpd).
Configuring Kerberos KDC (krb5kdc)
  [1/1]: installing X509 Certificate for PKINIT
Done configuring Kerberos KDC (krb5kdc).
Applying LDAP updates
Upgrading IPA:. Estimated time: 1 minute 30 seconds
  [1/10]: stopping directory server
  [2/10]: saving configuration
  [3/10]: disabling listeners
  [4/10]: enabling DS global lock
  [5/10]: disabling Schema Compat
  [6/10]: starting directory server
  [7/10]: upgrading server
  [8/10]: stopping directory server
  [9/10]: restoring configuration
  [10/10]: starting directory server
Done.
Restarting the KDC
dnssec-validation yes
Configuring DNS (named)
  [1/12]: generating rndc key file
  [2/12]: adding DNS container
  [3/12]: setting up our zone
  [4/12]: setting up reverse zone
  [5/12]: setting up our own record
  [6/12]: setting up records for other masters
  [7/12]: adding NS record to the zones
  [8/12]: setting up kerberos principal
  [9/12]: setting up named.conf
created new /etc/named.conf
created named user config '/etc/named/ipa-ext.conf'
created named user config '/etc/named/ipa-options-ext.conf'
created named user config '/etc/named/ipa-logging-ext.conf'
  [10/12]: setting up server configuration
  [11/12]: configuring named to start on boot
  [12/12]: changing resolv.conf to point to ourselves
Done configuring DNS (named).
Restarting the web server to pick up resolv.conf changes
Configuring DNS key synchronization service (ipa-dnskeysyncd)
  [1/7]: checking status
  [2/7]: setting up bind-dyndb-ldap working directory
  [3/7]: setting up kerberos principal
  [4/7]: setting up SoftHSM
  [5/7]: adding DNSSEC containers
  [6/7]: creating replica keys
  [7/7]: configuring ipa-dnskeysyncd to start on boot
Done configuring DNS key synchronization service (ipa-dnskeysyncd).
Restarting ipa-dnskeysyncd
Restarting named
Updating DNS system records
Configuring SID generation
  [1/8]: creating samba domain object
  [2/8]: adding admin(group) SIDs
  [3/8]: adding RID bases
  [4/8]: updating Kerberos config
'dns_lookup_kdc' already set to 'true', nothing to do.
  [5/8]: activating sidgen task
  [6/8]: restarting Directory Server to take MS PAC and LDAP plugins changes into account
  [7/8]: adding fallback group
  [8/8]: adding SIDs to existing users and groups
This step may take considerable amount of time, please wait..
Done.
Configuring client side components
This program will set up IPA client.
Version 4.9.8

Using existing certificate '/etc/ipa/ca.crt'.
Client hostname: idm.vercorp.org
Realm: VERCORP.ORG
DNS Domain: vercorp.org
IPA Server: idm.vercorp.org
BaseDN: dc=vercorp,dc=org

Configured /etc/sssd/sssd.conf
Systemwide CA database updated.
Adding SSH public key from /etc/ssh/ssh_host_ed25519_key.pub
Adding SSH public key from /etc/ssh/ssh_host_ecdsa_key.pub
Adding SSH public key from /etc/ssh/ssh_host_rsa_key.pub
SSSD enabled
Configured /etc/openldap/ldap.conf
Configured /etc/ssh/ssh_config
Configured /etc/ssh/sshd_config
Configuring vercorp.org as NIS domain.
Client configuration complete.
The ipa-client-install command was successful

==============================================================================
Setup complete

Next steps:
  1. You must make sure these network ports are open:
    TCP Ports:
      * 80, 443: HTTP/HTTPS
      * 389, 636: LDAP/LDAPS
      * 88, 464: kerberos
      * 53: bind
    UDP Ports:
      * 88, 464: kerberos
      * 53: bind

  2. You can now obtain a kerberos ticket using the command: 'kinit admin'
     This ticket will allow you to use the IPA tools (e.g., ipa user-add)
     and the web user interface.
  3. Kerberos requires time synchronization between clients
     and servers for correct operation. You should consider enabling chronyd.

Be sure to back up the CA certificates stored in /root/cacert.p12
These files are required to create replicas. The password for these
files is the Directory Manager password
The ipa-server-install command was successful
[root@idm ~]#

Seems that all went well and now we have our FreeIPA/IDM installed.

Lets check several things.

[root@idm ~]# ipactl status
Directory Service: RUNNING
krb5kdc Service: RUNNING
kadmin Service: RUNNING
named Service: RUNNING
httpd Service: RUNNING
ipa-custodia Service: RUNNING
pki-tomcatd Service: RUNNING
ipa-otpd Service: RUNNING
ipa-dnskeysyncd Service: RUNNING
ipa: INFO: The ipactl command was successful

[root@idm ~]# systemctl list-unit-files | grep ipa | grep service
ipa-ccache-sweep.service                   disabled
ipa-custodia.service                       disabled
ipa-dnskeysyncd.service                    disabled
ipa-healthcheck.service                    disabled
ipa-ods-exporter.service                   disabled
ipa-otpd@.service                          static
ipa.service                                enabled

Seems to be installed and working.

What about the /etc/sssd/sssd.conf config.

[root@idm ~]# cat /etc/sssd/sssd.conf
[domain/vercorp.org]

id_provider = ipa
ipa_server_mode = True
ipa_server = idm.vercorp.org
ipa_domain = vercorp.org
ipa_hostname = idm.vercorp.org
auth_provider = ipa
chpass_provider = ipa
access_provider = ipa
cache_credentials = True
ldap_tls_cacert = /etc/ipa/ca.crt
krb5_store_password_if_offline = True
[sssd]
services = nss, pam, ifp, ssh, sudo

domains = vercorp.org
[nss]
homedir_substring = /home
memcache_timeout = 600

[pam]

[sudo]

[autofs]

[ssh]

[pac]

[ifp]
allowed_uids = ipaapi, root

[session_recording]

There is also /etc/ssh/ssh_config.d/04-ipa.conf file …

[root@idm ~]# cat /etc/ssh/ssh_config.d/04-ipa.conf
# IPA-related configuration changes to ssh_config
#
PubkeyAuthentication yes
GlobalKnownHostsFile /var/lib/sss/pubconf/known_hosts
#VerifyHostKeyDNS yes

# assumes that if a user does not have shell (/sbin/nologin),
# this will return nonzero exit code and proxy command will be ignored
Match exec true
  ProxyCommand /usr/bin/sss_ssh_knownhostsproxy -p %p %h

For some reason we need to manually enable and start the Apache HTTP server.

[root@idm ~]# systemctl enable --now httpd

You can now access the FreeIPA/IDM at your browser on the http://idm.vercorp.org address. If you use the http://10.0.0.40 IP then you will be redirected to the http://idm.vercorp.org address so make sure you have added that host to your local /etc/hosts file.

FreeIPA-login-page

FreeIPA-login

On the second screen you will see that I have already created the vermaden user.

FreeBSD Client

UPDATE: Newer instructions for FreeBSD 13.2-RELEASE are available at the Connect FreeBSD 13.2 to FreeIPA/IDM article.

We will get straight into the point. After having FreeBSD 13.1-RELEASE installed in the most ‘default’ way in the bsdinstall(8) installer – the Auto ZFS road – we will now fetch the up to date FreeBSD Ports tree with portsnap(8) tool.

This is the main /etc/rc.conf config file.

# cat /etc/rc.conf
hostname="fbsd"
ifconfig_vtnet0="inet 10.0.0.42 netmask 255.255.255.0"
defaultrouter="10.0.0.1"
sshd_enable="YES"
moused_enable="YES"
dumpdev="AUTO"
zfs_enable="YES"
syslogd_flags="-ss"
sssd_enable="YES"

FreeBSD Packages

We need to have FreeBSD Ports tree.

# portsnap auto

Lets check what is the current default SAMBA version on FreeBSD.

# grep -i samba /usr/ports/Mk/*default*
        PYTHON2 PYTHON3 RUBY RUST SAMBA SSL TCLTK VARNISH
SAMBA_DEFAULT?=         4.12

To omit a lot of pointless compilation I will first install all precompiled packages – that would also install needed dependencies. Then we will rebuild just the several needed packages.

# pkg install krb5 sudo cyrus-sasl cyrus-sasl-gssapi pam_mkhomedir openldap26-client samba412

Settings in the /etc/make.conf file.

# cat /etc/make.conf
# USE /usr/ports/obj PLACE
WRKDIRPREFIX=${PORTSDIR}/obj

OPTIONS_UNSET=       DOCS EXAMPLES DEBUG X11
OPTIONS_UNSET+=      DBUS GSSAPI_BASE GSSAPI_HEIMDAL
OPTIONS_SET+=        GSSAPI_MIT
WITH_GSSAPI=         yes
WANT_OPENLDAP_SASL=  yes

Lets configure the needed ports.

# \
for I in /usr/ports/security/sudo \
         /usr/ports/security/sssd \
         /usr/ports/security/krb5 \
         /usr/ports/security/cyrus-sasl2-gssapi \
         /usr/ports/security/pam_mkhomedir \
         /usr/ports/net/openldap26-client
do
  make -C ${I} rmconfig
done

# \
for I in /usr/ports/security/sudo \
         /usr/ports/security/sssd \
         /usr/ports/security/krb5 \
         /usr/ports/security/cyrus-sasl2-gssapi \
         /usr/ports/security/pam_mkhomedir \
         /usr/ports/net/openldap26-client
do
  make -C ${I} config-recursive
done

The curses(3X) selection will look more or less like these below.

=> security/sudo | OPTIONS___________________________________________________________________________
[x] AUDIT              Enable BSM audit support
[ ] DISABLE_AUTH       Do not require authentication by default
[ ] DISABLE_ROOT_SUDO  Do not allow root to run sudo
[ ] DOCS               Build and/or install documentation
[ ] EXAMPLES           Build and/or install examples
[ ] INSULTS            Enable insults on failures
[x] LDAP               LDAP protocol support
[ ] NLS                Native Language Support
[ ] NOARGS_SHELL       Run a shell if no arguments are given
[ ] OPIE               Enable one-time passwords (no PAM support)
[ ] PAM                Pluggable authentication module support
[ ] PYTHON             Enable python plugin support
[x] SSSD               Enable SSSD backend support.
=> security/sudo | Kerberos 5 Authentication (no PAM support)
( ) GSSAPI_BASE        GSSAPI support via base system (needs Kerberos)
( ) GSSAPI_HEIMDAL     GSSAPI support via security/heimdal
(*) GSSAPI_MIT         GSSAPI support via security/krb5


=> security/sssd | OPTIONS___________________________________________________________________________
[ ] DOCS  Build and/or install documentation
[x] SMB   Install IPA and AD providers (requires Samba4)


=> security/cyrus-sasl2-gssapi | OPTIONS_____________________________________________________________
( ) GSSAPI_BASE     GSSAPI support via base system (needs Kerberos)
( ) GSSAPI_HEIMDAL  GSSAPI support via security/heimdal
(*) GSSAPI_MIT      GSSAPI support via security/krb5


=> net/openldap26-client | OPTIONS___________________________________________________________________
[ ] DEBUG   Build with debugging support
[ ] DOCS    Build and/or install documentation
[ ] FETCH   Enable fetch(3) support
[x] GSSAPI  With GSSAPI support


=> security/krb5 | OPTIONS___________________________________________________________________________
[ ] DNS_FOR_REALM  Enable DNS lookups for Kerberos realm names
[ ] EXAMPLES       Build and/or install examples
[x] KRB5_HTML      Install krb5 HTML documentation
[x] KRB5_PDF       Install krb5 PDF documentation
[x] LDAP           LDAP protocol support
[ ] LMDB           OpenLDAP Lightning Memory-Mapped Database support
[ ] NLS            Native Language Support
=> security/krb5 | Command Line Editing for kadmin and ktutil
(*) READLINE       Command line editing via libreadline
( ) LIBEDIT        Command line editing via libedit

We can now check what options have been saved.

# cat /var/db/ports/security_sudo-sssd/options
_OPTIONS_READ=sudo-sssd-1.9.11p3
_FILE_COMPLETE_OPTIONS_LIST=AUDIT DISABLE_AUTH DISABLE_ROOT_SUDO DOCS EXAMPLES INSULTS LDAP NLS NOARGS_SHELL OPIE PAM PYTHON SSSD GSSAPI_BASE GSSAPI_HEIMDAL GSSAPI_MIT
OPTIONS_FILE_SET+=AUDIT
OPTIONS_FILE_SET+=GSSAPI_MIT
OPTIONS_FILE_SET+=LDAP
OPTIONS_FILE_SET+=NLS
OPTIONS_FILE_SET+=SSSD
OPTIONS_FILE_UNSET+=DISABLE_AUTH
OPTIONS_FILE_UNSET+=DISABLE_ROOT_SUDO
OPTIONS_FILE_UNSET+=DOCS
OPTIONS_FILE_UNSET+=EXAMPLES
OPTIONS_FILE_UNSET+=GSSAPI_BASE
OPTIONS_FILE_UNSET+=GSSAPI_HEIMDAL
OPTIONS_FILE_UNSET+=INSULTS
OPTIONS_FILE_UNSET+=NOARGS_SHELL
OPTIONS_FILE_UNSET+=OPIE
OPTIONS_FILE_UNSET+=PAM
OPTIONS_FILE_UNSET+=PYTHON

# cat /var/db/ports/security_sssd/options
_OPTIONS_READ=sssd-1.16.5_6
_FILE_COMPLETE_OPTIONS_LIST=DOCS SMB
OPTIONS_FILE_UNSET+=DOCS
OPTIONS_FILE_SET+=SMB

# cat /var/db/ports/security_cyrus-sasl2/options
_OPTIONS_READ=cyrus-sasl-2.1.28
_FILE_COMPLETE_OPTIONS_LIST=ALWAYSTRUE AUTHDAEMOND DOCS KEEP_DB_OPEN  OBSOLETE_CRAM_ATTR OBSOLETE_DIGEST_ATTR  SASLDB_IN_VAR BDB1 BDB GDBM LMDB ANONYMOUS CRAM DIGEST LOGIN NTLM OTP PLAIN SCRAM
OPTIONS_FILE_SET+=ANONYMOUS
OPTIONS_FILE_SET+=AUTHDAEMOND
OPTIONS_FILE_SET+=BDB1
OPTIONS_FILE_SET+=CRAM
OPTIONS_FILE_SET+=DIGEST
OPTIONS_FILE_SET+=LOGIN
OPTIONS_FILE_SET+=NTLM
OPTIONS_FILE_SET+=OBSOLETE_CRAM_ATTR
OPTIONS_FILE_SET+=OBSOLETE_DIGEST_ATTR
OPTIONS_FILE_SET+=OTP
OPTIONS_FILE_SET+=PLAIN
OPTIONS_FILE_SET+=SCRAM
OPTIONS_FILE_UNSET+=ALWAYSTRUE
OPTIONS_FILE_UNSET+=BDB
OPTIONS_FILE_UNSET+=DOCS
OPTIONS_FILE_UNSET+=GDBM
OPTIONS_FILE_UNSET+=KEEP_DB_OPEN
OPTIONS_FILE_UNSET+=LMDB
OPTIONS_FILE_UNSET+=SASLDB_IN_VAR

# cat /var/db/ports/net_openldap26-client/options
_OPTIONS_READ=openldap26-client-2.6.3
_FILE_COMPLETE_OPTIONS_LIST=DEBUG DOCS FETCH GSSAPI
OPTIONS_FILE_SET+=GSSAPI
OPTIONS_FILE_UNSET+=DEBUG
OPTIONS_FILE_UNSET+=DOCS
OPTIONS_FILE_UNSET+=FETCH

# cat /var/db/ports/security_krb5/options
# This file is auto-generated by 'make config'.
# Options for krb5-1.20
_OPTIONS_READ=krb5-1.20
_FILE_COMPLETE_OPTIONS_LIST=DNS_FOR_REALM EXAMPLES KRB5_HTML KRB5_PDF LDAP LMDB NLS READLINE LIBEDIT
OPTIONS_FILE_UNSET+=DNS_FOR_REALM
OPTIONS_FILE_UNSET+=EXAMPLES
OPTIONS_FILE_SET+=KRB5_HTML
OPTIONS_FILE_SET+=KRB5_PDF
OPTIONS_FILE_SET+=LDAP
OPTIONS_FILE_UNSET+=LMDB
OPTIONS_FILE_SET+=NLS
OPTIONS_FILE_SET+=READLINE
OPTIONS_FILE_UNSET+=LIBEDIT

… and build them.

# \
for I in /usr/ports/security/sudo \
         /usr/ports/security/sssd \
         /usr/ports/security/krb5
         /usr/ports/security/cyrus-sasl2-gssapi \
         /usr/ports/security/pam_mkhomedir \
         /usr/ports/net/openldap26-client \
do
  make -C ${I} build
done

… unsinstall them and create their packages.

# \
for I in /usr/ports/security/sudo \
         /usr/ports/security/sssd \
         /usr/ports/security/krb5
         /usr/ports/security/cyrus-sasl2-gssapi \
         /usr/ports/security/pam_mkhomedir \
         /usr/ports/net/openldap26-client \
do
  make -C ${I} deinstall package
done

After some time we have our built packages.

# find /usr/ports/obj/ -name \*.pkg
/usr/ports/obj/usr/ports/lang/perl5.32/work/perl-5.32.1/symbian/ext/Moped/Msg/Msg.pkg
/usr/ports/obj/usr/ports/security/pam_mkhomedir/work/pkg/pam_mkhomedir-0.2.pkg
/usr/ports/obj/usr/ports/security/cyrus-sasl2-gssapi/work/pkg/cyrus-sasl-gssapi-2.1.28.pkg
/usr/ports/obj/usr/ports/security/krb5/work/pkg/krb5-1.20.pkg
/usr/ports/obj/usr/ports/security/sudo/work/pkg/sudo-1.9.11p3.pkg
/usr/ports/obj/usr/ports/security/sssd/work-default/pkg/sssd-1.16.5_6.pkg
/usr/ports/obj/usr/ports/net/openldap26-client/work/pkg/openldap26-client-2.6.3.pkg

In the future I need to add some short guide to build them regularly with Synth or Poudriere πŸ™‚

Now we need to install these packages in quite nontypical way. One by one – in specified order. It will not be needed it we would have a separate additional pkg(8) repository with Poudriere build packages.

Our packages:

# ls -1 *.pkg
cyrus-sasl-gssapi-2.1.28.pkg
krb5-1.20.pkg
openldap26-client-2.6.3.pkg
pam_mkhomedir-0.2.pkg
sssd-smb4-1.16.5_6.pkg
sudo-sssd-1.9.11p3.pkg

… and their install process.

# pkg install -y c-ares

# pkg add sssd-smb4-1.16.5_6.pkg

# pkg install -y cyrus-sasl-gssapi-2.1.28.pkg
(...)
New packages to be INSTALLED:
        cyrus-sasl: 2.1.28
        cyrus-sasl-gssapi: 2.1.28
        krb5: 1.20
(...)

# pkg delete -f -y krb5
(...)
Installed packages to be REMOVED:
        krb5: 1.20
(...)

# pkg add krb5-1.20.pkg

# pkg install -y sssd

# pkg add sudo-sssd-1.9.11p3.pkg

# pkg delete -f -y sssd
(...)
Installed packages to be REMOVED:
        sssd: 1.16.5_6
(...)

# pkg install ding-libs ldb21 nspr nss pcre samba412

# pkg add sssd-smb4-1.16.5_6.pkg

FreeBSD Setup

Create needed dirs.

# mkdir -p \
    /usr/local/etc/ipa \
    /var/log/sssd \
    /var/run/sss/private \
    /var/db/sss

Set system hostname.

# hostname fbsd.vercorp.org

# hostname
fbsd.vercorp.org

Fetch the FreeIPA/IDM certificate.

# fetch -o /usr/local/etc/ipa/ca.crt http://10.0.0.40/ipa/config/ca.crt

FreeIPA/IDM Setup Part

We need to execute several instructions on the FreeIPA/IDM to connect FreeBSD client to it.

Its adding the A and PTR records in DNS for the 10.0.0.42 address and adding the fbsd.vercorp.org host.

We also need to generate the key for our fbsd.vercorp.org system.

[root@idm ~]# kinit admin
Password for admin@VERCORP.ORG:

[root@idm ~]# ipa dnsrecord-add vercorp.org fbsd --a-rec=10.0.0.42 --a-create-reverse
  Record name: fbsd
  A record: 10.0.0.42

[root@idm ~]# ipa host-add fbsd.vercorp.org
-----------------------------
Added host "fbsd.vercorp.org"
-----------------------------
  Host name: fbsd.vercorp.org
  Principal name: host/fbsd.vercorp.org@VERCORP.ORG
  Principal alias: host/fbsd.vercorp.org@VERCORP.ORG
  Password: False
  Keytab: False
  Managed by: fbsd.vercorp.org

[root@idm ~]# ipa-getkeytab -s idm.vercorp.org -p host/fbsd.vercorp.org@VERCORP.ORG -k /root/fbsd.vercorp.org.keytab
Keytab successfully retrieved and stored in: /root/fbsd.vercorp.org.keytab

Now we need to get ‘our’ key from FreeIPA/IDM server … along with proper /etc/hosts file.

# scp root@10.0.0.40:/root/fbsd.vercorp.org.keytab /usr/local/etc/ipa/krb5.keytab

# cat << EOF > /etc/hosts
::1              localhost localhost.my.domain
127.0.0.1        localhost localhost.my.domain
10.0.0.40        idm.vercorp.org  idm
10.0.0.42        fbsd.vercorp.org fbsd
EOF

Now the /usr/local/etc/openldap/ldap.conf file.

# cat << EOF > /usr/local/etc/openldap/ldap.conf
BASE        dc=org,dc=vercorp
URI         ldap://idm.vercorp.org/
#SIZELIMIT  12
#TIMELIMIT  15
#DEREF      never
SASL_MECH   GSSAPI
SASL_REALM  VERCORP.ORG
ssl         start_tls
TLS_CACERT  /usr/local/etc/ipa/ca.crt
EOF

… and /etc/krb5.conf file.

# cat << EOF > /etc/krb5.conf
[libdefaults]
  default_realm = VERCORP.ORG
  default_keytab_name = FILE:/usr/local/etc/ipa/krb5.keytab
  default_tkt_enctypes = aes256-cts des-cbc-crc aes128-cts arcfour-hmac
  default_tgs_enctypes = aes256-cts des-cbc-crc aes128-cts arcfour-hmac
  dns_lookup_realm = false
  dns_lookup_kdc = false
  rdns = false
  ticket_lifetime = 24h
  forwardable = yes

[realms]
  VERCORP.ORG = {
    kdc = idm.vercorp.org:88
    master_kdc = idm.vercorp.org:88
    admin_server = idm.vercorp.org:749
    default_domain = vercorp.org
    pkinit_anchors = FILE:/usr/local/etc/ipa/ca.crt
}

[domain_realm]
  .vercorp.org = VERCORP.ORG
  vercorp.org = VERCORP.ORG

[logging]
  kdc = FILE:/var/log/krb5/krb5kdc.log
  admin_server = FILE:/var/log/krb5/kadmin.log
  kadmin_local = FILE:/var/log/krb5/kadmin_local.log
  default = FILE:/var/log/krb5/krb5lib.log
EOF

… and /usr/local/etc/sssd/sssd.conf file.

# cat << EOF > /usr/local/etc/sssd/sssd.conf

[domain/vercorp.org]
# debug_level = 9
cache_credentials = True
krb5_store_password_if_offline = True
krb5_realm = VERCORP.ORG
ipa_domain = vercorp.org
id_provider = ipa
auth_provider = ipa
access_provider = ipa
ipa_hostname = fbsd.vercorp.org
chpass_provider = ipa
ipa_server = _srv_, idm.vercorp.org
ldap_tls_cacert = /usr/local/etc/ipa/ca.crt
krb5_keytab = /usr/local/etc/ipa/krb5.keytab

[sssd]
services = nss, pam, ssh, sudo
config_file_version = 2
domains = vercorp.org

[nss]
filter_users = root,toor
homedir_substring = /usr/home/%u

[pam]

[sudo]
# debug_level = 0x3ff0

[ssh]
EOF

# chmod 600 /usr/local/etc/sssd/sssd.conf

FreeBSD have user account under /usr/home to make sure /home also points there.

# ln -s /usr/home /home

The automatic startup of sssd(8) daemon (not to confuse with sshd(8)) needs to be also configured.

# sysrc sssd_enable=YES
# service sssd start

We also need to configure /etc/nsswitch.conf file.

# cp /etc/nsswitch.conf /etc/nsswitch.conf.BCK

# diff -u /etc/nsswitch.conf.BCK /etc/nsswitch.conf
--- /etc/nsswitch.conf.BCK      2022-10-24 20:10:09.163251000 +0200
+++ /etc/nsswitch.conf  2022-10-24 20:10:57.207406000 +0200
@@ -2,15 +2,17 @@
 # nsswitch.conf(5) - name service switch configuration file
 # $FreeBSD$
 #
-group: compat
+group: files sss
 group_compat: nis
 hosts: files dns
-netgroup: compat
+# netgroup: compat
 networks: files
-passwd: compat
+passwd: files sss
 passwd_compat: nis
 shells: files
 services: compat
 services_compat: nis
 protocols: files
 rpc: files
+sudoers: sss files
+netgroup: files

The final /etc/nsswitch.conf file looks as follows.

# cat /etc/nsswitch.conf
#
# nsswitch.conf(5) - name service switch configuration file
# $FreeBSD$
#
group: files sss
group_compat: nis
hosts: files dns
# netgroup: compat
networks: files
passwd: files sss
passwd_compat: nis
shells: files
services: compat
services_compat: nis
protocols: files
rpc: files
sudoers: sss files
netgroup: files

Now the /etc/pam.d/system file.

# cp /etc/pam.d/system /root/etc---pam.d---system.BCK

# diff -u  /root/etc---pam.d---system.BCK /etc/pam.d/system
--- /root/etc---pam.d---system.BCK      2022-10-24 20:13:05.546657000 +0200
+++ /etc/pam.d/system   2022-10-24 20:16:36.722666000 +0200
@@ -7,19 +7,23 @@
 # auth
 auth           sufficient      pam_opie.so             no_warn no_fake_prompts
 auth           requisite       pam_opieaccess.so       no_warn allow_local
-#auth          sufficient      pam_krb5.so             no_warn try_first_pass
+auth           sufficient      pam_krb5.so             no_warn try_first_pass
 #auth          sufficient      pam_ssh.so              no_warn try_first_pass
+auth           sufficient      /usr/local/lib/pam_sss.so       use_first_pass
 auth           required        pam_unix.so             no_warn try_first_pass nullok

 # account
 #account       required        pam_krb5.so
 account                required        pam_login_access.so
 account                required        pam_unix.so
+account                required        /usr/local/lib/pam_sss.so       ignore_unknown_user ignore_authinfo_unavail

 # session
 #session       optional        pam_ssh.so              want_agent
 session                required        pam_lastlog.so          no_fail
+session                required        /usr/local/lib/pam_mkhomedir.so mode=0700

 # password
 #password      sufficient      pam_krb5.so             no_warn try_first_pass
+password       sufficient      /usr/local/lib/pam_sss.so       use_authtok
 password       required        pam_unix.so             no_warn try_first_pass

The final /etc/pam.d/system file looks as follows.

# cat /etc/pam.d/system
#
# $FreeBSD$
#
# System-wide defaults
#

# auth
auth            sufficient      pam_opie.so             no_warn no_fake_prompts
auth            requisite       pam_opieaccess.so       no_warn allow_local
auth            sufficient      pam_krb5.so             no_warn try_first_pass
#auth           sufficient      pam_ssh.so              no_warn try_first_pass
auth            sufficient      /usr/local/lib/pam_sss.so       use_first_pass
auth            required        pam_unix.so             no_warn try_first_pass nullok

# account
#account        required        pam_krb5.so
account         required        pam_login_access.so
account         required        pam_unix.so
account         required        /usr/local/lib/pam_sss.so       ignore_unknown_user ignore_authinfo_unavail

# session
#session        optional        pam_ssh.so              want_agent
session         required        pam_lastlog.so          no_fail
session         required        /usr/local/lib/pam_mkhomedir.so mode=0700

# password
#password       sufficient      pam_krb5.so             no_warn try_first_pass
password        sufficient      /usr/local/lib/pam_sss.so       use_authtok
password        required        pam_unix.so             no_warn try_first_pass

Now its time for /etc/pam.d/sshd file.

# cp /etc/pam.d/sshd /root/etc---pam.d---sshd.BCK

# diff -u /root/etc---pam.d---sshd.BCK /etc/pam.d/sshd
--- /root/etc---pam.d---sshd.BCK        2022-10-24 20:17:34.063630000 +0200
+++ /etc/pam.d/sshd     2022-10-24 20:19:16.165810000 +0200
@@ -7,8 +7,9 @@
 # auth
 auth           sufficient      pam_opie.so             no_warn no_fake_prompts
 auth           requisite       pam_opieaccess.so       no_warn allow_local
-#auth          sufficient      pam_krb5.so             no_warn try_first_pass
+auth           sufficient      pam_krb5.so             no_warn try_first_pass
 #auth          sufficient      pam_ssh.so              no_warn try_first_pass
+auth           sufficient      /usr/local/lib/pam_sss.so       use_first_pass
 auth           required        pam_unix.so             no_warn try_first_pass

 # account
@@ -16,11 +17,14 @@
 #account       required        pam_krb5.so
 account                required        pam_login_access.so
 account                required        pam_unix.so
+account                required        /usr/local/lib/pam_sss.so       ignore_unknown_user ignore_authinfo_unavail

 # session
 #session       optional        pam_ssh.so              want_agent
 session                required        pam_permit.so
+session                required        /usr/local/lib/pam_mkhomedir.so mode=0700

 # password
 #password      sufficient      pam_krb5.so             no_warn try_first_pass
+password       sufficient      /usr/local/lib/pam_sss.so       use_authtok
 password       required        pam_unix.so             no_warn try_first_pass

Final /etc/pam.d/sshd file below.

# cat /etc/pam.d/sshd
#
# $FreeBSD$
#
# PAM configuration for the "sshd" service
#

# auth
auth            sufficient      pam_opie.so             no_warn no_fake_prompts
auth            requisite       pam_opieaccess.so       no_warn allow_local
auth            sufficient      pam_krb5.so             no_warn try_first_pass
#auth           sufficient      pam_ssh.so              no_warn try_first_pass
auth            sufficient      /usr/local/lib/pam_sss.so       use_first_pass
auth            required        pam_unix.so             no_warn try_first_pass

# account
account         required        pam_nologin.so
#account        required        pam_krb5.so
account         required        pam_login_access.so
account         required        pam_unix.so
account         required        /usr/local/lib/pam_sss.so       ignore_unknown_user ignore_authinfo_unavail

# session
#session        optional        pam_ssh.so              want_agent
session         required        pam_permit.so
session         required        /usr/local/lib/pam_mkhomedir.so mode=0700

# password
#password       sufficient      pam_krb5.so             no_warn try_first_pass
password        sufficient      /usr/local/lib/pam_sss.so       use_authtok
password        required        pam_unix.so             no_warn try_first_pass

Small modification in the /etc/ssh/ssh_config and /etc/ssh/sshd_config files.

# cat << EOF >> /etc/ssh/ssh_config
GSSAPIAuthentication yes
EOF

# cat << EOF >> /etc/ssh/sshd_config
GSSAPIAuthentication yes
UsePAM yes
EOF

Finish Setup with Web Browser in FreeIPA/IDM Page

Visit the https://idm.vercorp.org/ipa/ui/#/e/hbacrule/details/freebsd page.

Next create the HBAC Rule named freebsd as showed below.

idm-1-hbac-rules-menu

idm-2-hbac-rules-freebsd

idm-3-hbac-rules-freebsd-details

… and the Sudo Rule named freebsd name.

idm-4-sudo-rules-menu

idm-5-sudo-rules-freebsd

idm-6-sudo-rules-freebsd-details

FreeBSD FreeIPA Login Test

After all these time consuming and pointless instructions we can now finally try to login to our FreeBSD client.

% ssh -l vermaden 10.0.0.42
(vermaden@10.0.0.42) Password:
Last login: Mon Oct 24 21:06:36 2022 from 10.0.0.3
FreeBSD 13.1-RELEASE releng/13.1-n250148-fc952ac2212 GENERIC

Welcome to FreeBSD!

Release Notes, Errata: https://www.FreeBSD.org/releases/
Security Advisories:   https://www.FreeBSD.org/security/
FreeBSD Handbook:      https://www.FreeBSD.org/handbook/
FreeBSD FAQ:           https://www.FreeBSD.org/faq/
Questions List: https://lists.FreeBSD.org/mailman/listinfo/freebsd-questions/
FreeBSD Forums:        https://forums.FreeBSD.org/

Documents installed with the system are in the /usr/local/share/doc/freebsd/
directory, or can be installed later with:  pkg install en-freebsd-doc
For other languages, replace "en" with a language code like de or fr.

Show the version of FreeBSD installed:  freebsd-version ; uname -a
Please include that output and any error messages when posting questions.
Introduction to manual pages:  man man
FreeBSD directory layout:      man hier

To change this login announcement, see motd(5).
You can upload the dmesg of your system to help developers get an overview of commonly
used hardware and peripherals for FreeBSD. Use the curl package to upload it like this:
curl -v -d "nickname=$USER" -d "description=FreeBSD/$(uname -m) on \
$(kenv smbios.system.maker) $(kenv smbios.system.product)" -d "do=addd" \
--data-urlencode 'dmesg@/var/run/dmesg.boot' http://dmesgd.nycbug.org/index.cgi

vermaden@fbsd:~ $ :> ~/.hushlogin

vermaden@fbsd:~ $ id
uid=1408200003(vermaden) gid=1408200000(admins) groups=1408200000(admins)

vermaden@fbsd:~ $ pwd
/home/vermaden

vermaden@fbsd:~ $ grep vermaden /etc/passwd /etc/group
vermaden@fbsd:~ $

vermaden@fbsd:~ $ getent passwd vermaden
vermaden:*:1408200003:1408200000:vermaden vermaden:/home/vermaden:/bin/sh

vermaden@fbsd:~ $ sudo su -
Password for vermaden@VERCORP.ORG:

root@fbsd:~ # logout

vermaden@fbsd:~ $ sudo -i

root@fbsd:~ #

Strange … seems to work properly πŸ™‚

FreeBSD Jail as FreeIPA/IDM Client

As ‘full’ FreeBSD system is able to connect to the FreeIPA/IDM server we will not configure FreeBSD Jail to do the same.

The FreeIPA/IDM FreeBSD client fbsdjail.vercorp.orgwill get the 10.0.0.43 IP.

Basic FreeBSD Jail Preparations

Lets setup the Jail for a start.

# mkdir -p /jail/fbsdjail /jail/BASE

# cd /jail/fbsdjail

# fetch -o /jail/BASE/13.1-RELEASE-base.txz https://download.freebsd.org/ftp/releases/amd64/13.1-RELEASE/base.txz

# tar --unlink -xvf ../BASE/13.1-RELEASE-base.txz

# cat << EOF > /etc/jail.conf
# GLOBAL
  exec.start = "/bin/sh /etc/rc";
  exec.stop = "/bin/sh /etc/rc.shutdown";
  exec.clean;
  exec.consolelog = "/var/log/jail_${name}_console.log";
  mount.devfs;
  host.hostname = ${name};
  path = /jail/${name};

# JAILS
  fbsdjail {
    ip4.addr = 10.0.0.43;
    host.hostname = fbsdjail.vercorp.org;
    interface = wlan0;
    allow.raw_sockets;
    allow.sysvipc;
  }
EOF

# cat /etc/resolv.conf | tee /jail/fbsdjail/etc/resolv.conf
nameserver 10.0.0.1

# echo 10.0.0.43 fbsdjail.vercorp.org fbsdjail | tee -a /etc/hosts | tee -a /jail/fbsdjail/etc/hosts

# cat /etc/hosts /jail/fbsdjail/etc/hosts
10.0.0.43 fbsdjail.vercorp.org fbsdjail

# cat << EOF > /jail/fbsdjail/etc/rc.conf
# DAEMONS | yes
  syslogd_flags="-ss"
  sshd_enable=YES

# OTHER
  clear_tmp_enable=YES
  clear_tmp_X=YES
  dumpdev=NO
  update_motd=NO
EOF

# sed -i '' s/quarterly/latest/g /jail/fbsdjail/etc/pkg/FreeBSD.conf

# grep latest /jail/fbsdjail/etc/pkg/FreeBSD.conf
  url: "pkg+http://pkg.FreeBSD.org/${ABI}/latest",

Now we can start our FreeBSD Jail.

# service jail onestart fbsdjail
Starting jails: fbsdjail.

# jls
   JID  IP Address      Hostname                      Path
     1  10.0.0.43       fbsdjail.vercorp.org          /jail/fbsdjail

# jls -v
   JID  Hostname                      Path
        Name                          State
        CPUSetID
        IP Address(es)
     1  fbsdjail.vercorp.org          /jail/fbsdjail
        fbsdjail                      ACTIVE
        3
        10.0.0.43

# jexec fbsdjail

root@fbsdjail:/ #

Our FreeBSD Jail works. Lets move to next steps.

Configure FreeBSD Jail to Connect to FreeIPA/IDM Server

I could not repaste all of the instructions above – the ones that we used for a ‘full’ FreeBSD system – but the same applies to a FreeBSD Jail. πŸ™‚

This means that earlier Basic FreeBSD Jail Preparations section covers all that is needed in case of ‘full’ FreeBSD versus FreeBSD Jail when it comes to the FreeIPA/IDM connection.

Linux FreeIPA/IDM Client

This article is not about Linux client – which is pretty straight-forward to connect to the FreeIPA/IDM server – but for the completness of the topic – here are the instructions I used to attach Alma Linux to the FreeIPA/IDM server.

Linux rhlike.vercorp.org system.

      IP: 10.0.0.41/24
      GW: 10.0.0.1
hostname: rhlike.vercorp.org

First – install the @idm:client and sssd packages.

client # yum -y install @idm:client sssd

FreeIPA/IDM Setup Part

Now – as earlier with FreeBSD – the FreeIPA/IDM part comes to play.

[root@idm ~]# kinit admin
Password for admin@VERCORP.ORG:

[root@idm ~]# klist
Ticket cache: KCM:0
Default principal: admin@VERCORP.ORG

Valid starting       Expires              Service principal
10/19/2022 13:33:52  10/20/2022 13:11:28  krbtgt/VERCORP.ORG@VERCORP.ORG

[root@idm ~]# ipa user-find
---------------
2 users matched
---------------
  User login: admin
  Last name: Administrator
  Home directory: /home/admin
  Login shell: /bin/bash
  Principal alias: admin@VERCORP.ORG, root@VERCORP.ORG
  UID: 1896600000
  GID: 1896600000
  Account disabled: False

  User login: vermaden
  First name: vermaden
  Last name: vermaden
  Home directory: /home/vermaden
  Login shell: /bin/sh
  Principal name: vermaden@VERCORP.ORG
  Principal alias: vermaden@VERCORP.ORG
  Email address: vermaden@vercorp.org
  UID: 1896600003
  GID: 1000
  Account disabled: False
----------------------------
Number of entries returned 2
----------------------------

[root@idm ~]# id vermaden
uid=1408200003(vermaden) gid=1408200000(admins) groups=1408200000(admins)

[root@idm ~]# ipa dnsrecord-add vercorp.org rhlike --a-rec 10.0.0.41
  Record name: rhlike
  A record: 10.0.0.41

We are done on the FreeIPA/IDM side.

Linux FreeIPA/IDM Client Setup

We will now continue our work on the Linux client.

client # echo "10.0.0.40   idm.vercorp.org"    >> /etc/hosts

client # echo "10.0.0.41   rhlike.vercorp.org" >> /etc/hosts

client # hostnamectl set-hostname rhlike.vercorp.org

client # cat /etc/hosts
127.0.0.1   localhost localhost.localdomain localhost4 localhost4.localdomain4
::1         localhost localhost.localdomain localhost6 localhost6.localdomain6
10.0.0.40   idm.vercorp.org
10.0.0.41   rhlike.vercorp.org

client # ipa-client-install --uninstall

client # ipa-client-install \
           --hostname=rhlike.vercorp.org \
           --mkhomedir \
           --server=idm.vercorp.org \
           --domain vercorp.org \
           --realm VERCORP.ORG

This program will set up IPA client.
Version 4.9.8

Autodiscovery of servers for failover cannot work with this configuration.
If you proceed with the installation, services will be configured to always access the discovered server for all operations and will not fail over to other servers in case of failure.
Proceed with fixed values and no DNS discovery? [no]: yes
Do you want to configure chrony with NTP server or pool address? [no]: no
Client hostname: rhlike.vercorp.org
Realm: VERCORP.ORG
DNS Domain: vercorp.org
IPA Server: idm.vercorp.org
BaseDN: dc=vercorp,dc=org

Continue to configure the system with these values? [no]: yes
Synchronizing time
No SRV records of NTP servers found and no NTP server or pool address was provided.
Using default chrony configuration.
Attempting to sync time with chronyc.
Time synchronization was successful.
User authorized to enroll computers: admin
Password for admin@VERCORP.ORG:
Successfully retrieved CA cert
    Subject:     CN=Certificate Authority,O=VERCORP.ORG
    Issuer:      CN=Certificate Authority,O=VERCORP.ORG
    Valid From:  2022-10-18 14:52:50
    Valid Until: 2042-10-18 14:52:50

Enrolled in IPA realm VERCORP.ORG
Created /etc/ipa/default.conf
Configured /etc/sssd/sssd.conf
Configured /etc/krb5.conf for IPA realm VERCORP.ORG
Systemwide CA database updated.
Hostname (rhlike.vercorp.org) does not have A/AAAA record.
Failed to update DNS records.
Missing A/AAAA record(s) for host rhlike.vercorp.org: 10.0.0.41.
Missing reverse record(s) for address(es): 10.0.0.41.
Adding SSH public key from /etc/ssh/ssh_host_ed25519_key.pub
Adding SSH public key from /etc/ssh/ssh_host_ecdsa_key.pub
Adding SSH public key from /etc/ssh/ssh_host_rsa_key.pub
Could not update DNS SSHFP records.
SSSD enabled
Configured /etc/openldap/ldap.conf
Configured /etc/ssh/ssh_config
Configured /etc/ssh/sshd_config
Configuring vercorp.org as NIS domain.
Client configuration complete.
The ipa-client-install command was successful

client # reboot

Now we will test how it goes with login against the FreeIPA/IDM server.

laptop % ssh -l vermaden 10.0.0.41
(vermaden@10.0.0.41) Password:
(vermaden@10.0.0.41) Password expired. Change your password now.
Current Password:
(vermaden@10.0.0.41) New password:
(vermaden@10.0.0.41) Retype new password:
Last failed login: Wed Oct 19 00:47:57 CEST 2022 from 10.0.0.3 on ssh:notty
There was 1 failed login attempt since the last successful login.
/usr/bin/id: cannot find name for group ID 1000

[vermaden@rhlike ~]$ w
 00:48:16 up 29 min,  2 users,  load average: 0.22, 0.13, 0.16
USER     TTY      FROM             LOGIN@   IDLE   JCPU   PCPU WHAT
root     pts/0    10.0.0.3         00:40   58.00s  0.03s  0.03s -bash
vermaden pts/1    10.0.0.3         00:48    0.00s  0.02s  0.01s w

[vermaden@rhlike ~]$ sudo su -

[root@rhlike ~]# getent passwd admin
admin:*:1896600000:1896600000:Administrator:/home/admin:/bin/bash

[root@rhlike ~]# getent passwd vermaden
vermaden:*:1896600003:1000:vermaden vermaden:/home/vermaden:/bin/sh

Seems to work at least OK πŸ™‚

I do not have anything more to add to this guide.

If you have – then please let me know in comments πŸ™‚

Regards.

EOF

Automated Kickstart Install of RHEL/Clones

There are two approaches to making your life more automated about installing multiple instances of operating systems. You can either maintain up-to-date templates for them or you can have automated/scripted installations. In this article I will share how to generate ISO image and Kickstart configuration to install Red Hat Enterprise Linux (and its clones such as Alma/Rocky/CentOS/Scientific/…) in easy and fast way. For the process I will use 8.5 version of RHEL.

Here is the Table of Contents for this article.

  • Logo
  • Possibilities
  • Environment
    • FreeBSD – www
    • RHEL Client – kickme
  • Validate
  • Generation
    • kickstart.config
    • kickstart.skel
    • kickstart.sh
    • ISO
  • Result
  • Alternatives
  • Summary

Logo

Shortly after IBM acquisition Red Hat started to use kinda boring ‘just a red hat’ logo – but its earlier logo – shown below – was more interesting.

rhel-logo

If you stare long enough you will see two dinosaurs. The Tyrannosaurus (red) punching a Triceratops (white) in the head. Once you see it you will not be able to unsee it πŸ™‚

Possibilities

There are many ways to do that automated Kickstart installation. You can use NFS/HTTP/FTP/HTTPS or your own generated DVD media … or use ‘stock’ DVD and Kickstart config available somewhere on the network.

I will use the following method that I find currently is best suited for my needs:

  • FreeBSD host with NGINX serving RHEL 8.5 DVD content (rhel-8.5-x86_64-dvd.iso) over HTTP.
  • Generate small (less then 1 MB in size) ISO with Kickstart config on it.
  • Boot from small rhel-8.5-x86_64-boot.iso ISO and also with generated Kickstart ISO.

Environment

I will use VirtualBox for this demo with NAT Network configuration for the virtual machines network adapters. The nat0 VirtualBox network is defined as 10.0.10.0/24 and I use Port Forwarding to access these machines from the FreeBSD host system.

Machines:

  • 10.0.10.210 - www – FreeBSD system with NGINX to serve RHEL 8.5 DVD contents
  • 10.0.10.199 - kickme – RHEL machine that would be installed with automated Kickstart install

FreeBSD – www

Below you will find the FreeBSD machine configuration as seen on VirtualBox.

vm-www

Its default FreeBSD ZFS install on single disk. Nothing fancy here to be honest. Below you will find its configuration from /etc/rc.conf file. I also installed the nginx package but the only thing I did with NGINX was to enable it to start automatically. I used the default stock config that points at /usr/local/www/nginx place. I later copied the RHEL 8.5 DVD contents to the /usr/local/www/nginx/rhel-8.5 directory. It takes about 10 GB.

www # cat /etc/rc.conf
hostname=www
ifconfig_em0="inet 10.0.10.210 netmask 255.255.255.0"
defaultrouter=10.0.10.1
sshd_enable=YES
nginx_enable=YES
zfs_enable=YES
dumpdev=AUTO
sendmail_enable=NO
sendmail_submit_enable=NO
sendmail_outbound_enable=NO
sendmail_msp_queue_enable=NO
update_motd=NO

Here is the unmodified NGINX config but with comments non displayed.

www # grep -v '#' /usr/local/etc/nginx/nginx.conf | grep '^[^#]'
worker_processes  1;
events {
    worker_connections  1024;
}
http {
    include       mime.types;
    default_type  application/octet-stream;
    sendfile        on;
    keepalive_timeout  65;
    server {
        listen       80;
        server_name  localhost;
        location / {
            root   /usr/local/www/nginx;
            index  index.html index.htm;
        }
        error_page   500 502 503 504  /50x.html;
        location = /50x.html {
            root   /usr/local/www/nginx-dist;
        }
    }
}

Here are the contents of the /usr/local/www/nginx/rhel-8.5 directory after copying here contents of RHEL 8.5 DVD.

www:~ # ls -l /usr/local/www/nginx/rhel-8.5/
total 71
-r--r--r--  1 root  wheel     60 Apr  6 21:34 .discinfo
-r--r--r--  1 root  wheel   1560 Apr  6 21:34 .treeinfo
dr-xr-xr-x  4 root  wheel      4 Apr  6 21:50 AppStream
dr-xr-xr-x  4 root  wheel      4 Apr  6 21:53 BaseOS
dr-xr-xr-x  3 root  wheel      3 Apr  6 21:53 EFI
-r--r--r--  1 root  wheel   8154 Apr  6 21:53 EULA
-r--r--r--  1 root  wheel  18092 Apr  6 21:53 GPL
-r--r--r--  1 root  wheel   1669 Apr  6 21:53 RPM-GPG-KEY-redhat-beta
-r--r--r--  1 root  wheel   5135 Apr  6 21:53 RPM-GPG-KEY-redhat-release
-r--r--r--  1 root  wheel   1796 Apr  6 21:53 TRANS.TBL
-r--r--r--  1 root  wheel   1455 Apr  6 21:53 extra_files.json
dr-xr-xr-x  3 root  wheel      6 Apr  6 21:54 images
dr-xr-xr-x  2 root  wheel     16 Apr  6 21:54 isolinux
-r--r--r--  1 root  wheel    103 Apr  6 21:54 media.repo

RHEL Client – kickme

Below you will find the RHEL machine that will be used for the automated Kickstart installation – also as seen on VirtualBox.

vm-kickme

To make that example more interesting (and more corporate) I added second NIC for the backup network – so we will also have to generate additional route for it in the Kickstart config.

The kickme RHEL machine needs to have two (2) CD-ROM drives. In the PRIMARY (the one to boot from) we will load the rhel-8.5-x86_64-boot.iso ISO file. In the SECONDARY one we will load our generated kickme.oemdrv.iso ISO file containing Kickstart config file.

Validate

There also exists pykickstart package which offers ksvalidator tool. Theoretically it allows you to make sure that your Kickstart config has proper syntax and that it would work – but only in theory. Here is what it RHEL documentation states about its accuracy.

rhel-ksvalidator

It means that you will not know if your Kickstart config will work until you really try it – thus I do not cared that much about this tool as is not available on FreeBSD.

Generation

Now to the most important part – Kickstart generation and ISO generation. Probably the easiest way to create new Kickstart config is to install ‘by hand’ new RHEL system under virtual machine and then take the generated by Anaconda /root/anaconda-ks.cfg file as a starting point. This is what I also did.

When you would like to install next host you will have to edit the hostname and IP addresses for next host in that Kickstart file – which seems not very convenient to say the least. In order to make that less PITA I created a kickstart.sh script that will read values from kickstart.config file and then put them into the kickstart.skel file that would be base for our future installations. Then the kickstart.sh will copy the generated Kickstart file and used Kickstart config with that hostname as a backup or for future reference – or for example for documentation purposes.

kickstart.config

Here is how such kickstart.config file looks like.

# cat kickstart.config
  SYSTEM_NAME=kickme
  REPO_SERVER_IP=10.0.10.210
  INTERFACE1=enp0s3
  IP_ADDRESS1=10.0.10.199
  NETMASK1=255.255.255.0
  INTERFACE2=enp0s8
  IP_ADDRESS2=10.0.90.199
  NETMASK2=255.255.255.0
  GATEWAY=10.0.10.1
  NAMESERVER1=1.1.1.1
  NAMESERVER2=9.9.9.9
  NTP1=132.163.97.6
  NTP2=216.239.35.0
  ROUTE_NET=10.0.40.10/24
  ROUTE_VIA=10.0.20.1

kickstart.skel

The kickstart.skel file is little longer – this is our barebone for the Kickstart configs.

# cat kickstart.skel
#version=RHEL8

# USE sda DISK
ignoredisk --only-use=sda

# CLEAR DISK PARTITIONS BEFORE INSTALL
clearpart --all --initlabel

# USE text INSTALL
text

# USE ONLINE INSTALLATION MEDIA
url --url=http://REPO_SERVER_IP/rhel-8.5/BaseOS --noverifyssl

# KEYBOARD LAYOUTS
keyboard --vckeymap=us --xlayouts='us','pl'

# LANGUAGE
lang en_US.UTF-8

# NETWORK INFORMATION
network --bootproto=static --device=INTERFACE1 --ip=IP_ADDRESS1 --netmask=NETMASK1 --gateway=GATEWAY --nameserver=NAMESERVER1,NAMESERVER2 --noipv6 --activate
network --bootproto=static --device=INTERFACE2 --ip=IP_ADDRESS2 --netmask=NETMASK2 --noipv6 --activate --onboot=on
network --hostname=SYSTEM_NAME

# REPOS
repo --name="AppStream" --baseurl=http://REPO_SERVER_IP/rhel-8.5/AppStream

# ROOT PASSWORD
rootpw --plaintext asd

# DISABLE Setup Agent ON FIRST BOOT
firstboot --disable

# DISABLE SELinux AND FIREWALL
selinux --disabled
firewall --disabled

# OMIT X11
skipx

# REBOOT AND EJECT BOOT MEDIUM
reboot --eject

# TIMEZONE
timezone Europe/Warsaw --isUtc --nontp

# PARTITIONS
part   /boot/efi --fstype="efi"   --size=600  --ondisk=sda --label=EFI  --fsoptions="umask=0077,shortname=winnt"
part   /boot     --fstype="xfs"   --size=1024 --ondisk=sda --label=BOOT --fsoptions="rw,noatime,nodiratime"
part   pv.475    --fstype="lvmpv" --size=1    --ondisk=sda --grow

# LVM
volgroup rootvg --pesize=4096 pv.475
logvol /         --fstype="xfs"   --size=1024 --name=root --label="ROOT" --vgname=rootvg --fsoptions="rw,noatime,nodiratime"
logvol /usr      --fstype="xfs"   --size=5120 --name=usr  --label="USR"  --vgname=rootvg --fsoptions="rw,noatime,nodiratime"
logvol /var      --fstype="xfs"   --size=3072 --name=var  --label="VAR"  --vgname=rootvg --fsoptions="rw,noatime,nodiratime"
logvol /tmp      --fstype="xfs"   --size=1024 --name=tmp  --label="TMP"  --vgname=rootvg --fsoptions="rw,noatime,nodiratime"
logvol /opt      --fstype="xfs"   --size=1024 --name=opt  --label="OPT"  --vgname=rootvg --fsoptions="rw,noatime,nodiratime"
logvol /home     --fstype="xfs"   --size=1024 --name=home --label="HOME" --vgname=rootvg --fsoptions="rw,noatime,nodiratime"
logvol swap      --fstype="swap"  --size=4096 --name=swap --label="SWAP" --vgname=rootvg

# RPM PACKAGES
%packages
@^minimal-environment
kexec-tools
nfs-utils
nfs4-acl-tools
perl
chrony
%end

# KDUMP
%addon com_redhat_kdump --enable --reserve-mb='auto'
%end

# POST INSTALL COMMANDS TO EXECUTE
%post --log=/root/ks-post.log --interpreter=/usr/bin/bash

  # POST: route
  echo ROUTE_NET via ROUTE_VIA > /etc/sysconfig/network-scripts/route-INTERFACE2

  # POST: chrony CONFIG
  cat << TIME > /etc/chrony.conf
server NTP1 iburst
server NTP2 iburst
driftfile /var/lib/chrony/drift
makestep 1.0 3
rtcsync
logdir /var/log/chrony
keyfile /etc/chrony.keys
leapsectz right/UTC
TIME

  # POST: chrony SERVICE
  systemctl enable chronyd

%end

# PASSWORD REQUIREMENTS
%anaconda
pwpolicy root --minlen=6 --minquality=1 --notstrict --nochanges --notempty
pwpolicy user --minlen=6 --minquality=1 --notstrict --nochanges --emptyok
pwpolicy luks --minlen=6 --minquality=1 --notstrict --nochanges --notempty
%end

kickstart.sh

… and last but not least – the kickstart.sh script. It does not take any arguments – it just loads the kickstart.config file variables and then replaces all config options in kickstart.skel with sed(1) to generate new Kickstart file as files/${SYSTEM_NAME}.cfg file. It also copies that config into files/${SYSTEM_NAME}.config for convenience.

# cat kickstart.sh
#! /bin/sh

if [ ! -f kickstart.config ]
then
  echo "ERROR: file 'kickstart.config' not available"
  exit 1
fi

if [ ! -f kickstart.skel ]
then
  echo "ERROR: file 'kickstart.skel' not available"
  exit 1
fi

. "$( pwd )/kickstart.config"

mkdir -p files ksfloppy iso

cp kickstart.config files/${SYSTEM_NAME}.config

if [ ${?} -eq 0 ]
then
  echo "INFO: kickstart config copied to 'files/${SYSTEM_NAME}.config' location"
else
  echo "ERROR: could not copy config to 'files/${SYSTEM_NAME}.config' location"
  exit 1
fi

sed                                           \
  -e s@SYSTEM_NAME@${SYSTEM_NAME}@g           \
  -e s@SALT_MINION_NAME@${SALT_MINION_NAME}@g \
  -e s@SALT_MASTER_IP@${SALT_MASTER_IP}@g     \
  -e s@REPO_SERVER_IP@${REPO_SERVER_IP}@g     \
  -e s@RHEL_MAJOR@${RHEL_MAJOR}@g             \
  -e s@RHEL_VERSION@${RHEL_VERSION}@g         \
  -e s@RHEL_ARCH@${RHEL_ARCH}@g               \
  -e s@INTERFACE1@${INTERFACE1}@g             \
  -e s@IP_ADDRESS1@${IP_ADDRESS1}@g           \
  -e s@NETMASK1@${NETMASK1}@g                 \
  -e s@INTERFACE2@${INTERFACE2}@g             \
  -e s@IP_ADDRESS2@${IP_ADDRESS2}@g           \
  -e s@NETMASK2@${NETMASK2}@g                 \
  -e s@GATEWAY@${GATEWAY}@g                   \
  -e s@NAMESERVER1@${NAMESERVER1}@g           \
  -e s@NAMESERVER2@${NAMESERVER2}@g           \
  -e s@NTP1@${NTP1}@g                         \
  -e s@NTP2@${NTP2}@g                         \
  -e s@ROUTE_NET@${ROUTE_NET}@g               \
  -e s@ROUTE_VIA@${ROUTE_VIA}@g               \
  kickstart.skel > files/${SYSTEM_NAME}.cfg

if [ ${?} -eq 0 ]
then
  echo "INFO: kickstart file 'files/${SYSTEM_NAME}.cfg' generated"
else
  echo "ERROR: failed to generate 'files/${SYSTEM_NAME}.cfg' kickstart file"
  exit 1
fi

echo "INFO: mkisofs(8) output BEGIN"
echo "-----------------------------"

mkisofs -J -R -l -graft-points -V "OEMDRV" \
        -input-charset utf-8 \
        -o iso/${SYSTEM_NAME}.oemdrv.iso \
        ks.cfg=files/${SYSTEM_NAME}.cfg ksfloppy

echo "-----------------------------"
echo "INFO: mkisofs(8) output ENDED"

if [ ${?} -eq 0 ]
then
  echo "INFO: ISO image 'iso/${SYSTEM_NAME}.oemdrv.iso' generated"
else
  echo "ERROR: failed to generate 'iso/${SYSTEM_NAME}.oemdrv.iso' ISO image"
  exit 1
fi

ISO

It finishes its work in less then a second. Here is its output.

kickstart.sh

… and the generated ISO file.

# ls -lh iso/kickme.oemdrv.iso
-rw-r--r--  1 root  wheel   366K Apr 10 21:57 iso/kickme.oemdrv.iso

Result

Now – when you boot the kickme VirtualBox virtual machine with CD-ROM devices loaded you will end up with RHEL system installed according to your generated Kickstart config. Here are some files from the kickme RHEL installed system.

Filesystems with LABELs such as BOOT or VAR defined.

# lsblk -i -f
NAME            FSTYPE      LABEL UUID                                   MOUNTPOINT
sda
|-sda1          xfs         BOOT  b5c66ea5-b38a-4072-b1a8-0d5882ace179   /boot
|-sda2          vfat        EFI   BB7A-4BFD                              /boot/efi
`-sda3          LVM2_member       e9BwIq-4I2W-zX6y-As42-f9N2-WTTR-WfHKdC
  |-rootvg-root xfs         ROOT  dbf8dd30-51cc-408a-9d05-b1ae67c0637c   /
  |-rootvg-swap swap        SWAP  c8a016b5-f43d-4510-9703-e9c68f02ae64   [SWAP]
  |-rootvg-usr  xfs         USR   c6694796-a5bd-4833-9a6b-a740e8bf83bf   /usr
  |-rootvg-home xfs         HOME  5264afe6-5d9c-4dc3-9d8d-e19078864aea   /home
  |-rootvg-opt  xfs         OPT   039e9575-3af8-4a8b-95c0-54fb8a515f70   /opt
  |-rootvg-tmp  xfs         TMP   11709a48-a64f-4b93-86a3-e943ff9ecf01   /tmp
  `-rootvg-var  xfs         VAR   ed20343c-b915-4234-b13e-0c6c94e03edc   /var
sr0
sr1

The /etc/fstab file with rw,noatime,nodiratime mount options.

# grep '^[^#] /etc/fstab
/dev/mapper/rootvg-root /                       xfs     rw,noatime,nodiratime 0 0
UUID=b5c66ea5-b38a-4072-b1a8-0d5882ace179 /boot xfs     rw,noatime,nodiratime 0 0
UUID=BB7A-4BFD          /boot/efi               vfat    defaults,uid=0,gid=0,umask=077,shortname=winnt 0 2
/dev/mapper/rootvg-home /home                   xfs     rw,noatime,nodiratime 0 0
/dev/mapper/rootvg-opt  /opt                    xfs     rw,noatime,nodiratime 0 0
/dev/mapper/rootvg-tmp  /tmp                    xfs     rw,noatime,nodiratime 0 0
/dev/mapper/rootvg-usr  /usr                    xfs     rw,noatime,nodiratime 0 0
/dev/mapper/rootvg-var  /var                    xfs     rw,noatime,nodiratime 0 0
/dev/mapper/rootvg-swap none                    swap    defaults        0 0

Networking on two network interfaces and additional route generated.

# cat /etc/sysconfig/network-scripts/ifcfg-enp0s3
# Generated by parse-kickstart
TYPE=Ethernet
DEVICE=enp0s3
UUID=e1fddd41-f398-4c1d-8bef-e28ef705d568
ONBOOT=yes
IPADDR=10.0.10.199
NETMASK=255.255.255.0
GATEWAY=10.0.10.1
IPV6INIT=no
DNS1=1.1.1.1
DNS2=9.9.9.9
PROXY_METHOD=none
BROWSER_ONLY=no
PREFIX=24
DEFROUTE=yes
IPV4_FAILURE_FATAL=no
NAME="System enp0s3"

# cat /etc/sysconfig/network-scripts/ifcfg-enp0s8
# Generated by parse-kickstart
TYPE=Ethernet
DEVICE=enp0s8
UUID=5454b587-8c29-41a7-93f8-532c814865de
ONBOOT=yes
IPADDR=10.0.90.199
NETMASK=255.255.255.0
IPV6INIT=no
PROXY_METHOD=none
BROWSER_ONLY=no
PREFIX=24
DEFROUTE=yes
IPV4_FAILURE_FATAL=no
NAME="System enp0s8"

# cat /etc/sysconfig/network-scripts/route-enp0s8
10.0.40.10/24 via 10.0.20.1

# cat /etc/resolv.conf
# Generated by NetworkManager
nameserver 1.1.1.1
nameserver 9.9.9.9

Alternatives

Its also possible to use the livemedia-creator from the lorax package … but I would omit it. To be honest I tried it – and it did not worked at all. I started the following process … and it run for more then a DAY and produced NOTHING.

# livemedia-creator \
    --make-iso \
    --ram 4096 \
    --vcpus 4 \
    --iso=/mnt/rhel-8.5-x86_64-boot.iso \
    --ks=/mnt/mykick.cfg

The log file for the operation was also EMPTY. At least that was the run when using the virt-install option with creating everything under virtual machine. This also intrigue me a lot. Why use virtual machines just to create installation media? Its just a bunch of files. There are better options available such as chroot(8) for example … or even so glorified containers such as Docker or Podman. Why use fully fledged virtual machine just to create ISO image? This is a big mystery for me.

Seems that livemedia-creator also has --no-virt option available … but as documentation states – it can “render the entire system unusable” – not very production ready solution for my taste. Below is a screenshot from the official RHEL documentation.

rhel-render

Pity that livemedia-creator did not worked for me – but I already have a working process for that.

Some people also suggested these as valuable alternatives:

Maybe some day I will find time to check them out.

Summary

I am not the best at summaries so I will just write here that the article has ended successfully πŸ™‚

Regards.

EOF