The Bhyve FreeBSD hypervisor (called/spelled ‘beehive’ usually) was created almost 10 years ago. Right now it offers speed and features that other similar solutions provide – such as KVM/VMware/XEN. You can check all the details in the FreeBSD Handbook for details. One of the last things Bhyve lacks is so called live migration between physical hosts but save state and resume from saved state are in the works currently so not long before that live migration. Up until recently I used mostly VirtualBox for my small virtualization needs. Recently I started to evaluate Bhyve and this time I am very pleased – the FreeBSD VirtualBox integration is not perfect anyway – for example – the USB passthru does not work since several years – and even when it worked – it was limited to USB 1.x speeds only. Also because of FreeBSD policy of pkg(8) packages building process – the VirtualBox packages remain broken for 3 months after each *.1 or upper release (*.2/*.3/…). The other impulse that forced me to switch from VirtualBox to Bhyve was the VirtualBox (in)stability. I often needed to restart crashed VirtualBox VMs because they failed for some unspecified reason.
![]()
One of the Bhyve features that I especially liked was that by default Bhyve only uses memory that guest system wanted to allocate. For example a FreeBSD virtual machine with 2 GB RAM set will use after boot about 70 MB RAM 🙂
Another great feature I really liked about Bhyve was that I could suspend the host machine with all the VMs started – both on my ThinkPad W520 laptop and AMD Based FreeBSD Desktop and then it all successfully resumed. With VirtualBox you would have to poweroff all VMs because if you suspend with running VirtualBox VMs – it will just crash – its not possible to do suspend/resume cycle with VirtualBox.
The Table of Contents for this article is as follows:
- FreeBSD Bhyve Virtualization
- Bhyve Managers
- Bhyve versus KVM and VMware
- Bhyve libvirt/virt-manager GUI
- vm-bhyve
- Install/Setup
- Networking
- Server/Desktop LAN Bridge
- Laptop WiFi NAT
- Networking Restart
- Datastores
- Templates
- NVMe
- ISO Images
- Guest OS Install
- FreeBSD
- Linux
- Windows 7
- Windows 10
- Force Windows 10 Offline Account
- Windows 10 Bloat Removers
- Windows 11
- Dealing with Locked VMs
- Disk Resize
- Summary
Bhyve Managers
While VirtualBox has quite usable QT based GUI – the Bhyve does not have anything like that. I once seen some GUI QT prototype for Bhyve but it was very basic – so forget about that currently. There are however several web interfaces such as TrueNAS CORE or CBSD/CloneOS. There are also several terminal managers such as vm-bhyve. The older one iohyve has not been maintained for at least 6 long years. There is also libvirt Bhyve driver but more on that later.
Bhyve versus KVM and VMware
Klara Systems compared Bhyve to KVM and Benjamin Bryan compared it against VMware hypervisor. While Bhyve remains competitive against both of them there are two important aspects from Klara Systems that stand out and are worth repeating here.
First – using nvme driver is a lot faster then using more traditional virtio-blk or ahci-hd backends.

Second – and this one seems strange – using a raw file is faster then using ZFS zvol device.

To summarize these thoughts – just just file on a disk like disk0.img and use nvme as storage backend everytime the guest operating system supports it.
Bhyve libvirt/virt-manager GUI
Theoretically the libvirt virtualization API supports Bhyve as one of its backends and the details about Bhyve driver – https://libvirt.org/drvbhyve.html – are available here. I have tried it with virt-manager and after some basic configuration I was able to start FreeBSD 13.2 installation … but it got frozen at the kernel messages and nothing more happened.

… and the moment it hanged below. I have tried multiple times with the same effect.

I really liked the virtual machine settings window of virt-manager.

vm-bhyve
While You can use Bhyve directly with bhyve(8) and bhyvectl(8) commands – which I was doing in the past – after trying the vm-bhyve both on the desktop and server space – I really liked it and this is what I currently use. I just moved from vm-bhyve package to the newer vm-bhyve-devel one.
The vm(8) command is simple and provides all needed use cases.
host # vm help
vm-bhyve: Bhyve virtual machine management v1.6-devel (rev. 106001)
Usage: vm ...
    version
    init
    set [setting=value] [...]
    get [all|setting] [...]
    switch list
    switch info [name] [...]
    switch create [-t type] [-i interface] [-n vlan-id] [-m mtu] [-a address/prefix-len] [-b bridge] [-p]
    switch vlan
    switch nat
    switch private
    switch add
    switch remove
    switch destroy
    datastore list
    datastore add
    datastore remove
    datastore add
    list
    info [name] [...]
    create [-d datastore] [-t template] [-s size] [-m memory] [-c vCPUs]
    install [-fi]
    start [-fi]  [...]
    stop  [...]
    restart
    console  [com1|com2]
    configure
    rename
    add [-d device] [-t type] [-s size|switch]
    startall
    stopall
    reset  [-f]
    poweroff [-f]
    destroy [-f]
    passthru
    clone
    snapshot [-f]
    rollback [-r]
    iso [url]
    img [url]
    image list
    image create [-d description] [-u]
    image destroy
    image provision [-d datastore]
Install/Setup
We need only several packages to add.
host # pkg install -y \
         vm-bhyve-devel \
         uefi-edk2-bhyve-csm \
         bhyve-firmware \
         edk2-bhyve \
         dnsmasq \
         grub2-bhyve \
         tigervnc-viewer \
         rdesktop
The setup is pretty easy also.
First we need to add several vm_* settings into the main FreeBSD /etc/rc.conf file.
  vm_enable=YES
  vm_dir="zfs:zroot/vm"
  vm_list=""
  vm_delay=3
Keep in mind that you will later use the vm_list="" for the list of VMs that you would like to be started at boot. Like vm_list="freebsd13 freebsd14uefi" for example. Then the vm list command would place [1] in at the freebsd13 name (as its first) and [2] in the freebsd14uefi name as this one is second on the list. See below.
host # vm list
NAME           DATASTORE  LOADER     CPU  MEMORY  VNC           AUTO     STATE
almalinux8     default    uefi       2    2G      0.0.0.0:5908  No       Running (11819)
freebsd13      default    bhyveload  1    256M    -             Yes [1]  Running (2342)
freebsd14      default    bhyveload  1    256M    -             No       Stopped
freebsd14uefi  default    uefi       2    8G      -             Yes [2]  Running (35394)
windows10      default    uefi       2    2G      -             No       Stopped
windows7       default    uefi       2    2G      -             No       Stopped
We need to create a dedicated ZFS dataset for our VMs. You can also use directory on UFS – check vm-bhyve documentation.
host # zfs create -o mountpoint=/vm zroot/vm
We will also copy the available templates to our new /vm dir.
host # cp -a /usr/local/share/examples/vm-bhyve /vm/.templates
Remember to check /vm/.templates/config.sample as it has the documentation for all available options.
host # head -12 /vm/.templates/config.sample
# This is a sample configuration file containing all supported options
# Please do not try and use this file itself for a guest
# For any option that contains a number in the name, such as "network0_type",
# you can add additional devices of that type by creating a new set of
# variables using the next number in sequence, e.g "network1_type"
#
# Please make sure all option names are specified in lowercase and
# at the beginning of the line. If there is any whitespace before
# the option name, the line will be ignored.
# The '#' character signifies the start of a comment, even within
# double-quotes, and so cannot be used inside any values.
We can now start initialize the vm-bhyve.
host # service vm start
Networking
There as many network setups as many FreeBSD has network capabilities – a lot! I this guide I will cover two most typical network setups for Bhyve. One would be the most server (or desktop) oriented – as it requires a LAN card to be used. The other one I would call a laptop one – that one would provide network connectivity using wlan0 WiFi interface.
No matter which one we will choose – we need to enable port forwarding on our FreeBSD host. Do that with these two commands.
host # sysrc gateway_enable=YES

host # sysctl net.inet.ip.forwarding=1

host # echo net.link.tap.up_on_open=1 >> /etc/sysctl.conf

host # sysctl net.link.tap.up_on_open=1
I assume that our FreeBSD host system would use 10.0.0.10/24 IP address and that 10.0.0.1 would be its default gateway.
Your host system main /etc/rc.conf file can looks as follows then.
host # cat /etc/rc.conf
# NETWORK
  hostname=host
  ifconfig_re0="inet 10.0.0.10/24 up"
  defaultrouter="10.0.0.1"
  gateway_enable=YES

# DAEMONS
  sshd_enable=YES
  zfs_enable=YES

# BHYVE
  vm_enable="YES"
  vm_dir="zfs:zroot/vm"
  vm_list=""
  vm_delay="3"
Server/Desktop LAN Bridge
We will use 10.0.0.0/24 network – the same that our host system uses. We will need one bridge/switch named vm-public with 10.0.0.100/24 address on it. Without that address later the dnsmasq will complain unknown interface vm-public about it. Information about the switches is kept in the /vm/.config/system.conf file. We will also need to add out LAN interface to the public switch. It will be re0 interface in my case.
host # vm switch create -a 10.0.0.100/24 public

host # vm switch add public re0

host # vm switch list
NAME    TYPE      IFACE      ADDRESS        PRIVATE  MTU  VLAN  PORTS
public  standard  vm-public  10.0.0.100/24  no       -    -     re0

host # cat /vm/.config/system.conf
switch_list="public"
type_public="standard"
addr_public="10.0.0.100/24"
ports_public="re0"
To be honest the networking part setup is complete.
When you will be setting up your Bhyve VMs you will either use static 10.0.0.0/24 IP address space or just use DHCP and the one that is already on your network will take care of the rest (assuming you have one).
If you do not have one you may use dnsmasq service to do that easily.
host # cat /usr/local/etc/dnsmasq.conf
port=0
no-resolv
server=1.1.1.1
except-interface=lo0
bind-interfaces
local-service
dhcp-authoritative
interface=vm-public
dhcp-range=10.0.0.69,10.0.0.96

host # service dnsmasq enable

host # service dnsmasq start
That should do.
Now – to access the VMs in this bridged networking mode you can just ssh(1) to their IP address directly.
Laptop WiFi NAT
This is one of the cases where VirtualBox has one more feature over Bhyve. With VirtualBox its possible to use bridge mode over WiFi interface. Its not possible with Bhyve currently. I have submitted a proposal to FreeBSD Foundation to implement such configuration – especially as open source VirtualBox code already exists. Time will tell if it will be implemented or if there would be more important tasks to take care of.
We will use 10.1.1.0/24 network for our VM needs. We will also need only one vm-bhyve switch that we will use – and it will be the vm-public one with 10.1.1.1/24 address – we will be using it as a gateway for our VMs in NAT. Information about the switches is kept in the /vm/.config/system.conf file.
host # vm switch create -a 10.1.1.1/24 public

host # vm switch list
NAME    TYPE      IFACE      ADDRESS      PRIVATE  MTU  VLAN  PORTS
public  standard  vm-public  10.1.1.1/24  no       -    -     -

host # cat /vm/.config/system.conf
switch_list="public"
type_public="standard"
addr_public="10.1.1.1/24"
Now the NAT part – we will do that with very simple pf(4) config.
host # cat /etc/pf.conf
# SKIP LOOPBACK
  set skip on lo0

# bhyve(8) VMS NAT
  nat on wlan0 from {10.1.1.1/24} to any -> (wlan0)

# PASS IN/OUT ALL
  pass in all
  pass out all

host # service pf enable

host # service pf start
You can check the stats of that pf(4) rules like that.
host # pfctl -Psn -vv
No ALTQ support in kernel
ALTQ related functions disabled
@0 nat on wlan0 inet from 10.1.1.0/24 to any -> (wlan0) round-robin
  [ Evaluations: 18774     Packets: 362277    Bytes: 352847937   States: 0     ]
  [ Inserted: uid 0 pid 69837 State Creations: 38    ]
Feel free to add all your pf(4) rules into the /etc/pf.conf file.
Now the DHCP server. For simplicity of the setup we will use dnsmasq daemon – but nothing prevents you from setting up a Highly Available DHCP Server instead using isc-dhcp44-server package.
host # cat /usr/local/etc/dnsmasq.conf
port=0
no-resolv
server=1.1.1.1
except-interface=lo0
bind-interfaces
local-service
dhcp-authoritative
interface=vm-public
dhcp-range=10.1.1.11,10.1.1.99

host # service dnsmasq enable

host # service dnsmasq start
Now you should be ready to setup Bhyve VMs on your laptop.
When I was using VirtualBox – it allowed me to use its Port Forwarding feature where I could add as many mappings in the NAT network type as shown below.
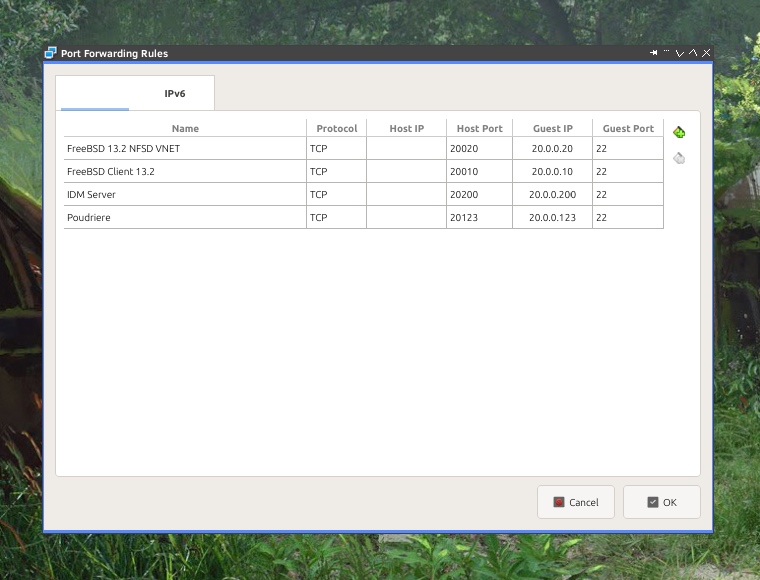
… but with Bhyve its even better as no port forwarding in the NAT mode is needed at all! 🙂
You can access the Bhyve VMs in NAT networking mode the same as you can in the bridged mode – with just ssh(1) to their IP address from directly from the 10.1.1.0/24 range.
So to put it bluntly – if a Bhyve VM in NAT mode got 10.1.1.33/24 IP address – then just ssh(1) to that IP address directly from the host system.
Networking Restart
Sometimes – when for example you laptop will boot without network connectivity – the tap(4) interfaces sometimes do not went UP.

There is simple fix tor that problem – bhyve-network-restart.sh script.
Its shown below.
# ADD IP ADDRESS TO EACH vm-bhyve SWITCH
vm switch list \
  | sed 1d \
  | while read NAME TYPE IFACE ADDRESS PRIVATE MTU VLAN PORTS a0 a1 a2 a3 a4 a5 a6 a7 a8 a9
    do
      if [ "${ADDRESS}" != "-" ]
      then
             vm switch address ${NAME} ${ADDRESS}
        echo vm switch address ${NAME} ${ADDRESS}
      fi
    done

# SET TO 'up' ALL vm-bhyve SWITCH MEMBERS
vm switch list \
  | sed 1d \
  | awk '{print $1}' \
  | while read SWITCH
    do
      ifconfig vm-${SWITCH} \
        | awk '/member:/ {print $2}' \
        | while read INTERFACE
          do
                 ifconfig ${INTERFACE} up
            echo ifconfig ${INTERFACE} up
          done
    done
Execute it everytime you lost connectivity with your VMs and you are done.
Datastores
While vm-bhyve supports multiple datastores – you will only need one – the default one.
host # vm datastore list
NAME            TYPE        PATH                      ZFS DATASET
default         zfs         /vm                       zroot/vm
Snapshots and Clones
The vm-bhyve also supports snapshots and clones of the VMs disks. Generally they are just ZFS snapshots and clones.
Templates
While vm-bhyve comes with several handy templates – they are incomplete – and small several changes makes the game more playable.
NVMe
First – we will implement the things that we know work faster – the nvme type for disk images instead of virt-blk or ahci-hd ones. Of course not all operating systems have support for such devices – for them we will use the latter options.
A fast way to change it to nvme is below.
host # sed -i '' s.virtio-blk.nvme.g /vm/.templates/freebsd.conf
ISO Images
Each VM needs an ISO image from which it will be installed. Of course you can also just create new VM and copy the disk contents from other server or use one of the FreeBSD images.
There are two ways to feed vm-bhyve with ISO images.
One is to fetch them from some URL.
host # vm iso http://ftp.freebsd.org/pub/FreeBSD/releases/ISO-IMAGES/13.2/FreeBSD-13.2-RELEASE-amd64-disc1.iso

host # vm iso
DATASTORE           FILENAME
default             FreeBSD-13.2-RELEASE-amd64-disc1.iso
The other way is to just simple copy ISO file to the /vm/.iso directory.
host # cp /home/vermaden/download/ubuntu-mate-23.04-desktop-amd64.iso /vm/.iso/

host # vm iso
DATASTORE           FILENAME
default             FreeBSD-13.2-RELEASE-amd64-disc1.iso
default             ubuntu-mate-23.04-desktop-amd64.iso
Guest OS Install
Generally each VM install is very similar as shown below.
host # vm create -t TEMPLATE NAME

host # vm install NAME ISO

host # vm console NAME
Example for FreeBSD is below.
host # vm create -t freebsd freebsd13

host # vm install freebsd13 FreeBSD-13.2-RELEASE-amd64-disc1.iso
Starting freebsd13
  * found guest in /vm/freebsd13
  * booting...

host # vm console freebsd13
You will probably see something like that below.

Then you do the installation in the text mode and after reboot you have your running FreeBSD VM.
host # vm list
NAME          DATASTORE  LOADER     CPU  MEMORY  VNC  AUTO     STATE
freebsd13     default    bhyveload  1    256M    -    Yes [1]  Running (85315)
Some more info to display can be shown with info argument.
host # vm info freebsd13
------------------------
Virtual Machine: freebsd13
------------------------
  state: stopped
  datastore: default
  loader: bhyveload
  uuid: a91287a1-39d3-11ee-b73d-f0def1d6aea1
  cpu: 1
  memory: 256M

  network-interface
    number: 0
    emulation: virtio-net
    virtual-switch: public
    fixed-mac-address: 58:9c:fc:0b:98:30
    fixed-device: -

  virtual-disk
    number: 0
    device-type: file
    emulation: nvme
    options: -
    system-path: /vm/freebsd13/disk0.img
    bytes-size: 21474836480 (20.000G)
    bytes-used: 885089280 (844.086M)

  snapshots
    zroot/vm/freebsd13@fresh    85.2M   Mon Aug 14 11:18 2023

host # env EDITOR=cat vm configure freebsd13
loader="bhyveload"
cpu=1
memory=256M
network0_type="virtio-net"
network0_switch="public"
disk0_type="nvme"
disk0_name="disk0.img"
uuid="a91287a1-39d3-11ee-b73d-f0def1d6aea1"
network0_mac="58:9c:fc:0b:98:30"
If you want to edit and not only display the VM config use this.
host # vm configure freebsd13
FreeBSD
FreeBSD can be boot in two ways. One is with bhyveload which may be translated to legacy BIOS boot. You can also of course boot FreeBSD un UEFI mode.
host # cat /vm/.templates/freebsd.conf
loader="bhyveload"
cpu=1
memory=256M
network0_type="virtio-net"
network0_switch="public"
disk0_type="nvme"
disk0_name="disk0.img"
The above will use bhyveload and it mostly works … but sometimes if you want to install a lot newer version under Bhyve the loader may not have all the needed features. I was hit by this problem recently where I used FreeBSD 13.2-RELEASE for the FreeBSD host system and wanted to try 14.0-ALPHA1 version.
I described the details of this problem here – FreeBSD Bug 273099 – in a BUG report.
This is how such error looks like:
| FreeBSD/amd64 User boot lua, Revision 1.2
| ZFS: unsupported feature: com.klarasystems:vdev_zaps_v2
| ERROR: cannot open /boot/lua/loader.lua: no such file or directory.
|
| Type '?' for a list of commands, 'help' for more detailed help.
| OK
To overcome that you will need latest (more up to date then 14.0-ALPHA1 version) FreeBSD sources and below commands.
host # pkg install gitup

host # cp /usr/local/etc/gitup.conf.sample /usr/local/etc/gitup.conf

host # gitup current

host # cd /usr/src/stand

host # make

host # find /usr/obj -type f -name userboot_lua.so
/usr/obj/usr/src/amd64.amd64/stand/userboot/userboot_lua/userboot_lua.so

host # cp /usr/obj/usr/src/amd64.amd64/stand/userboot/userboot_lua/userboot_lua.so /vm/userboot_lua.so
Now – we need to add bhyveload_loader="/vm/userboot_lua.so" option to out FreeBSD 14.0-ALPHA1 machine config.
host # cat /vm/freebsd14/freebsd14.conf
loader="bhyveload"
bhyveload_loader="/vm/userboot_lua.so"
cpu=1
memory=256M
network0_type="virtio-net"
network0_switch="public"
disk0_type="nvme"
disk0_name="disk0.img"
uuid="975bca2a-39c4-11ee-b73d-f0def1d6aea1"
network0_mac="58:9c:fc:03:67:47"
Now it will boot properly.
Of course it was very easy to overcome that using UEFI boot instead.
host # cat /vm/freebsd14uefi/freebsd14uefi.conf
loader="uefi"
cpu=1
memory=256M
network0_type="virtio-net"
network0_switch="public"
disk0_type="nvme"
disk0_name="disk0.img"
uuid="35ca42b7-7f28-43eb-afd9-2488c5ec83cf"
network0_mac="58:9c:fc:0a:16:4b"
Linux
By default for Linux the grub way is the proposed way. I do not use it as at it olny allows console access – and even many so called enterprice grade Linux distributions such as AlmaLinux or Rocky have graphical installer that needs/wants graphical display … and that is only available in uefi mode.
Maybe for Alpine or Void Linux such approach may be usable … but uefi will also work very well – thus I do not see ANY advantages of using grub way here.
I will show you the next example based on AlmaLinux 8.x install but the same worked properly with Ubuntu Mate for example.
First the default template.
host # cat /vm/.templates/linux.conf
loader="uefi"
cpu=2
memory=4G
network0_type="virtio-net"
network0_switch="public"
disk0_type="nvme"
disk0_name="disk0.img"
xhci_mouse="yes"
graphics="yes"
The above added xhci_mouse="yes" uses more precise xhci(4) USB 3.x mouse driver and graphics="yes" forces the exposure of VNC connection.
With such template the installation looks like that.
host # cp AlmaLinux-8.8-x86_64-minimal.iso /vm/.iso/

host # vm create -t linux almalinux8

host # vm install almalinux8 AlmaLinux-8.8-x86_64-minimal.iso
Starting almalinux8
  * found guest in /vm/almalinux8
  * booting...

host # vm list
NAME           DATASTORE  LOADER     CPU  MEMORY  VNC           AUTO  STATE
almalinux8     default    uefi       2    4G      0.0.0.0:5900  No    Running (11819)

host % vncviewer -SendClipboard -AcceptClipboard -LowColorLevel -QualityLevel 6 :5900 &
The last vncviewer(1) command is executed as regular user. It comes from net/tigervnc-viewer package.
If you will be connecting to some external server then use IP address in the command.
host % vncviewer -SendClipboard -AcceptClipboard -LowColorLevel -QualityLevel 6 10.0.0.66::5900 &
After the Linux system is installed you may specify the exact VNC port or IP address. Also the screen resolution or enable/disable waiting for the VNC connection.
graphics_port="5900"
graphics_listen="0.0.0.0"
graphics_res="1400x900"
graphics_wait="no"
Windows 7
A lot of people will criticize me for this one – as Windows 7 is not an officially supported version anymore. I do not care about that when I want to use some localhost software … or older software that works better on older version. Not to mention that its one of the last Windows versions that does not force online Microsoft account down your throat. It also uses less resources and is more responsive.
First – the template – similar to the Linux one.
host # cat /vm/.templates/windows7.conf
loader="uefi"
graphics="yes"
cpu=2
memory=2G
ahci_device_limit="8"
network0_type="e1000"
network0_switch="public"
disk0_type="ahci-hd"
disk0_name="disk0.img"
disk0_opts="sectorsize=512"
utctime="no"
bhyve_options="-s 8,hda,play=/dev/dsp,rec=/dev/dsp"
If you set the xhci_mouse="yes" option with Windows 7 – you will end up without a working mouse in VNC connection and you will have to make all the install and configuration by keyboard only.
One may think about adding xhci_mouse="yes" after installation when you will already have working RDP connection – but that would also reqiure additional drivers. In theory – the device VEN_8086&DEV_1E31 name is recognized as Intel USB 3.0 eXtensible Host Controller … but for some reason anytime I wanted to install it – the Windows 7 system crashed and instantly rebooted.
The other even more imporant thing is having the disk0_opts="sectorsize=512" option. Without it the Windows 7 instaler will fail with the following error.

The last option bhyve_options="-s 8,hda,play=/dev/dsp,rec=/dev/dsp" enables audio.
The install procedure is also similar to Linux.
host # cp win_7_amd64_sp1_en.iso /vm/.iso/

host # vm iso
DATASTORE           FILENAME
default             win_7_amd64_sp1_en.iso

host # vm create -t windows7 -s 40G windows7

host # vm install windows7 win_7_amd64_sp1_en.iso
Starting windows7
  * found guest in /vm/windows7
  * booting...

host # vm list
NAME           DATASTORE  LOADER     CPU  MEMORY  VNC           AUTO  STATE
windows7       default    uefi       2    2G      0.0.0.0:5900  No    Running (11819)

host % vncviewer -SendClipboard -AcceptClipboard -LowColorLevel -QualityLevel 6 :5900 &
After the install we should enable RDP connections for more features. Rememeber to select any version option.

You can add one or more CD-ROM drives with following options in the configure argument.
disk1_type="ahci-cd"
disk1_dev="custom"
disk1_name="/vm/.iso/virtio-drivers.iso"
It would be easier for RDP connections to have static IP instead of a DHCP one.
Now as we have the static 10.1.1.7 IP address we can use RDP connection with rdesktop(1) command.
host % rdesktop -u buser -p bpass -P -N -z -g 1800x1000 -a 24 -r sound:local -r disk:HOME=/home/vermaden 10.1.1.7
Autoselecting keyboard map 'en-us' from locale

ATTENTION! The server uses and invalid security certificate which can not be trusted for
the following identified reasons(s);

 1. Certificate issuer is not trusted by this system.

     Issuer: CN=vbox


Review the following certificate info before you trust it to be added as an exception.
If you do not trust the certificate the connection atempt will be aborted:

    Subject: CN=vbox
     Issuer: CN=vbox
 Valid From: Mon Aug 14 00:58:25 2023
         To: Mon Feb 12 23:58:25 2024

  Certificate fingerprints:

       sha1: 4ad853c40a8aa0560af315b691038202506e07ce
     sha256: 44ec8f7650486aef6261aea42da99caba4e84d7bc58341c0ca1bb8e28b81d222


Do you trust this certificate (yes/no)? yes
Connection established using SSL.
There are several useful options here.
The -u buser and -p bpass will take care of credentials.
The -P option enables caching of bitmaps to disk (persistent bitmap caching). This improves performance (especially on low bandwidth connections) and reduces network traffic.
The -N option enables numlock synchronization between the X11 server and remote RDP session.
The -z enables compression of the RDP datastream.
The -g 1800x1000 and -a 24 specifies resolution and color depth rate.
The -r disk:HOME=/home/vermaden enables transparent sharing of your home directory and additional share is shown in My Computer in the Windows 7 machine – very handy for sharing files between the host and guest VM as chown below.

The last one option -r sound:local specifies that the audio will be realized on the guest VM – this will only work if you added the bhyve_options="-s 8,hda,play=/dev/dsp,rec=/dev/dsp" to the Windows 7 Bhyve config. Alternatively without that hda(4) emulation you can use -r sound:remote option – this would use RDP protocol to transfer audio events from the guest machine to your host machine and then audio will be played then locally on your host machine.
Windows 10
Finally a supported version.
Template is similar to the Windows 7 one.
host # cat /vm/.templates/windows10.conf
loader="uefi"
graphics="yes"
xhci_mouse="yes"
cpu=2
memory=2G
ahci_device_limit="8"
network0_type="e1000"
network0_switch="public"
disk0_type="nvme"
disk0_name="disk0.img"
utctime="no"
bhyve_options="-s 8,hda,play=/dev/dsp,rec=/dev/dsp"
The Windows 10 supports the xhci_mouse="yes" so we enable and keep it all the time.
The Windows 10 does not need the disk0_opts="sectorsize=512" option.
As Windows 10 is newer – the nvme can (and should) be used for performance reasons.
The last option bhyve_options="-s 8,hda,play=/dev/dsp,rec=/dev/dsp" enables audio.
The install procedure is also similar to Windows 7.
host # cp win_10_amd64_en_LTSC.iso /vm/.iso/

host # vm iso
DATASTORE           FILENAME
default             win_10_amd64_en_LTSC.iso

host # vm create -t windows10 -s 40G windows10

host # vm install windows10 win_10_amd64_en_LTSC.iso
Starting windows10
  * found guest in /vm/windows10
  * booting...

host # vm list
NAME           DATASTORE  LOADER     CPU  MEMORY  VNC           AUTO  STATE
windows10      default    uefi       2    2G      0.0.0.0:5900  No    Running (11819)

host % vncviewer -SendClipboard -AcceptClipboard -LowColorLevel -QualityLevel 6 :5900 &
After the install we should enable RDP connections for more features. Remember to select any version option.

You can add one or more CD-ROM drives with following options in the configure argument.
disk1_type="ahci-cd"
disk1_dev="custom"
disk1_name="/vm/.iso/virtio-drivers.iso"
It would be easier for RDP connections to have static IP instead of a DHCP one.

Now as we have the static 10.1.1.8 IP address we can use RDP connection with rdesktop(1) command.
host % rdesktop -u buser -p bpass -P -N -z -g 1600x900 -a 24 -r sound:local -r disk:HOME=/home/vermaden 10.1.1.8
Autoselecting keyboard map 'en-us' from locale

ATTENTION! The server uses and invalid security certificate which can not be trusted for
the following identified reasons(s);

 1. Certificate issuer is not trusted by this system.

     Issuer: CN=DESKTOP-HKJ3H6T


Review the following certificate info before you trust it to be added as an exception.
If you do not trust the certificate the connection atempt will be aborted:

    Subject: CN=DESKTOP-HKJ3H6T
     Issuer: CN=DESKTOP-HKJ3H6T
 Valid From: Mon Aug 14 10:33:41 2023
         To: Tue Feb 13 09:33:41 2024

  Certificate fingerprints:

       sha1: 967d5cdb164e53f7eb4c5c17b0343f2f279fb709
     sha256: c08b732122a39c44d91fac2a9093724da12d2f3e6ea51613245d13cf762f4cd2


Do you trust this certificate (yes/no)? yes
Options are the same as with Windows 7 and they are described in the Windows 7 section.
Force Windows 10 Offline Account
To force creation of local account instead of forced online account you need to boot the Windows 10 without network.
Do the following steps to do that.
host # yes | vm poweroff windows10

host # vm configure windows10
- network0_type="e1000"
- network0_switch="public"

host # vm start windows10
Now create the offline account.
After creating it poweroff the Windows 10 VM.
host # vm configure windows10
+ network0_type="e1000"
+ network0_switch="public"

host # vm start windows10
Now you have local account on Windows 10 system.
Windows 10 Bloat Removers
You may consider using on of the known Windows 10 bloat removers available here:
- https://github.com/Sycnex/Windows10Debloater
- https://github.com/W4RH4WK/Debloat-Windows-10
- https://github.com/LeDragoX/Win-Debloat-Tools
- https://github.com/ChrisTitusTech/winutil
Windows 11
The setup/install of Windows 11 is the same as Windows 10.
Dealing with Locked VMs
Lets assume that our host system crashed.
The vm-bhyve will left run.lock files in the machines dirs.
host # ls -l /vm/freebsd14uefi
total 1389223K
-rw-r--r-- 1 root wheel          32 2023-08-16 23:36 console
-rw------- 1 root wheel 21474836480 2023-08-16 23:46 disk0.img
-rw-r--r-- 1 root wheel         200 2023-08-16 23:35 freebsd14uefi.conf
-rw-r--r-- 1 root wheel          11 2023-08-16 23:36 run.lock
-rw-r--r-- 1 root wheel        5583 2023-08-16 23:36 vm-bhyve.log

host # vm list
NAME           DATASTORE  LOADER     CPU  MEMORY  VNC  AUTO     STATE
almalinux8     default    uefi       2    2G      -    No       Stopped
freebsd13      default    bhyveload  1    256M    -    Yes [1]  Running (19258)
freebsd13alt   default    bhyveload  1    256M    -    No       Stopped
freebsd14      default    bhyveload  1    256M    -    No       Stopped
freebsd14uefi  default    uefi       2    8G      -    No       Locked (w520.local)
windows10ltsc  default    uefi       2    2G      -    No       Stopped
windows7       default    uefi       2    2G      -    No       Stopped

host # rm /vm/freebsd14uefi/run.lock

host # vm list
NAME           DATASTORE  LOADER     CPU  MEMORY  VNC  AUTO     STATE
almalinux8     default    uefi       2    2G      -    No       Stopped
freebsd13      default    bhyveload  1    256M    -    Yes [1]  Running (19258)
freebsd13alt   default    bhyveload  1    256M    -    No       Stopped
freebsd14      default    bhyveload  1    256M    -    No       Stopped
freebsd14uefi  default    uefi       2    8G      -    No       Stopped
windows10ltsc  default    uefi       2    2G      -    No       Stopped
windows7       default    uefi       2    2G      -    No       Stopped
Now you may want to start the locked machine properly.
Disk Resize
By default vm-bhyve will create disks with 20 GB in size.
To resize the Bhyve virtual machine disk we would use truncate(1) command.
host # vm stop freebsd13

host # cd /vm/freebsd13

host # truncate -s 40G disk0.img

host # vm start freebsd13
If you are not sure about that – you may work on a copy instead.
host # vm stop freebsd13

host # truncate -s 40G disk0.img.NEW

host # dd bs=1m if=disk0.img of=disk0.img.NEW conv=notrunc status=progress
  20865613824 bytes (21 GB, 19 GiB) transferred 43.002s, 485 MB/s
20480+0 records in
20480+0 records out
21474836480 bytes transferred in 43.454036 secs (494196586 bytes/sec)

host # mv disk0.img disk0.img.BACKUP

host # mv disk0.img.NEW disk0.img

host # vm start freebsd13
Now we need to resize the filesystem inside the VM.
freebsd13 # lsblk
DEVICE         MAJ:MIN SIZE TYPE                                          LABEL MOUNT
nvd0             0:90   40G GPT                                               - -
  nvd0p1         0:91  512K freebsd-boot                           gpt/gptboot0 -
           -:-   492K -                                                 - -
  nvd0p2         0:92  2.0G freebsd-swap                              gpt/swap0 SWAP
  nvd0p3         0:93   18G freebsd-zfs                                gpt/zfs0
           -:-   1.0M -                                                 - -

freebsd13 # geom disk list
Geom name: nvd0
Providers:
1. Name: nvd0
   Mediasize: 42949672960 (40G)
   Sectorsize: 512
   Mode: r2w2e3
   descr: bhyve-NVMe
   lunid: 589cfc2081410001
   ident: NVME-4-0
   rotationrate: 0
   fwsectors: 0
   fwheads: 0

freebsd13 # gpart show
=>      40  41942960  nvd0  GPT  (40G) [CORRUPT]
        40      1024     1  freebsd-boot  (512K)
      1064       984        - free -  (492K)
      2048   4194304     2  freebsd-swap  (2.0G)
   4196352  37744640     3  freebsd-zfs  (18G)
  41940992      2008        - free -  (1.0M)

freebsd13 # gpart recover nvd0
nvd0 recovered

freebsd13 # gpart show
=>      40  83886000  nvd0  GPT  (40G)
        40      1024     1  freebsd-boot  (512K)
      1064       984        - free -  (492K)
      2048   4194304     2  freebsd-swap  (2.0G)
   4196352  37744640     3  freebsd-zfs  (18G)
  41940992  41945048        - free -  (20G)

freebsd13 # gpart resize -i 3 -a 1m nvd0
nvd0p3 resized

freebsd13 # gpart show
=>      40  83886000  nvd0  GPT  (40G)
        40      1024     1  freebsd-boot  (512K)
      1064       984        - free -  (492K)
      2048   4194304     2  freebsd-swap  (2.0G)
   4196352  79687680     3  freebsd-zfs  (38G)
  83884032      2008        - free -  (1.0M)

freebsd13 # zpool status
  pool: zroot
 state: ONLINE
config:

        NAME        STATE     READ WRITE CKSUM
        zroot       ONLINE       0     0     0
          nvd0p3    ONLINE       0     0     0

freebsd13 # zpool list
NAME    SIZE  ALLOC   FREE  CKPOINT  EXPANDSZ   FRAG    CAP  DEDUP    HEALTH  ALTROOT
zroot  17.5G  17.0G   544M        -         -    87%    96%  1.00x    ONLINE  -

freebsd13 # zpool set autoexpand=on zroot

freebsd13 # zpool online -e zroot nvd0p3

freebsd13 # zpool list
NAME    SIZE  ALLOC   FREE  CKPOINT  EXPANDSZ   FRAG    CAP  DEDUP    HEALTH  ALTROOT
zroot  37.5G  17.0G  20.5G        -         -    41%    45%  1.00x    ONLINE  -
Summary
I hope I was able to provide all needed information.
Let me know in comments if I missed something.
UPDATE 1 – The sysutils/edk2 Issue
Recently a lot of people started to get problems with running UEFI machines on Bhyve. After a short investigation (details in the 273560 BUG report) the root of all cause was the new sysutils/edk2 version that caused the problem. The problem does not exists as long as You use the -A flag for bhyve(8) command. Unfortunately its not the default for vm-bhyve and -A options is needed in the bhyve_options parameter in each UEFI boot VM.
For example:
host % grep bhyve_options /vm/freebsd14uefi/freebsd14uefi.conf
bhyve_options="-A"
Additional details for vm-bhyve available HERE.
Hope that helps.
EOF

Pingback: FreeBSD Bhyve 仮想化 – 世界の話題を日本語でザックリ素早く確認!
Hey, great article! I saw you had some problems with virt-manager, and I did too! There is a solution your problem:
If you notice at the bootloader screen, it says something like “5. Cons: Dual (Serial primary)”
Pressing the 5 key at the bootloader screen will toggle the output from “Serial primary” to “Video primary” or something to that effect. Once you toggle this setting, it should fix the output hanging and you should get a login prompt.
The other way to fix this problem, is through the virt-manager menu, you can simply switch the view from Graphical Console, to the Serial Console. Under View -> Consoles -> Serial 1
Hope this helps make your experience a little better under virt-manager.
LikeLike
Thank You.
I tried that and it helped – but I faced another problem NAT (Network Type 6) is not supported on virt-manager – or I should say by libvirt Bhyve driver – so it will be useless on a system with wireless WiFi interface only.
LikeLike
Good morning!
Thank you so much for this email Vermaden. I really appreciate your taking the time to experiment and write it all down then email it to me (maybe and others but I’m appreciating you as myself, personally). Thank you. I’m most grateful for this and other articles you prepare and send.
Kind regards,
Simon.
LikeLike
Thank You.
LikeLike
I would switch to Bhyve in notime, if it would offer a solid USB pass through implementation. Example: The lack of bluetooth support in FreeBSD forces me to use a native Windows for proper headset / webcam support. To have Windows been inside the vm would enable me to switch completely.
LikeLike
You can pass entire USB controller (PCI passthru) into Bhyve VM.
I just tested that on Windows 7 VM.
First – list USB controllers you have in your system.
Below is list of mine on ThinkPad W520:
So I have 3 controllers.
Now we need to check how many of them support MSI/MSI-X interrupts.
# pciconf -lvc

// DOES NOT HAVE MSI
ehci0@pci0:0:29:0:      class=0x0c0320 rev=0x04 hdr=0x00 vendor=0x8086 device=0x1c26 subvendor=0x17aa subdevice=0x21cf
    vendor     = 'Intel Corporation'
    device     = '6 Series/C200 Series Chipset Family USB Enhanced Host Controller'
    class      = serial bus
    subclass   = USB
    bar   [10] = type Memory, range 32, base 0xf2629000, size 1024, enabled
    cap 01[50] = powerspec 2  supports D0 D3  current D0
    cap 0a[58] = EHCI Debug Port at offset 0xa0 in map 0x14
    cap 13[98] = PCI Advanced Features: FLR TP

// DOES NOT HAVE MSI
ehci0@pci0:0:26:0:       class=0x0c0320 rev=0x04 hdr=0x00 vendor=0x8086 device=0x1c2d subvendor=0x17aa subdevice=0x21cf
    vendor     = 'Intel Corporation'
    device     = '6 Series/C200 Series Chipset Family USB Enhanced Host Controller'
    class      = serial bus
    subclass   = USB
    bar   [10] = type Memory, range 32, base 0xf262a000, size 1024, enabled
    cap 01[50] = powerspec 2  supports D0 D3  current D0
    cap 0a[58] = EHCI Debug Port at offset 0xa0 in map 0x14
    cap 13[98] = PCI Advanced Features: FLR TP

// HAVE MSI
xhci0@pci0:14:0:0:      class=0x0c0330 rev=0x04 hdr=0x00 vendor=0x1033 device=0x0194 subvendor=0x17aa subdevice=0x21cf
    vendor     = 'NEC Corporation'
    device     = 'uPD720200 USB 3.0 Host Controller'
    class      = serial bus
    subclass   = USB
    bar   [10] = type Memory, range 64, base 0xf1400000, size 8192, enabled
    cap 01[50] = powerspec 3  supports D0 D3  current D0
    cap 05[70] = MSI supports 8 messages, 64 bit
    cap 11[90] = MSI-X supports 8 messages, enabled
                 Table in map 0x10[0x1000], PBA in map 0x10[0x1080]
    cap 10[a0] = PCI-Express 2 endpoint max data 128(128) NS
                 max read 512
                 link x1(x1) speed 5.0(5.0) ASPM L1(L0s/L1) ClockPM enabled
    ecap 0001[100] = AER 1 0 fatal 0 non-fatal 1 corrected
    ecap 0003[140] = Serial 1 ffffffffffffffff
    ecap 0018[150] = LTR 1
So we can use only one of those USB controller with Bhyve.
Add below configuration to /boot/loader.conf file:
Now after reboot modify – for example – the Windows 7 machine config.
Now start the Windows 7 VM as usual.
I was able to successfully use my Jabra headphones in a testing Webex meeting:
– https://vermaden.files.wordpress.com/2023/08/bhyve-passthru-usb-1-3.png
– https://vermaden.files.wordpress.com/2023/08/bhyve-passthru-usb-2-3.png
– https://vermaden.files.wordpress.com/2023/08/bhyve-passthru-usb-3-3.png
The single USB port/device is still in the works:
– https://github.com/FreeBSD-UPB/freebsd-src/wiki/USB-device-passthrough-for-bhyve
Regards,
vermaden
LikeLiked by 1 person
Thank you for your work on this. I’ve been using Bhyve for a while, but have had some issues getting more advanced options like sound to work. I look forward to playing with some of these settings over the weekend.
LikeLike
Thank You.
LikeLike
Pingback: Links 18/08/2023: KDE Frameworks 5.109.0 and SUSE Gone Private | Techrights
Hi, thank you for excellent post! You howtos are on of the best. I spotted on typo in the Vm-bhyve section, last line: “vm-bhybe-devel one.”
LikeLike
Thank You – fixed 🙂
LikeLike
Could you show us how to boot more exotic operating systems on bhyve? Such as Vinix, TempleOS or GenodeOS. I weren’t successful with neither of these.
Regards
LikeLike
I believe as long as they boot in UEFI mode then they should work.
I will try when I have some free time.
That is one of the good sides of VirtualBox – You can install Windows Me there or Windows XP and it will ‘just’ work.
PITY that Bhyve dropped the ‘old’ way of booting systems that fast.
For example – its possible to run Windows XP under Bhyve – but first You need to install it under VirtualBox, then patch it and then move the image and start it under Bhyve – a lot of wasted work.
Regards,
vermaden
LikeLike
In my opinion FreeBSD still should have some sort of external (not in source tree) installable extension module that contains all old OS related info and get triggered when attempt to boot such image happens.
LikeLike
It kinda have – just install and use QEMU/Bocks/VirtualBox/… 😉
… but I get what You mean. I would also like to use Bhyve for everything.
LikeLike
Suprised to see you / this article surface in my chrome Discover. Only sites with sponsered ads surface. Also you have to meet certain criteria to qualify being featured. Great article, thanks, big fan here.
LikeLike
Thanks, seems I now need to treat that article as a template for the rest of them :p
LikeLiked by 1 person
Thanks for this, I hadn’t been able to get bhyve to work for me until now. This was a good simple set of instructions to follow, with clear illustrations.
I did need to add one more command to get bridged networking to work: “vm switch add public em0”. I don’t know why I required that and you didn’t; my host machine runs a VPN if that matters. Also, dnsmasq complains “unknown interface vm-public” if the switch doesn’t have an address, so that may not be a good option when bridging.
Typo note: “MAME” instead of “NAME” in the Guest OS Install section.
Not exactly exotic, but I did install OmniOSCE in a VM; the only odd hack required was to use the post-install shell to unmount /.cdrom so it would boot to the installation and not the installer again.
LikeLike
Thank You.
You are right. Its mandatory in the BRIDGE setup. I added it to the instructions. Thank You for catching that.
I also added that to the instructions. Thank You.
Also fixed 🙂
I usually select ‘POWER OFF’ instead of ‘REBOOT’ at installers and then boot without install media – but as You showed – it can also be achieved that way 🙂
Regards,
vermaden
LikeLike
Pingback: Valuable News – 2023/08/21 | 𝚟𝚎𝚛𝚖𝚊𝚍𝚎𝚗
PROTEIN
LikeLike
Yes, protein is very important for a healthy diet, I agree.
LikeLiked by 1 person
Pingback: Quare FreeBSD? | 𝚟𝚎𝚛𝚖𝚊𝚍𝚎𝚗
Pretty detailed article! I had a problem when i tried to create the public switch, my network card was disconnected from the network. The same problem was when i installed Networkmgr. Sure, after reboot worked normally, but is not a normal behavior.
LikeLike
Thanks. I do not remember if I was disconnected on virtual switch creation … maybe I was but I did not noticed 🙂
LikeLike
Tried once again following step by step your article-same result – host network disconnected.
LikeLike
Have you tried this?
https://bhyve.npulse.net/
At the first look, seems to be OK … but too slow, many problems with mouse pointer (not captured and I didn’t found a hint how can I do this).
LikeLike
No.
I did not tried BVCP panel.
I do not like the fact that there is no source code available. I try to omit using closed solutions.
LikeLike
Hi buddy,
I tried once again following your article, step by step.Main problem remain the network; once the installation is started, my network is disconnected automatically.
LikeLiked by 1 person
for more modern encryption support, I use freerdp like this ~ % xfreerdp /u:{user} /p:{pass} /w:1366 /h:768 /v:192.168.1.50:3389 when connecting to a Fedora 40 Workstation VM… with the caveat of having to use VNC to “wake” the client. Maybe this would work on windows 11 with encryption on.
LikeLike
one can also install xrdp on the server like this https://www.server-world.info/en/note?os=Fedora_40&p=desktop&f=6
LikeLike