I really like small and simple dedicated solutions that do one thing well and do it really good – maybe its because I like UNIX that much. Good example of such approach is Minio object storage which implements S3 protocol with distributed clustering, erasure code and builtin web interface along with many other features about which I wrote in the Distributed Object Storage with Minio on FreeBSD article.
The RabbitMQ is another such example – currently probably the most popular implementation of the AMQP protocol – it also comes with small and sleek web interface. The difference is power. Minio comes with very basic user oriented web interface while most administrative and configuration tasks needs to be done from the CLI. The Minio web interface allows one to create/delete buckets there and also to download/upload files. RabbitMQ have so sophisticated web interface that after you enable it you do not need command line anymore. Everything can be accomplished using just web interface.
![]()
Compared to other messaging solutions like ActiveMQ or Apache Kafka it is very popular when checked in the Google Trends query.

Today I would like to show you RabbitMQ messaging with quite redundant clustered setup with mirrored queues.
You will find Table of Contents below.
- Jails Setup
- RabbitMQ Installation
- RabbitMQ Setup
- RabbitMQ Plugins
- RabbitMQ Administrative User
- RabbitMQ Cluster Setup
- RabbitMQ Highly Available Policy
- Feed the Queue
- Go Language Installation
- Simple Benchmark
- High Availability
- UPDATE 1 – This Month in RabbitMQ
- UPDATE 2 – Make RabbitMQ Use Less CPU
From all possible virtualization possibilities available on FreeBSD (VirtualBox/Bhyve/QEMU/Jails/Docker) I have chosen the lightweight FreeBSD Containers – Jails 🙂
The legend is the same as usual.
Command run on the host system as root user.
host # command
Command run on the host system as regular user.
host % command
Command run on the rabbitX Jail.
rabbitX # command
Jails Setup
First we will create the base Jails for our setup. Both the host system and Jails Containers use FreeBSD 11.2-RELEASE system.
host # mkdir -p /jail/BASE
host # fetch -o /jail/BASE/11.2-RELEASE.base.txz http://ftp.freebsd.org/pub/FreeBSD/releases/amd64/12.1-RELEASE/base.txz
host # for I in 1 2; do echo ${I}; mkdir -p /jail/rabbit${I}; tar --unlink -xpJf /jail/BASE/11.2-RELEASE.base.txz -C /jail/rabbit${I}; done
1
2
host #
We now have 2 empty clean Jails.
We will now add Jails configuration to the /etc/jail.conf file.
I have used my laptop for the Jail host thus Jails will configured to use the wireless wlan0 interface and 192.168.43.10X addresses. I also added 10.0.0.10X network addresses as this will make it more convenient for me for the purposes of writing this article.
host # for I in 1 2
do
  cat >> /etc/jail.conf << __EOF
rabbit${I} {
  host.hostname = rabbit${I}.local;
  ip4.addr += 192.168.43.10${I};
  ip4.addr += 10.0.0.10${I};
  interface = wlan0;
  path = /jail/rabbit${I};
  exec.start = "/bin/sh /etc/rc";
  exec.stop = "/bin/sh /etc/rc.shutdown";
  exec.clean;
  mount.devfs;
  allow.raw_sockets;
}

__EOF
done
host #
This is how the /etc/jail.conf file looks after its configured.
host # cat /etc/jail.conf
rabbit1 {
  host.hostname = rabbit1.local;
  ip4.addr += 192.168.43.101;
  ip4.addr += 10.0.0.101;
  interface = wlan0;
  path = /jail/rabbit1;
  exec.start = "/bin/sh /etc/rc";
  exec.stop = "/bin/sh /etc/rc.shutdown";
  exec.clean;
  mount.devfs;
  allow.raw_sockets;
}

rabbit2 {
  host.hostname = rabbit2.local;
  ip4.addr += 192.168.43.102;
  ip4.addr += 10.0.0.102;
  interface = wlan0;
  path = /jail/rabbit2;
  exec.start = "/bin/sh /etc/rc";
  exec.stop = "/bin/sh /etc/rc.shutdown";
  exec.clean;
  mount.devfs;
  allow.raw_sockets;
}
Now we can start our Jails.
host # for I in 1 2; do service jail onestart rabbit${I}; done
Starting jails: rabbit1.
Starting jails: rabbit2.
Jails are running properly.
# jls
   JID  IP Address      Hostname                      Path
     1  192.168.43.101  rabbit1.local                 /jail/rabbit1
     2  192.168.43.102  rabbit2.local                 /jail/rabbit2
Time to add DNS server to the Jails so they will have Internet connectivity.
host # for I in 1 2; do cat /jail/rabbit${I}/etc/resolv.conf; done
nameserver 1.1.1.1
nameserver 1.1.1.1
Now we will switch from 'quarterly' to 'latest' packages.
host # for I in 1 2; do sed -i '' s/quarterly/latest/g /jail/rabbit${I}/etc/pkg/FreeBSD.conf; done

host # for I in 1 2; do grep latest /jail/rabbit${I}/etc/pkg/FreeBSD.conf; done
  url: "pkg+http://pkg.FreeBSD.org/${ABI}/latest",
  url: "pkg+http://pkg.FreeBSD.org/${ABI}/latest",
RabbitMQ Installation
We can now install RabbitMQ package.
host # for I in 1 2; do jexec rabbit${I} env ASSUME_ALWAYS_YES=yes pkg install -y rabbitmq; echo; done
Bootstrapping pkg from pkg+http://pkg.FreeBSD.org/FreeBSD:11:amd64/latest, please wait...
Verifying signature with trusted certificate pkg.freebsd.org.2013102301... done
[rabbit1.local] Installing pkg-1.10.5_5...
[rabbit1.local] Extracting pkg-1.10.5_5: 100%
Updating FreeBSD repository catalogue...
pkg: Repository FreeBSD load error: access repo file(/var/db/pkg/repo-FreeBSD.sqlite) failed: No such file or directory
[rabbit1.local] Fetching meta.txz: 100%    944 B   0.9kB/s    00:01
[rabbit1.local] Fetching packagesite.txz: 100%    6 MiB 745.4kB/s    00:09
Processing entries: 100%
FreeBSD repository update completed. 32114 packages processed.
All repositories are up to date.
Updating database digests format: 100%
The following 2 package(s) will be affected (of 0 checked):

New packages to be INSTALLED:
        rabbitmq: 3.7.15
        erlang-runtime19: 21.3.8.2

Number of packages to be installed: 2

The process will require 104 MiB more space.
41 MiB to be downloaded.
[rabbit1.local] [1/2] Fetching rabbitmq-3.7.15.txz: 100%    9 MiB 762.2kB/s    00:12
[rabbit1.local] [2/2] Fetching erlang-runtime19-21.3.8.2.txz: 100%   33 MiB 978.8kB/s    00:35
Checking integrity... done (0 conflicting)
[rabbit1.local] [1/2] Installing erlang-runtime19-21.3.8.2...
[rabbit1.local] [1/2] Extracting erlang-runtime19-21.3.8.2: 100%
[rabbit1.local] [2/2] Installing rabbitmq-3.7.15...
===> Creating groups.
Creating group 'rabbitmq' with gid '135'.
===> Creating users
Creating user 'rabbitmq' with uid '135'.
[rabbit1.local] [2/2] Extracting rabbitmq-3.7.15: 100%
Message from erlang-runtime19-21.3.8.2:

===========================================================================

To use this runtime port for development or testing, just prepend
its binary path ("/usr/local/lib/erlang19/bin") to your PATH variable.

===========================================================================

(...)

// SAME MESSAGES FOR THE OTHER rabbit2 JAIL //
Lets verify that RabbitMQ package has installed successfully.
host # for I in 1 2; do jexec rabbit${I} which rabbitmqctl; done
/usr/local/sbin/rabbitmqctl
/usr/local/sbin/rabbitmqctl
RabbitMQ Setup
We will now configure /etc/hosts files on our Jails.
host # for I in 1 2; do cat >> /jail/rabbit${I}/etc/hosts << __EOF
192.168.43.101 rabbit1
192.168.43.102 rabbit2

__EOF
done
… and fast verification.
host # cat /jail/rabbit?/etc/hosts | grep 192.168.43 | sort -n | uniq -c
2 192.168.43.101 rabbit1
2 192.168.43.102 rabbit2
As we have RabbitMQ package installed we need to enable it and start it.
host # jexec rabbit1 /usr/local/etc/rc.d/rabbitmq rcvar
# rabbitmq
#
rabbitmq_enable="NO"
#   (default: "")
As we see we need to set rabbitmq_enable=YES value in /etc/rc.conf file within each of our Jails.
host # for I in 1 2; do jexec rabbit${I} sysrc rabbitmq_enable=YES; done
rabbitmq_enable:  -> YES
rabbitmq_enable:  -> YES
Now we can start the RabbitMQ in the Jails.
host # for I in 1 2; do jexec rabbit${I} service rabbitmq start; done
Starting rabbitmq.
Starting rabbitmq.
Now we have four RabbitMQ instances up and running.
This is the list of plugins enabled by default. None.
RabbitMQ Plugins
rabbit1 # rabbitmq-plugins list
 Configured: E = explicitly enabled; e = implicitly enabled
 | Status: * = running on rabbit@rabbit1
 |/
[  ] rabbitmq_amqp1_0                  3.7.15
[  ] rabbitmq_auth_backend_cache       3.7.15
[  ] rabbitmq_auth_backend_http        3.7.15
[  ] rabbitmq_auth_backend_ldap        3.7.15
[  ] rabbitmq_auth_mechanism_ssl       3.7.15
[  ] rabbitmq_consistent_hash_exchange 3.7.15
[  ] rabbitmq_event_exchange           3.7.15
[  ] rabbitmq_federation               3.7.15
[  ] rabbitmq_federation_management    3.7.15
[  ] rabbitmq_jms_topic_exchange       3.7.15
[  ] rabbitmq_management               3.7.15
[  ] rabbitmq_management_agent         3.7.15
[  ] rabbitmq_mqtt                     3.7.15
[  ] rabbitmq_peer_discovery_aws       3.7.15
[  ] rabbitmq_peer_discovery_common    3.7.15
[  ] rabbitmq_peer_discovery_consul    3.7.15
[  ] rabbitmq_peer_discovery_etcd      3.7.15
[  ] rabbitmq_peer_discovery_k8s       3.7.15
[  ] rabbitmq_random_exchange          3.7.15
[  ] rabbitmq_recent_history_exchange  3.7.15
[  ] rabbitmq_sharding                 3.7.15
[  ] rabbitmq_shovel                   3.7.15
[  ] rabbitmq_shovel_management        3.7.15
[  ] rabbitmq_stomp                    3.7.15
[  ] rabbitmq_top                      3.7.15
[  ] rabbitmq_tracing                  3.7.15
[  ] rabbitmq_trust_store              3.7.15
[  ] rabbitmq_web_dispatch             3.7.15
[  ] rabbitmq_web_mqtt                 3.7.15
[  ] rabbitmq_web_mqtt_examples        3.7.15
[  ] rabbitmq_web_stomp                3.7.15
[  ] rabbitmq_web_stomp_examples       3.7.15
Time to enable web interface plugin.
host # for I in 1 2; do jexec rabbit${I} rabbitmq-plugins enable rabbitmq_management; done
The following plugins have been configured:
  rabbitmq_management
  rabbitmq_management_agent
  rabbitmq_web_dispatch
Applying plugin configuration to rabbit@rabbit1...
The following plugins have been enabled:
  rabbitmq_management
  rabbitmq_management_agent
  rabbitmq_web_dispatch

started 3 plugins.

(...)

// SAME MESSAGES FOR THE OTHER rabbit2 JAIL //
Now we have web interface plugin enabled in each RabbitMQ FreeBSD Jail.
Big ‘E‘ letter means that this is the plugin that we enabled and small ‘e‘ letter means that this plugin is only enabled as ‘dependency’ for some other plugin we requested to be enabled.
rabbit1 # rabbitmq-plugins list
 Configured: E = explicitly enabled; e = implicitly enabled
 | Status: * = running on rabbit@rabbit1
 |/
[  ] rabbitmq_amqp1_0                  3.7.15
[  ] rabbitmq_auth_backend_cache       3.7.15
[  ] rabbitmq_auth_backend_http        3.7.15
[  ] rabbitmq_auth_backend_ldap        3.7.15
[  ] rabbitmq_auth_mechanism_ssl       3.7.15
[  ] rabbitmq_consistent_hash_exchange 3.7.15
[  ] rabbitmq_event_exchange           3.7.15
[  ] rabbitmq_federation               3.7.15
[  ] rabbitmq_federation_management    3.7.15
[  ] rabbitmq_jms_topic_exchange       3.7.15
[E*] rabbitmq_management               3.7.15
[e*] rabbitmq_management_agent         3.7.15
[  ] rabbitmq_mqtt                     3.7.15
[  ] rabbitmq_peer_discovery_aws       3.7.15
[  ] rabbitmq_peer_discovery_common    3.7.15
[  ] rabbitmq_peer_discovery_consul    3.7.15
[  ] rabbitmq_peer_discovery_etcd      3.7.15
[  ] rabbitmq_peer_discovery_k8s       3.7.15
[  ] rabbitmq_random_exchange          3.7.15
[  ] rabbitmq_recent_history_exchange  3.7.15
[  ] rabbitmq_sharding                 3.7.15
[  ] rabbitmq_shovel                   3.7.15
[  ] rabbitmq_shovel_management        3.7.15
[  ] rabbitmq_stomp                    3.7.15
[  ] rabbitmq_top                      3.7.15
[  ] rabbitmq_tracing                  3.7.15
[  ] rabbitmq_trust_store              3.7.15
[e*] rabbitmq_web_dispatch             3.7.15
[  ] rabbitmq_web_mqtt                 3.7.15
[  ] rabbitmq_web_mqtt_examples        3.7.15
[  ] rabbitmq_web_stomp                3.7.15
[  ] rabbitmq_web_stomp_examples       3.7.15
Now – in order to create a cluster – we need these RabbitMQ instances to share the same ERLANG cookie. The ERLANG cookie can be found at /var/db/rabbitmq/.erlang.cookie on FreeBSD system.
rabbot1 # cat /var/db/rabbitmq/.erlang.cookie; echo
NOEVQNXJDNLAJOSVWNIW
rabbot1 #
We will need to stop RabbitMQ to change ERLANG cookie.
host # for I in 1 2; do jexec rabbit${I} service rabbitmq stop; done
Stopping rabbitmq.
Waiting for PIDS: 88684.
Stopping rabbitmq.
Waiting for PIDS: 20976.
Let’s set the same ERLANG cookie on each FreeBSD Jail then.
host # for I in 1 2; do cat > /jail/rabbit${I}/var/db/rabbitmq/.erlang.cookie << __EOF
RABBITMQFREEBSDJAILS
__EOF
done
… and now we need to start them again.
host # for I in 1 2; do jexec rabbit${I} service rabbitmq start; done
Starting rabbitmq.
Starting rabbitmq.
Fast verification.
host # for I in 1 2; do jexec rabbit${I} cat /var/db/rabbitmq/.erlang.cookie; done
RABBITMQFREEBSDJAILS
RABBITMQFREEBSDJAILS
RabbitMQ Administrative User
Now we will create administrative user called admin for the RabbitMQ instances.
host # for I in 1 2; do jexec rabbit${I} rabbitmqctl add_user admin ADMINPASSWORD; done
Adding user "admin" ...
Adding user "admin" ...

host # for I in 1 2; do jexec rabbit${I} rabbitmqctl set_user_tags admin administrator; done
Setting tags for user "admin" to [administrator] ...
Setting tags for user "admin" to [administrator] ...

host # for I in 1 2; do jexec rabbit${I} rabbitmqctl set_permissions -p / admin ".*" ".*" ".*" ; done
Setting permissions for user "admin" in vhost "/" ...
Setting permissions for user "admin" in vhost "/" ...
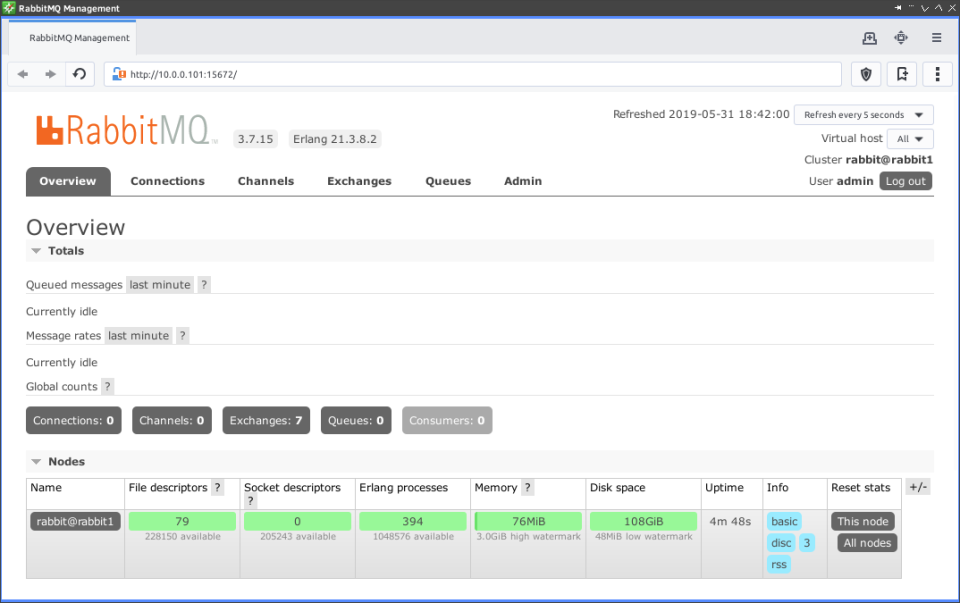
We should now be able to login to the http://192.168.43.101:15672/ (or http://10.0.0.101:15672/ also) RabbitMQ management page.

After login a useful RabbitMQ dashboard will welcome you.
RabbitMQ Cluster Setup
We will now create RabbitMQ cluster.
rabbit1 # rabbitmqctl cluster_status
Cluster status of node rabbit@rabbit1 ...
[{nodes,[{disc,[rabbit@rabbit1]}]},
 {running_nodes,[rabbit@rabbit1]},
 {cluster_name,},
 {partitions,[]},
 {alarms,[{rabbit@rabbit1,[]}]}]

rabbit2 # hostname
rabbit2.local

rabbit2 # rabbitmqctl join_cluster rabbit@rabbit1
Error: this command requires the 'rabbit' app to be stopped on the target node. Stop it with 'rabbitmqctl stop_app'.
Arguments given:
        join_cluster rabbit@rabbit1

Usage

rabbitmqctl [--node ] [--longnames] [--quiet] join_cluster [--disc|--ram]
We first need to stop the RabbitMQ ‘application’ to join the cluster.
rabbit2 # rabbitmqctl stop_app
Stopping rabbit application on node rabbit@rabbit2 ...

rabbit2 # rabbitmqctl join_cluster rabbit@rabbit1
Clustering node rabbit@rabbit2 with rabbit@rabbit1

rabbit2 # rabbitmqctl start_app
Starting node rabbit@rabbit2 ...
 completed with 5 plugins.

rabbit2 # rabbitmqctl cluster_status
Cluster status of node rabbit@rabbit2 ...
[{nodes,[{disc,[rabbit@rabbit1,rabbit@rabbit2]}]},
 {running_nodes,[rabbit@rabbit1,rabbit@rabbit2]},
 {cluster_name,},
 {partitions,[]},
 {alarms,[{rabbit@rabbit1,[]},{rabbit@rabbit2,[]}]}]

rabbit1 # rabbitmqctl cluster_status
Cluster status of node rabbit@rabbit1 ...
[{nodes,[{disc,[rabbit@rabbit1,rabbit@rabbit2]}]},
 {running_nodes,[rabbit@rabbit2,rabbit@rabbit1]},
 {cluster_name,},
 {partitions,[]},
 {alarms,[{rabbit@rabbit2,[]},{rabbit@rabbit1,[]}]}]
Now we have formed two node RabbitMQ cluster. We will rename it to cluster then.
rabbit1 # rabbitmqctl set_cluster_name rabbit@cluster
Setting cluster name to rabbit@cluster ...

rabbit1 # rabbitmqctl cluster_status
Cluster status of node rabbit@rabbit1 ...
[{nodes,[{disc,[rabbit@rabbit1,rabbit@rabbit2]}]},
 {running_nodes,[rabbit@rabbit2,rabbit@rabbit1]},
 {cluster_name,},
 {partitions,[]},
 {alarms,[{rabbit@rabbit2,[]},{rabbit@rabbit1,[]}]}]
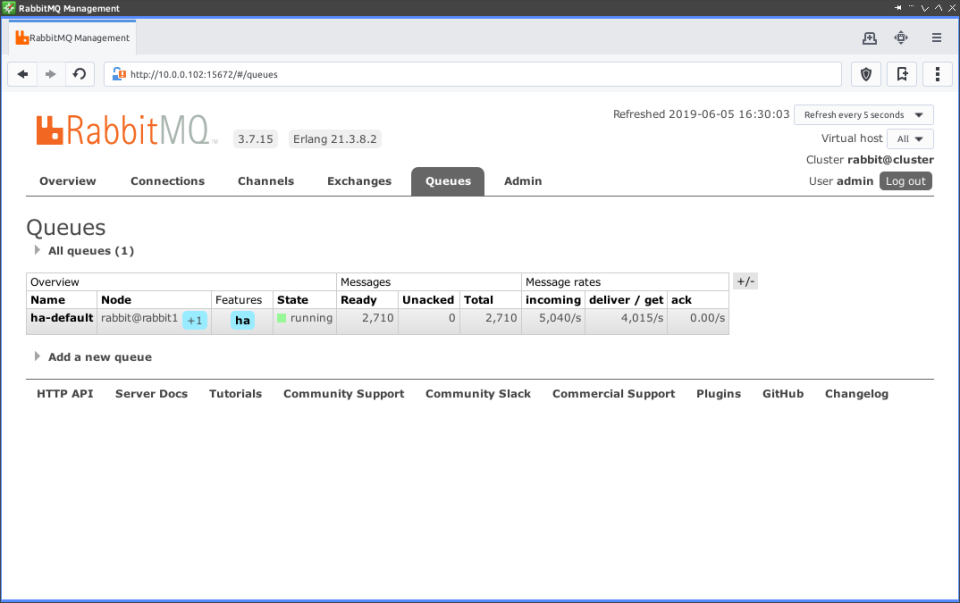
Here is how our cluster looks in the web interface.

RabbitMQ Highly Available Policy
To have Highly Available (Mirrored) Queues in RabbitMQ you need to create Policy. We will declare Policy named ha which will match queues whose names begin with ‘ha-‘ prefix so they will be configured with mirroring to all two nodes in the cluster.
This is the command you need to execute to create such Policy.
rabbit1 # rabbitmqctl set_policy ha "^ha-\.*" '{"ha-mode":"all","ha-sync-mode":"automatic"}'
Setting policy "ha-mirror" for pattern "^ha-\." to "{"ha-mode":"all","ha-sync-mode":"automatic"}" with priority "0" for vhost "/" ...
… or alternatively you can use the web interface to create it.
No matter which method you have chosen you will end up with needed ha Policy as shown below.

Feed the Queue
We now have two node RabbitMQ cluster with HA for queues that name starts with ha- prefix. We will now test our RabbitMQ setup and will create and feed the queue with send.go script – as you probably guessed – written in Go. We will need to add Go language to our host system.
Go Language Installation
host # pkg install go
Updating FreeBSD repository catalogue...
FreeBSD repository is up to date.
All repositories are up to date.
The following 1 package(s) will be affected (of 0 checked):

New packages to be INSTALLED:
        go: 1.12.5,1

Number of packages to be installed: 1

The process will require 262 MiB more space.
75 MiB to be downloaded.

Proceed with this action? [y/N]: y
(...)

host % go version
go version go1.12.5 freebsd/amd64
This is the send.go script – we will use it to send 10 messages to the ha-default queue. Its based on the RabbitMQ Hello World tutorial.
host % cat send.go
package main

import (
  "log"
  "amqp"
)

func FAIL_ON_ERROR(err error, msg string) {
  if err != nil {
    log.Fatalf("%s: %s", msg, err)
  }
}

func main() {
  conn, err := amqp.Dial("amqp://admin:ADMINPASSWORD@10.0.0.101:5672/")
  FAIL_ON_ERROR(err, "ER: failed to connect to RabbitMQ")
  defer conn.Close()

  ch, err := conn.Channel()
  FAIL_ON_ERROR(err, "ER: failed to open channel")
  defer ch.Close()

  q, err := ch.QueueDeclare(
    "ha-default", // name
    false,        // durable
    false,        // delete when unused
    false,        // exclusive
    false,        // no-wait
    nil,          // arguments
  )
  FAIL_ON_ERROR(err, "ER: failed to declare queue")

  body := "Hello World!"

  for i := 1; i <= 10; i++ {
    err = ch.Publish(
      "",     // exchange
      q.Name, // routing key
      false,  // mandatory
      false,  // immediate
      amqp.Publishing{
        ContentType: "text/plain",
        Body:        []byte(body),
      })
    log.Printf("IN: sent message '%s' (%d)", body, i)
    FAIL_ON_ERROR(err, "ER: failed to publish message")
  }

}
We will now run it.
host % go run send.go
send.go:5:3: cannot find package "amqp" in any of:
        /usr/local/go/src/amqp (from $GOROOT)
        /home/vermaden/.gopkg/src/amqp (from $GOPATH)
We lack the amqp package for the Go language.
We will need to download it from its https://github.com/streadway/amqp page. We will get it by downloading everything in a ZIP package.
host % mkdir -p ~/.gopkg/src
host % cd !$
host % pwd
/home/vermaden/.gopkg/src
host % fetch https://github.com/streadway/amqp/archive/master.zip
host % unzip master.zip
Archive:  /home/vermaden/.gopkg/src/master.zip
   creating: amqp-master/
 extracting: amqp-master/.gitignore
 extracting: amqp-master/.travis.yml
 (...)
 extracting: amqp-master/uri.go
 extracting: amqp-master/uri_test.go
 extracting: amqp-master/write.go
host % rm master.zip
host % mv amqp-master amqp
host % cd amqp
host % pwd
/home/vermaden/.gopkg/src/amqp
host % exa
_examples          confirms.go         delivery_test.go        LICENSE            spec091.go
spec               confirms_test.go    doc.go                  pre-commit         tls_test.go
allocator.go       connection.go       example_client_test.go  read.go            types.go
allocator_test.go  connection_test.go  examples_test.go        read_test.go       uri.go
auth.go            consumers.go        fuzz.go                 README.md          uri_test.go
certs.sh           consumers_test.go   gen.sh                  reconnect_test.go  write.go
channel.go         CONTRIBUTING.md     go.mod                  return.go
client_test.go     delivery.go         integration_test.go     shared_test.go
We also need to make sure that PATH and GOPATH are properly configured. To do so you need to put these in your interactive shell config.
# GO SHELL SETUP
mkdir -p ~/.gopkg
export GOPATH=~/.gopkg
export PATH="${PATH}:~/.gopkg"
Now we can get back to feeding our queue.
host % go run send.go
2019/06/05 13:53:59 IN: sent message 'Hello World!' (1)
2019/06/05 13:53:59 IN: sent message 'Hello World!' (2)
2019/06/05 13:53:59 IN: sent message 'Hello World!' (3)
2019/06/05 13:53:59 IN: sent message 'Hello World!' (4)
2019/06/05 13:53:59 IN: sent message 'Hello World!' (5)
2019/06/05 13:53:59 IN: sent message 'Hello World!' (6)
2019/06/05 13:53:59 IN: sent message 'Hello World!' (7)
2019/06/05 13:53:59 IN: sent message 'Hello World!' (8)
2019/06/05 13:53:59 IN: sent message 'Hello World!' (9)
2019/06/05 13:53:59 IN: sent message 'Hello World!' (10)
%
The ha-default queue has been created and feeded with 10 messages.

Now we need to ‘receive’ these messages from the queue. This is where receive.go script comes with help. It is also based on the RabbitMQ Hello World tutorial.
host % cat receive.go
package main

import (
  "log"
  "amqp"
)

func FAIL_ON_ERROR(err error, msg string) {
  if err != nil {
    log.Fatalf("%s: %s", msg, err)
  }
}

func main() {
  conn, err := amqp.Dial("amqp://admin:ADMINPASSWORD@10.0.0.102:5672/")
  FAIL_ON_ERROR(err, "ER: failed to connect to RabbitMQ")
  defer conn.Close()

  ch, err := conn.Channel()
  FAIL_ON_ERROR(err, "ER: failed to open channel")
  defer ch.Close()

  q, err := ch.QueueDeclare(
    "ha-default", // name
    false,        // durable
    false,        // delete when unused
    false,        // exclusive
    false,        // no-wait
    nil,          // arguments
  )
  FAIL_ON_ERROR(err, "ER: failed to declare queue")

  msgs, err := ch.Consume(
    q.Name, // queue
    "",     // consumer
    true,   // auto-ack
    false,  // exclusive
    false,  // no-local
    false,  // no-wait
    nil,    // args
  )
  FAIL_ON_ERROR(err, "ER: failed to register consumer")

  forever := make(chan bool)

  go func() {
    for d := range msgs {
      log.Printf("IN: received message: %s", d.Body)
    }
  }()

  log.Printf("IN: waiting for messages")
  log.Printf("IN: to exit press CTRL+C")
  <-forever
}
Here is its output after running. It will not stop running until you end it with CTRL-C sequence.
host % go run receive.go
2019/06/05 13:54:34 IN: waiting for messages
2019/06/05 13:54:34 IN: to exit press CTRL+C
2019/06/05 13:54:34 IN: received message: Hello World!
2019/06/05 13:54:34 IN: received message: Hello World!
2019/06/05 13:54:34 IN: received message: Hello World!
2019/06/05 13:54:34 IN: received message: Hello World!
2019/06/05 13:54:34 IN: received message: Hello World!
2019/06/05 13:54:34 IN: received message: Hello World!
2019/06/05 13:54:34 IN: received message: Hello World!
2019/06/05 13:54:34 IN: received message: Hello World!
2019/06/05 13:54:34 IN: received message: Hello World!
2019/06/05 13:54:34 IN: received message: Hello World!
^C
%
If you checked the source code carefully then you probably noticed that I ‘sent’ messages to the rabbit1 node (10.0.0.101) while I ‘received’ the messages at the rabbit2 node (10.0.0.102).
Simple Benchmark
We will now make simple benchmark with receive.go script left running and modified send.go script with the for loop with 100000 messages.
host % go run receive.go
2019/06/05 13:52:34 IN: waiting for messages
2019/06/05 13:52:34 IN: to exit press CTRL+C
… and now the messages.
host % go run send.go
2019/06/05 13:53:59 IN: sent message 'Hello World!' (1)
2019/06/05 13:53:59 IN: sent message 'Hello World!' (2)
2019/06/05 13:53:59 IN: sent message 'Hello World!' (3)
(...)
2019/06/05 13:56:26 IN: sent message 'Hello World!' (99998)
2019/06/05 13:56:26 IN: sent message 'Hello World!' (99999)
2019/06/05 13:56:26 IN: sent message 'Hello World!' (100000)
%
The results of this simple benchmark are below.
About 4000-5000 messages per second are handled by this RabbitMQ clustered instance within two FreeBSD Jails.
High Availability
Now we will test the high availability of our RabbitMQ cluster.
Currently the ha-default qeue is at rabbit1 node. We will now kill the rabbit1 Jail and see how RabbitMQ web interface reacts.
host # jls
   JID  IP Address      Hostname                      Path
     1  192.168.43.101  rabbit1.local                 /jail/rabbit1
     2  192.168.43.102  rabbit2.local                 /jail/rabbit2

host # killall -9 -j 1

host # umount /jail/rabbit1/dev
Our ha-default queue in a matter of seconds switched to the rabbit2 node – HA works as desired.

Let’s start rabbit1 Jail to get redundancy back.
host # service jail onestart rabbit1
Starting jails: rabbit1.
host #

The ha-default queue got redundancy back with +1 mark but it remained on the rabbit2 node.
… and last but not least – little anniversary at the end – this is the 50th article (not counting Valuable News series) on my blog 🙂
UPDATE 1 – This Month in RabbitMQ
The RabbitMQ Cluster on FreeBSD Containers article was featured in the This Month in RabbitMQ – July 2019 episode.
Thanks for mentioning!
UPDATE 2 – Make RabbitMQ Use Less CPU
As reported by Felix Ehlers on Twitter – the RabbitMQ CPU usage will be reduced by setting RABBITMQ_SERVER_ADDITIONAL_ERL_ARGS="+sbwt none" variable.

Oh, so detail tutorial. Thanks for sharing this topic, i interested in rabbitMQ while ago but stop exploring it and now after read this article my passion come again. And plus for implementing it on top FreeBSD
LikeLike
Thank you for this great tutorial! Do you plan to write something on RabbitMQ peer discovery so that we can start and stop jails automatically?
LikeLike
Pingback: In Other BSDs for 2019/06/15 – DragonFly BSD Digest
Pingback: In Other BSDs for 2019/06/15 - IOBurn