I like to post new articles and solutions when I think they are ready. Production tested and stable. Well thought and tested … or at least trying to make things as good as possible in the available time window. Perfectionism definitely does not help making often articles on the blog.
Today’s solution is not perfect but I will ‘ship it’ anyway because good and done is better then perfect. I wanted to rework it so many times that I stopped counting … and I really would like to continue the series – thus I have made a conscious decision to finally release it and hope that maybe someone else will have better ideas to make it better. I really wanted to provide pixel perfect solution with as much screen space used as possible but to deliver it as it is I tested it only on the resolution I use the most – the FullHD one with 1920×1080 pixels.
You may want to check other articles in the FreeBSD Desktop series on the FreeBSD Desktop – Global Page where you will find links to all episodes of the series along with table of contents for each episode’s contents.
Aero Snap
Today I would like to share with You what I call Aero Snap Extended. The original Aero Snap was introduced in Windows 7 and this is how it is described in the Wikipedia page – “Dragging a window to the right or left side of the desktop causes the window to fill the respective half of the screen. Snapping a window to the top of the screen maximizes it. Windows can be resized by stretching them to touch the top or bottom of the screen, which fully increases their vertical screen estate, while retaining their width, these windows can then slide horizontally if moved by the title bar, or pulled off, which returns the window to its original height. In spite of the “Aero” moniker, this feature is available if one uses the Classic theme. This feature is also available on Windows 10.”
This is like the original Aero Snap looks like.

The idea behind original Aero Snap was pretty simple. Its basically these four shortcuts.
[WIN] + [LEFT] – will place window on the left half of the screen.
[WIN] + [RIGHT] – will place window on the right half of the screen.
[WIN] + [UP] – will maximize the window.
[WIN] + [DOWN] – will minimize the window.
Aero Snap Extended
Mine Aero Snap Extended is … well more extended 🙂
As usual its just a small POSIX /bin/sh compatible shell script. There are only two dependencies for it – the /usr/local/bin/xdpyinfo from xdpyinfo package and /usr/local/bin/wmctrl from wmctrl package. At the beginning of the script you will find several ‘settings’ that you may find needed to be tuned to your needs. Most important ones are MARGIN_TOP/MARGIN_LEFT/MARGIN_RIGHT options. Unfortunately MARGIN_BOTTOM is not implemented. Sorry.

Here are the shortcuts that I use for mine version but You may of course use other key then [WIN] for it.
(L) [WIN] + [LEFT] – will place window on the left half of the screen.
(R) [WIN] + [RIGHT] – will place window on the right half of the screen.
(U) [WIN] + [UP] – will place window on the upper half of the screen.
(D) [WIN] + [DOWN] – will place window on the lower half of the screen.
Here is ASCII diagram for its graphical visualization.
+------+------+  +-------------+
|      |      |  |     (U)     |
|      |      |  |             |
| (L)  |  (R) |  +-------------+
|      |      |  |             |
|      |      |  |     (D)     |
+------+------+  +-------------+
… and also a live screenshots.


(SL) [WIN] + [SHIFT] + [LEFT] – will place window on the left half of the screen taking 2/3 space of the screen.
(SR) [WIN] + [SHIFT] + [RIGHT] – will place window on the right half of the screen taking 1/3 space of the screen.
(SU) [WIN] + [SHIFT] + [UP] – will place window on the upper half of the screen taking 2/3 space of the screen.
(SD) [WIN] + [SHIFT] + [DOWN] – will place window on the lower half of the screen taking 1/3 space of the screen.
Here is ASCII diagram for its graphical visualization.
+--------+----+  +-------------+
|        |    |  |    (SU)     |
|        |    |  |             |
|  (SL)  |(SR)|  |             |
|        |    |  +-------------+
|        |    |  |    (SD)     |
+--------+----+  +-------------+
… and also a live screenshots.

The above shortcuts are quite simple and easy to remember.
Now here comes when this is more interesting.
Most keyboards – at least those with the best possible keyboard layout in the world – the ANSI standard keyboard (includes 7-row ThinkPad keyboards – have these three keys one next to another – [CTRL] [WIN] [ALT] – some call the [WIN] key as [SUPER] instead. I use [WIN] as it takes shorter to write and it shows where this key came from.
The 87 keys ANSI stand alone keyboard.

The ThinkPad T420s keyboard.

Now back to topic.
How to use these three keys to send windows to various places of the screen to make it easy to memorize and also not to break existing shortcuts … I think I found a way.
{ [CTRL] [WIN] } [ALT] – these two will send windows to the left side of the screen.
[CTRL] { [WIN] [ALT] } – these two will send windows to the right side of the screen.
Now to the point …
(Q1) [CTRL] + [WIN] + [UP] – will take window to the left and upper part of the screen – taking 1/4 of its space.
(Q2) [CTRL] + [WIN] + [DOWN] – will take window to the left and lower part of the screen – taking 1/4 of its space.
(Q3) [WIN] + [ALT] + [UP] – will take window to the right and upper part of the screen – taking 1/4 of its space.
(Q4) [WIN] + [ALT] + [DOWN] – will take window to the right and lower part of the screen – taking 1/4 of its space.
Now for some the exact 1/4 screen for each of these windows may be not suitable.
Thus I also added a modified versions with [SHIFT] key.
(S1) [SHIFT] + [CTRL] + [WIN] + [UP] – will take window to the left and upper part of the screen – taking 2/3 of horizontal and 2/3 vertical space of the screen.
(S2) [SHIFT] + [CTRL] + [WIN] + [DOWN] – will take window to the left and lower part of the screen – taking 2/3 of horizontal and 1/3 vertical space of the screen.
(S3) [SHIFT] + [WIN] + [ALT] + [UP] – will take window to the right and upper part of the screen – taking 1/3 of horizontal and 2/3 vertical space of the screen.
(S4) [SHIFT] + [WIN] + [ALT] + [DOWN] – will take window to the right and lower part of the screen – taking 1/3 of horizontal and 1/3 vertical space of the screen.
Here is ASCII diagram for its graphical visualization.
+------+------+  +--------+----+
| (Q1) | (Q3) |  |  (S1)  |(S3)|
|      |      |  |        |    |
+------+------+  |        |    |
|      |      |  +--------+----+
| (Q2) | (Q4) |  |  (S2)  |(S4)|
+------+------+  +--------+----+
… and also a live screenshots.


Now you have about 95% variations of needed windows places in the keyboard shortcuts.
There are also several complementary addons like making the window centered on the screen but without making it cover the whole screen. As I already use other originated from Windows [ALT] + [ESC] shortcut to send the current windows to the ‘back’ I also added [WIN] + [ESC] for this feature.
(C) [WIN] + [ESC] – place current window centered on screen covering about 2/3 of its space.
As it was relatively easy and fast I also added fullscreen option.
(F) [CTRL] + [ALT] + [F] – make current window go fullscreen
+-------------+  +-------------+
|             |  | +---------+ |
|             |  | |         | |
|     (F)     |  | |   (C)   | |
|             |  | |         | |
|             |  | +---------+ |
+-------------+  +-------------+
… and also a live screenshot.

Usage
The Aero Snap Extended has the following options.
% aero-snap.sh
usage:

  aero-snap.sh OPTION

OPTION(s):

  L - place window on left  half of screen
  R - place window on right half of screen
  T - place window on upper half of screen
  B - place window on lower half of screen

  SHIFT-L - place window on left  half of screen taking 2/3 space
  SHIFT-R - place window on right half of screen taking 1/3 space
  SHIFT-T - place window on upper half of screen taking 2/3 space
  SHIFT-B - place window on lower half of screen taking 1/3 space

  TL - place window to left/upper  part of screen
  TR - place window to left/lower  part of screen
  BL - place window to right/upper part of screen
  BR - place window to right/lower part of screen

  SHIFT-TL - use left/upper  part with 2/3 of H. and 2/3 V. space
  SHIFT-TR - use left/lower  part with 2/3 of H. and 1/3 V. space
  SHIFT-BL - use right/upper part with 1/3 of H. and 2/3 V. space
  SHIFT-BR - use right/lower part with 1/3 of H. and 1/3 V. space

  C - center window covering about 2/3 of screen
  F - make current window go fullscreen
  Q - remove fullscreen property from window
The Aero Snap Extended can be downloaded from here – aero-snap.sh – the usual place for my scripts.
Openbox Integration
Because of WordPress limitation I will not post Openbox configuration here but You will also find a link to that content in the text form below.
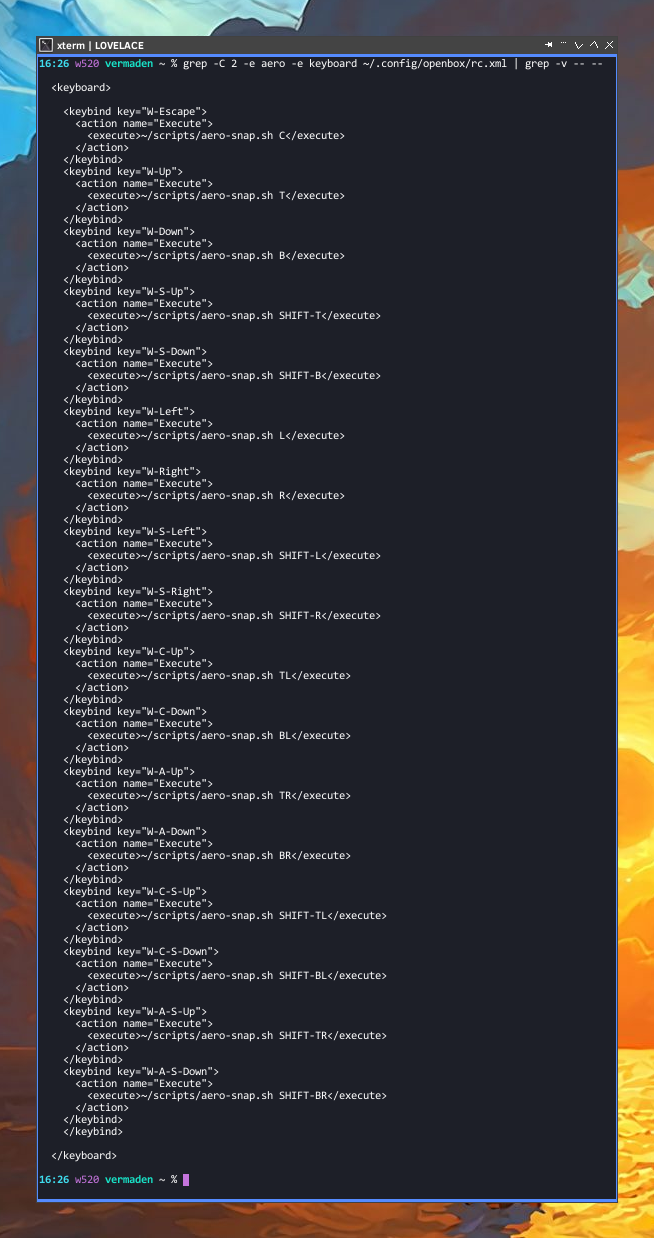
Here is this configuration in text form – rc.xml.openbox.aero.config – from the same location.
More then a year after I implemented this way of tiling on Openbox I found out that its also possible to use that ‘natively’ on Openbox using ‘direct’ Openbox configuration rules.

It definitely should be faster and easier to implement – not to mention that external dependencies will not be available – but a script allows more tuning and flexibility.
Other Window Managers
If you are not into Openbox then you may create these shortcuts using xbindkeys for example.
Future Work
Mine Aero Snap Extended could use some polish and especially testing in the other resolutions the the well tested 1920×1080.
Regards.

A lot of work, but the effect is great 🙂 Thanks a lot
LikeLiked by 1 person
Thanks 🙂
LikeLiked by 1 person
Looks nice. I see you are trying to reinvent tiling window managers. Check out dwm + some patches or similar window managers like Awesome or Xmonad.
LikeLiked by 1 person
Thanks.
I have tried several tiling window managers in the past (i3/dwm/awesome) but I do not feel there like ‘at home’.
My Openbox setup suits me well but sometimes I would like to tile windows or just arrange them the way I like.
I do not have anything against using mouse for many things – I do not need pure ‘keyboard’ setup to work with.
Most windows I use are xterm(1) and my xterm(1) window size is minimally less then a quarter of the screen – which means that using Openbox with placement policy set to ‘Smart’ these xterm(1) windows will arrange on screen the way they would like I would be using the tiling window manager.
At least this is what suits me best. Maybe I should force myself in i3 for longer time to get used to it – and maybe I will in the future 🙂
Regards.
LikeLiked by 1 person
Pingback: ● NEWS ● #Vermaden #BSD ☞ #FreeBSD Desktop – Part 22 – Configuratio… | Dr. Roy Schestowitz (罗伊)