Long time no see :). In this article of the FreeBSD Desktop series we will add Plank and Skippy-XD to the existing setup.
I will share with You Plank configuration along with theme that fits to the rest of the setup. Plank is an open implementation of the ideas that was brought to life by Mac OS X (macOS) Dock. We will also add Skippy-XD tool that implements Mac OS X (macOS) Expose ideas.
One my ask why use Plank while we already have Tint2 for similar purposes? While both support autohide I prefer to see Tint2 all the time to get basic/fast idea about what is launched on which desktop and have Plank hidden as it does not hurt and sometimes helps.
Here is both Mac OS X (macOS) Dock and Expose in action.

You may want to check other articles in the FreeBSD Desktop series on the FreeBSD Desktop – Global Page where you will find links to all episodes of the series along with table of contents for each episode’s contents.
To install both Plank and Skippy-XD on FreeBSD just use the default packages as shown below.
# pkg install skippy-xd plank
Plank
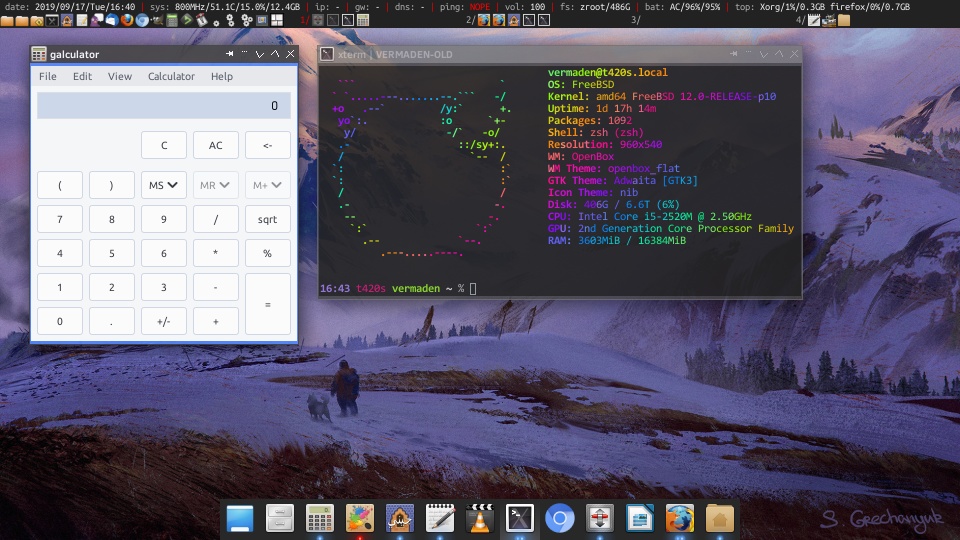
Here is how Plank dock composes with the rest of the setup.
The Plank dock comes with graphical preferences window if needed but you need to launch it from the command line as plank --preferences command.

Here is the used Plank theme which is kept in the ~/.local/share/plank/themes/vermaden/dock.theme file.
% grep '^[^#]' ~/.local/share/plank/themes/vermaden/dock.theme

[PlankTheme]
TopRoundness=0
BottomRoundness=0
LineWidth=0
OuterStrokeColor=0;;0;;0;;255
FillStartColor=40;;40;;40;;255
FillEndColor=40;;40;;40;;255
InnerStrokeColor=40;;40;;40;;255

[PlankDockTheme]
HorizPadding=0
TopPadding=1
BottomPadding=2
ItemPadding=2.5
IndicatorSize=10
IconShadowSize=0
UrgentBounceHeight=0
LaunchBounceHeight=0
FadeOpacity=0
ClickTime=300
UrgentBounceTime=600
LaunchBounceTime=600
ActiveTime=300
SlideTime=300
FadeTime=250
HideTime=150
GlowSize=24
GlowTime=10000
GlowPulseTime=2000
UrgentHueShift=150
ItemMoveTime=150
CascadeHide=true

[PlankDrawingDockTheme]
HorizPadding=0
ItemPadding=2.5
CascadeHide=true
And here are mine Plank dock settings which are kept in the ~/.config/plank/dock1/settings file.
% grep '^[^#]' ~/.config/plank/dock1/settings

[PlankDockPreferences]
CurrentWorkspaceOnly=false
IconSize=32
HideMode=0
UnhideDelay=0
HideDelay=0
Monitor=DP-1
DockItems=caja.dockitem;;leafpad.dockitem;;firefox.dockitem;;geany.dockitem;;thunderbird.dockitem;;galculator.dockitem;;deadbeef.dockitem;;transmission-gtk.dockitem;;pidgin.dockitem
Position=3
Offset=20
Theme=vermaden
Alignment=3
ItemsAlignment=3
LockItems=false
PressureReveal=false
PinnedOnly=false
AutoPinning=true
ShowDockItem=true
ZoomEnabled=false
ZoomPercent=150
Skippy-XD
You may wonder why the XD in the Skippy name. Its because Skippy started as a pure software solution – which unfortunately was quite slow – especially in the times when Skippy was introduced, and it was about a decade ago. Then Skippy developers rewrote it to use the – new then XDAMAGE module for X11 – from this change Skippy started to work almost instantly – and this was marked in its name and it remains to this date as Skippy-XD.
This is how Skippy-XD looks like.

The Skippy-XD does not need/support themes – it just has a configuration file located at ~/.config/skippy-xd/skippy-xd.rc place.
% grep '^[^#]' ~/.config/skippy-xd/skippy-xd.rc

[general]
distance = 50
useNetWMFullscreen = true
ignoreSkipTaskbar = true
updateFreq = 30.0
lazyTrans = true
pipePath = /tmp/skippy-xd-fifo
movePointerOnStart = true
movePointerOnSelect = true
movePointerOnRaise = true
switchDesktopOnActivate = true
useNameWindowPixmap = false
forceNameWindowPixmap = false
includeFrame = true
allowUpscale = true
showAllDesktops = true
showUnmapped = true
preferredIconSize = 32
clientDisplayModes = thumbnail icon filled none
iconFillSpec = orig mid mid #666666
fillSpec = orig mid mid #FFFFFF
background =

[xinerama]
showAll = true

[normal]
tint = black
tintOpacity = 0
opacity = 200

[highlight]
tint = #202020
tintOpacity = 64
opacity = 255

[tooltip]
show = true
followsMouse = true
offsetX = 20
offsetY = 20
align = left
border = #111111
background = #333333
opacity = 128
text = #eedddd
textShadow = none
font = ubuntu-10:weight=normal

[bindings]
miwMouse1 = focus
miwMouse2 = close-ewmh
miwMouse3 = iconify
One of the nice features of Skippy-XD is that you can configure it per desktop or globally per all currently existing virtual desktops. I also prefer to display window thumbnails only from the windows that exist on the current desktop. You can of course change that behavior with the Skippy-XD config file.

Pingback: FreeBSD desktop (19) | 0ddn1x: tricks with *nix
Pingback: Valuable News – 2019/12/16 | 𝚟𝚎𝚛𝚖𝚊𝚍𝚎𝚗
I am having problems, these either .xinitrc or these scripts will not launch dzen2 and tent2. openboxes launches without them, I cannot seem to find any errors being generated.
#PATH TO SCRIPTS
export PATH=${PATH}:~/scripts
# SET PROPER locale(l) with LC_ALL VARIABLE.
export LC_ALL=en_US.UTF-8
# PRESTARTED APPS
xterm
xsetroot -solid black &
~/scripts__openbox_restart_dzen2.sh &
~/scripts/__openbox_restart_tint2.sh &
# WINDOW MANAGER
openbox
I am using startx (not xdm), and I have verified all the scripts are installed and i’m pretty sure theyre executable Here is the output of ls in ~/scripts/
https://dpaste.com/4R7MX6KVH.txt
and my crontab…
SHELL=/bin/sh
PATH=/etc:/bin:/sbin:/usr/bin:/usr/sbin
# Order of crontab fields
# minute hour mday month wday command
* * * * * ~/scripts/desktop-kill-shit.sh 1> /dev/null 2> /dev/null
*/5 * * * * ~/scripts/desktop-battery-warning.sh
*/20 * * * * ~/scripts/random_wallpaper.sh ~/gfx/wallpapers 1> /dev/null 2> /dev/null
12,0 * * * * /usr/bin/find ~/.cache -mtime +10 -delete 1> /dev/null 2> /dev/null
0 */3 * * * /usr/bin/find ~/.local/share/Trash/files -mtime +1 -delete 1> /dev/null 2> /dev/null
0 * * * * ~/scripts/dzen2-update.sh 1> ~/.dzen2-fifo 2> /dev/null
LikeLike
Hi.
Change that:
~/scripts__openbox_restart_dzen2.sh &
~/scripts/__openbox_restart_tint2.sh &
Into that:
~/scripts/__openbox_restart_dzen2.sh &
~/scripts/__openbox_restart_tint2.sh &
Regards.
LikeLike
So I have dzen2 running, however the tint2 script will not run from ,xinitrc
It can be started manually, and so can tint2 and it seems to wrok but running it like that from .xinitrc does not seem to work
#PATH TO SCRIPTS
export PATH=${PATH}:~/scripts
# SET PROPER locale(l) with LC_ALL VARIABLE.
export LC_ALL=en_US.UTF-8
# PRESTARTED APPS
xterm &
xsetroot -solid black &
~/scripts/__openbox_restart_dzen2.sh &
~/scripts/__openbox_restart_tint2.sh &
# WINDOW MANAGER
openbox
Furthermore, what must I do to make dzen2 update on its own? I have to click it at the moment, i will re-read that part in the mean time. I am legally blind so I miss things sometimes
LikeLike
Whoops, I had to type my .xinitrc out on here, so I should say that missing slash does not reflect my actual .xinitrc
LikeLike
The idea is that DZEN2 updates ‘automatically’ as often as configured in the crontab(5) file to save battery time and to not distract.
This (your config) means once every hour:
0 * * * * ~/scripts/dzen2-update.sh 1> ~/.dzen2-fifo 2> /dev/null
To make it run every 5 minutes use this:
*/5 * * * * ~/scripts/dzen2-update.sh 1> ~/.dzen2-fifo 2> /dev/null
Regards.
LikeLike
Thanks, but I still cannot seem to get tint2 to launch properly. I have re-done the entire guide, save the bit on XDM.
When running the script manually there are no errors other than it complaining about me using UFS, and starting in rhe wrong spot.
LikeLike
I use ~/.tint2rc.ALL as a configuration file in the __openbox_restart_tint2.sh script.
tint2 -c ~/.tint2rc.ALL
You are probably using the shorter ~/.tint2rc name.
LikeLike
Thanks, you were correct. Guide suggested the use of the rc file but I guess I should have thoroughly run the script, I think the important things working now.
May I ask how you start things ike xbindkeys? it seems to be one of those things that .xinitrc likes to ignore.
LikeLike
That one I do ‘typically’ 🙂
LikeLike
I see, .xinitrc is so finicky. I wonder why these extra steps are needed, foss really be like that sometimes
Thank you
LikeLike
I would say that ~/.xinitrc is just like any other POSIX shell script. Its only up to you how you organize it 🙂
LikeLike
Pingback: FreeBSD GNOME 3 Fast Track | 𝚟𝚎𝚛𝚖𝚊𝚍𝚎𝚗