Today FreeBSD operating system turns 26 years old. 19 June is an International FreeBSD Day. This is why I got something special today :). How about using FreeBSD as an Enterprise Storage solution on real hardware? This where FreeBSD shines with all its storage features ZFS included.
Today I will show you how I have built so called Enterprise Storage based on FreeBSD system along with more then 1 PB (Petabyte) of raw capacity.
I have build various storage related systems based on FreeBSD:
- Distributed Object Storage with Minio on FreeBSD
- GlusterFS Cluster on FreeBSD with Ansible and GNU Parallel
- Silent Fanless FreeBSD Server – Redundant Backup
This project is different. How much storage space can you squeeze from a single 4U system? It turns out a lot! Definitely more then 1 PB (1024 TB) of raw storage space.
Here is the (non clickable) Table of Contents.
- Hardware
- Management Interface
- BIOS/UEFI
- FreeBSD System
- Disks Preparation
- ZFS Pool Configuration
- ZFS Settings
- Network Configuration
- FreeBSD Configuration
- Purpose
- Performance
- Network Performance
- Disk Subsystem Performance
- FreeNAS
- UPDATE 1 – BSD Now 305
- UPDATE 2 – Real Life Pictures in Data Center
Hardware
There are 4U servers with 90-100 3.5″ drive slots which will allow you to pack 1260-1400 Terabytes of data (with 14 TB drives). Examples of such systems are:
- TYAN Thunder SX FA100 (100 bays)
- Supermicro SuperStorage 6048R-E1CR90L (90 bays)
I would use the first one – the TYAN FA100 for short name.
![]()
While both GlusterFS and Minio clusters were cone on virtual hardware (or even FreeBSD Jails containers) this one uses real physical hardware.
The build has following specifications.
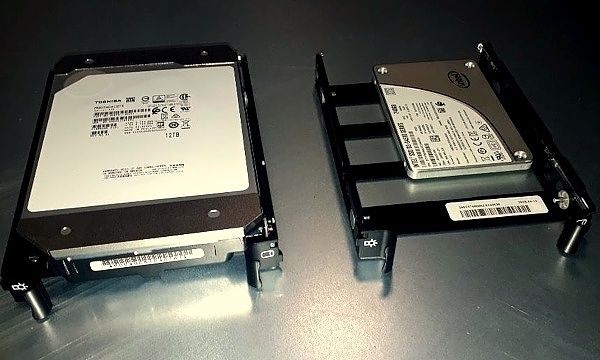
 2 x 10-Core Intel Xeon Silver 4114 CPU @ 2.20GHz
 4 x 32 GB RAM DDR4 (128 GB Total)
 2 x Intel SSD DC S3500 240 GB (System)
90 x Toshiba HDD MN07ACA12TE 12 TB (Data)
 2 x Broadcom SAS3008 Controller
 2 x Intel X710 DA-2 10GE Card
 2 x Power Supply
Price of the whole system is about $65 000 – drives included. Here is how it looks.

One thing that you will need is a rack cabinet that is 1200 mm long to fit that monster 🙂
Management Interface
The so called Lights Out management interface is really nice. Its not bloated, well organized and works quite fast. you can create several separate user accounts or can connect to external user services like LDAP/AD/RADIUS for example.

After logging in a simple Dashboard welcomes us.

We have access to various Sensor information available with temperatures of system components.
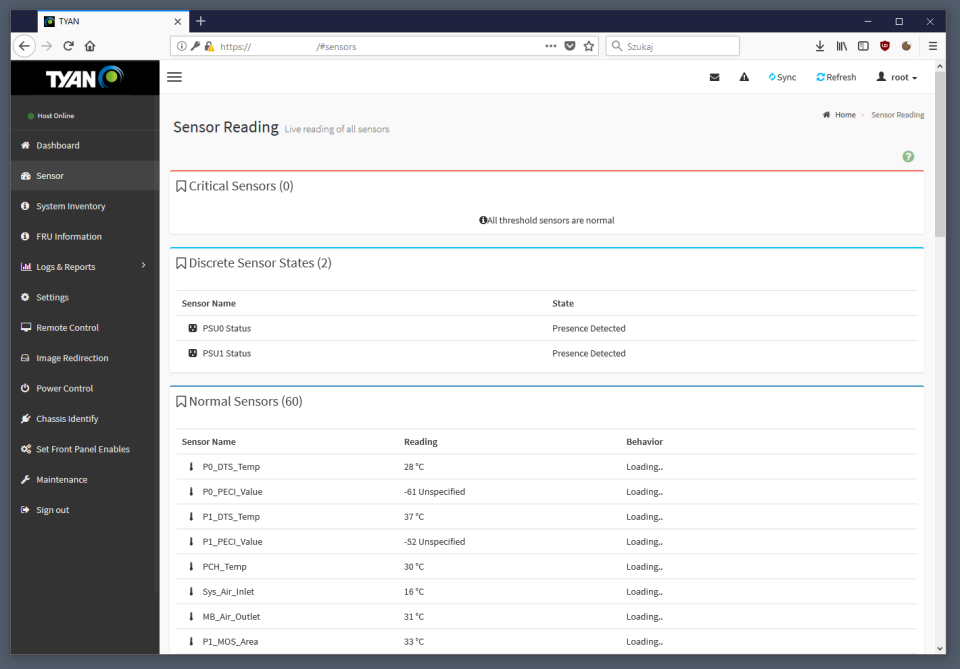
We have System Inventory information with installed hardware.

There is separate Settings menu for various setup options.

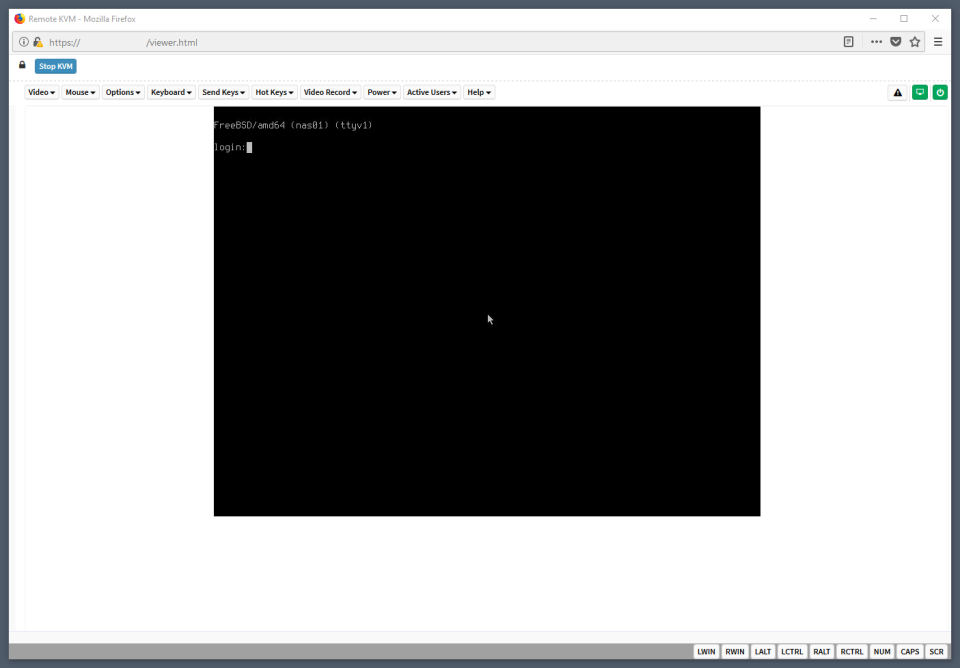
I know its 2019 but HTML5 only Remote Control (remote console) without need for any third party plugins like Java/Silverlight/Flash/… is very welcomed. It works very well too.

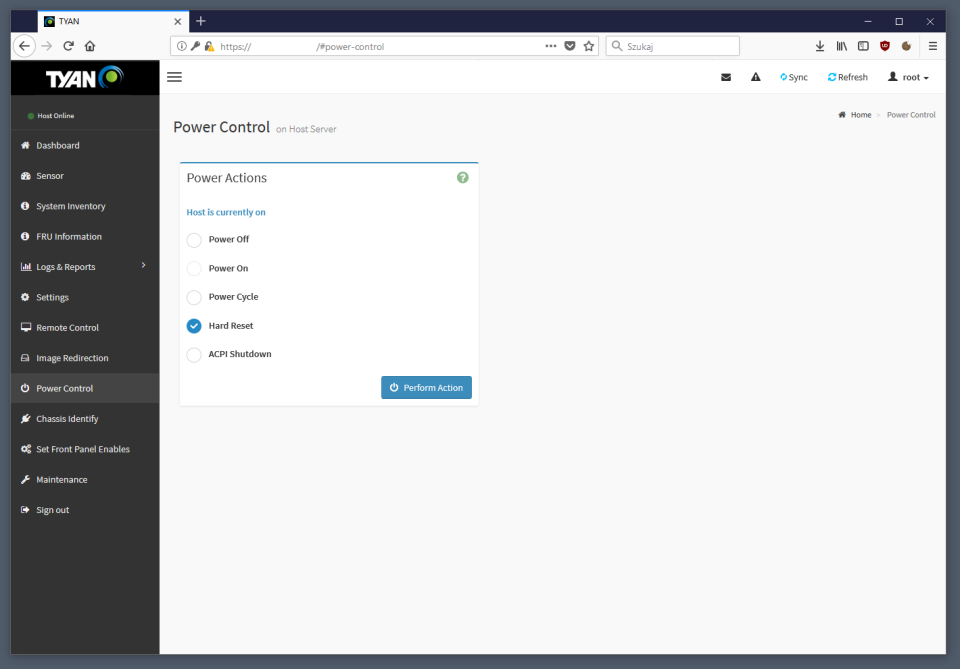
One is of course allowed to power on/off/cycle the box remotely.
The Maintenance menu for BIOS updates.

BIOS/UEFI
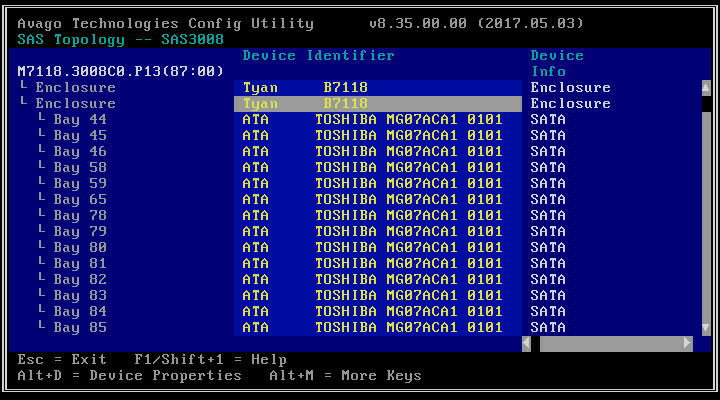
After booting into the BIOS/UEFI setup its possible to select from which drives to boot from. On the screenshots the two SSD drives prepared for system.

The BIOS/UEFI interface shows two Enclosures but its two Broadcom SAS3008 controllers. Some drive are attached via first Broadcom SAS3008 controller, the rest is attached via the second one, and they call them Enclosures instead od of controllers for some reason.
FreeBSD System
I have chosen latest FreeBSD 12.0-RELEASE for the purpose of this installation. Its generally very ‘default’ installation with ZFS mirror on two SSD disks. Nothing special.
![]()
The installation of course supports the ZFS Boot Environments bulletproof upgrades/changes feature.
# zpool list zroot
NAME    SIZE  ALLOC   FREE  CKPOINT  EXPANDSZ   FRAG    CAP  DEDUP  HEALTH  ALTROOT
zroot   220G  3.75G   216G        -         -     0%     1%  1.00x  ONLINE  -

# zpool status zroot
  pool: zroot
 state: ONLINE
  scan: none requested
config:

        NAME        STATE     READ WRITE CKSUM
        zroot       ONLINE       0     0     0
          mirror-0  ONLINE       0     0     0
            da91p4  ONLINE       0     0     0
            da11p4  ONLINE       0     0     0

errors: No known data errors

# df -g
Filesystem              1G-blocks Used  Avail Capacity  Mounted on
zroot/ROOT/default            211    2    209     1%    /
devfs                           0    0      0   100%    /dev
zroot/tmp                     209    0    209     0%    /tmp
zroot/usr/home                209    0    209     0%    /usr/home
zroot/usr/ports               210    0    209     0%    /usr/ports
zroot/usr/src                 210    0    209     0%    /usr/src
zroot/var/audit               209    0    209     0%    /var/audit
zroot/var/crash               209    0    209     0%    /var/crash
zroot/var/log                 209    0    209     0%    /var/log
zroot/var/mail                209    0    209     0%    /var/mail
zroot/var/tmp                 209    0    209     0%    /var/tmp

# beadm list
BE      Active Mountpoint  Space Created
default NR     /            2.4G 2019-05-24 13:24
Disks Preparation
From all the possible setups with 90 disks of 12 TB capacity I have chosen to go the RAID60 way – its ZFS equivalent of course. With 12 disks in each RAID6 (raidz2) group – there will be 7 such groups – we will have 84 used for the ZFS pool with 6 drives left as SPARE disks – that plays well for me. The disks distribution will look more or less like that.
DISKS  CONTENT
   12  raidz2-0
   12  raidz2-1
   12  raidz2-2
   12  raidz2-3
   12  raidz2-4
   12  raidz2-5
   12  raidz2-6
    6  spares
   90  TOTAL
Here is how FreeBSD system sees these drives by camcontrol(8) command. Sorted by attached SAS controller – scbus(4).
# camcontrol devlist | sort -k 6
(AHCI SGPIO Enclosure 1.00 0001)   at scbus2 target 0 lun 0 (pass0,ses0)
(ATA TOSHIBA MG07ACA1 0101)        at scbus3 target 50 lun 0 (pass1,da0)
(ATA TOSHIBA MG07ACA1 0101)        at scbus3 target 52 lun 0 (pass2,da1)
(ATA TOSHIBA MG07ACA1 0101)        at scbus3 target 54 lun 0 (pass3,da2)
(ATA TOSHIBA MG07ACA1 0101)        at scbus3 target 56 lun 0 (pass5,da4)
(ATA TOSHIBA MG07ACA1 0101)        at scbus3 target 57 lun 0 (pass6,da5)
(ATA TOSHIBA MG07ACA1 0101)        at scbus3 target 59 lun 0 (pass7,da6)
(ATA TOSHIBA MG07ACA1 0101)        at scbus3 target 60 lun 0 (pass8,da7)
(ATA TOSHIBA MG07ACA1 0101)        at scbus3 target 66 lun 0 (pass9,da8)
(ATA TOSHIBA MG07ACA1 0101)        at scbus3 target 67 lun 0 (pass10,da9)
(ATA TOSHIBA MG07ACA1 0101)        at scbus3 target 74 lun 0 (pass11,da10)
(ATA INTEL SSDSC2KB24 0100)        at scbus3 target 75 lun 0 (pass12,da11)
(ATA TOSHIBA MG07ACA1 0101)        at scbus3 target 76 lun 0 (pass13,da12)
(ATA TOSHIBA MG07ACA1 0101)        at scbus3 target 82 lun 0 (pass14,da13)
(ATA TOSHIBA MG07ACA1 0101)        at scbus3 target 83 lun 0 (pass15,da14)
(ATA TOSHIBA MG07ACA1 0101)        at scbus3 target 85 lun 0 (pass16,da15)
(ATA TOSHIBA MG07ACA1 0101)        at scbus3 target 87 lun 0 (pass17,da16)
(Tyan B7118 0500)                  at scbus3 target 88 lun 0 (pass18,ses1)
(ATA TOSHIBA MG07ACA1 0101)        at scbus3 target 89 lun 0 (pass19,da17)
(ATA TOSHIBA MG07ACA1 0101)        at scbus3 target 90 lun 0 (pass20,da18)
(ATA TOSHIBA MG07ACA1 0101)        at scbus3 target 91 lun 0 (pass21,da19)
(ATA TOSHIBA MG07ACA1 0101)        at scbus3 target 92 lun 0 (pass22,da20)
(ATA TOSHIBA MG07ACA1 0101)        at scbus3 target 93 lun 0 (pass23,da21)
(ATA TOSHIBA MG07ACA1 0101)        at scbus3 target 94 lun 0 (pass24,da22)
(ATA TOSHIBA MG07ACA1 0101)        at scbus3 target 95 lun 0 (pass25,da23)
(ATA TOSHIBA MG07ACA1 0101)        at scbus3 target 96 lun 0 (pass26,da24)
(ATA TOSHIBA MG07ACA1 0101)        at scbus3 target 97 lun 0 (pass27,da25)
(ATA TOSHIBA MG07ACA1 0101)        at scbus3 target 98 lun 0 (pass28,da26)
(ATA TOSHIBA MG07ACA1 0101)        at scbus3 target 99 lun 0 (pass29,da27)
(ATA TOSHIBA MG07ACA1 0101)        at scbus3 target 100 lun 0 (pass30,da28)
(ATA TOSHIBA MG07ACA1 0101)        at scbus3 target 101 lun 0 (pass31,da29)
(ATA TOSHIBA MG07ACA1 0101)        at scbus3 target 102 lun 0 (pass32,da30)
(ATA TOSHIBA MG07ACA1 0101)        at scbus3 target 103 lun 0 (pass33,da31)
(ATA TOSHIBA MG07ACA1 0101)        at scbus3 target 104 lun 0 (pass34,da32)
(ATA TOSHIBA MG07ACA1 0101)        at scbus3 target 105 lun 0 (pass35,da33)
(ATA TOSHIBA MG07ACA1 0101)        at scbus3 target 106 lun 0 (pass36,da34)
(ATA TOSHIBA MG07ACA1 0101)        at scbus3 target 107 lun 0 (pass37,da35)
(ATA TOSHIBA MG07ACA1 0101)        at scbus3 target 108 lun 0 (pass38,da36)
(ATA TOSHIBA MG07ACA1 0101)        at scbus3 target 109 lun 0 (pass39,da37)
(ATA TOSHIBA MG07ACA1 0101)        at scbus3 target 110 lun 0 (pass40,da38)
(ATA TOSHIBA MG07ACA1 0101)        at scbus4 target 48 lun 0 (pass41,da39)
(ATA TOSHIBA MG07ACA1 0101)        at scbus4 target 49 lun 0 (pass42,da40)
(ATA TOSHIBA MG07ACA1 0101)        at scbus4 target 51 lun 0 (pass43,da41)
(ATA TOSHIBA MG07ACA1 0101)        at scbus4 target 53 lun 0 (pass44,da42)
(ATA TOSHIBA MG07ACA1 0101)        at scbus4 target 55 lun 0 (da43,pass45)
(ATA TOSHIBA MG07ACA1 0101)        at scbus4 target 59 lun 0 (pass46,da44)
(ATA TOSHIBA MG07ACA1 0101)        at scbus4 target 64 lun 0 (pass47,da45)
(ATA TOSHIBA MG07ACA1 0101)        at scbus4 target 67 lun 0 (pass48,da46)
(ATA TOSHIBA MG07ACA1 0101)        at scbus4 target 68 lun 0 (pass49,da47)
(ATA TOSHIBA MG07ACA1 0101)        at scbus4 target 69 lun 0 (pass50,da48)
(ATA TOSHIBA MG07ACA1 0101)        at scbus4 target 73 lun 0 (pass51,da49)
(ATA TOSHIBA MG07ACA1 0101)        at scbus4 target 76 lun 0 (pass52,da50)
(ATA TOSHIBA MG07ACA1 0101)        at scbus4 target 77 lun 0 (pass53,da51)
(Tyan B7118 0500)                  at scbus4 target 80 lun 0 (pass54,ses2)
(ATA TOSHIBA MG07ACA1 0101)        at scbus4 target 81 lun 0 (pass55,da52)
(ATA TOSHIBA MG07ACA1 0101)        at scbus4 target 82 lun 0 (pass56,da53)
(ATA TOSHIBA MG07ACA1 0101)        at scbus4 target 83 lun 0 (pass57,da54)
(ATA TOSHIBA MG07ACA1 0101)        at scbus4 target 84 lun 0 (pass58,da55)
(ATA TOSHIBA MG07ACA1 0101)        at scbus4 target 85 lun 0 (pass59,da56)
(ATA TOSHIBA MG07ACA1 0101)        at scbus4 target 86 lun 0 (pass60,da57)
(ATA TOSHIBA MG07ACA1 0101)        at scbus4 target 87 lun 0 (pass61,da58)
(ATA TOSHIBA MG07ACA1 0101)        at scbus4 target 88 lun 0 (pass62,da59)
(ATA TOSHIBA MG07ACA1 0101)        at scbus4 target 89 lun 0 (da63,pass66)
(ATA TOSHIBA MG07ACA1 0101)        at scbus4 target 90 lun 0 (pass64,da61)
(ATA TOSHIBA MG07ACA1 0101)        at scbus4 target 91 lun 0 (pass65,da62)
(ATA TOSHIBA MG07ACA1 0101)        at scbus4 target 92 lun 0 (da60,pass63)
(ATA TOSHIBA MG07ACA1 0101)        at scbus4 target 94 lun 0 (pass67,da64)
(ATA TOSHIBA MG07ACA1 0101)        at scbus4 target 97 lun 0 (pass68,da65)
(ATA TOSHIBA MG07ACA1 0101)        at scbus4 target 98 lun 0 (pass69,da66)
(ATA TOSHIBA MG07ACA1 0101)        at scbus4 target 99 lun 0 (pass70,da67)
(ATA TOSHIBA MG07ACA1 0101)        at scbus4 target 100 lun 0 (pass71,da68)
(Tyan B7118 0500)                  at scbus4 target 101 lun 0 (pass72,ses3)
(ATA TOSHIBA MG07ACA1 0101)        at scbus4 target 102 lun 0 (pass73,da69)
(ATA TOSHIBA MG07ACA1 0101)        at scbus4 target 103 lun 0 (pass74,da70)
(ATA TOSHIBA MG07ACA1 0101)        at scbus4 target 104 lun 0 (pass75,da71)
(ATA TOSHIBA MG07ACA1 0101)        at scbus4 target 105 lun 0 (pass76,da72)
(ATA TOSHIBA MG07ACA1 0101)        at scbus4 target 106 lun 0 (pass77,da73)
(ATA TOSHIBA MG07ACA1 0101)        at scbus4 target 107 lun 0 (pass78,da74)
(ATA TOSHIBA MG07ACA1 0101)        at scbus4 target 108 lun 0 (pass79,da75)
(ATA TOSHIBA MG07ACA1 0101)        at scbus4 target 109 lun 0 (pass80,da76)
(ATA TOSHIBA MG07ACA1 0101)        at scbus4 target 110 lun 0 (pass81,da77)
(ATA TOSHIBA MG07ACA1 0101)        at scbus4 target 111 lun 0 (pass82,da78)
(ATA TOSHIBA MG07ACA1 0101)        at scbus4 target 112 lun 0 (pass83,da79)
(ATA TOSHIBA MG07ACA1 0101)        at scbus4 target 113 lun 0 (pass84,da80)
(ATA TOSHIBA MG07ACA1 0101)        at scbus4 target 114 lun 0 (pass85,da81)
(ATA TOSHIBA MG07ACA1 0101)        at scbus4 target 115 lun 0 (pass86,da82)
(ATA TOSHIBA MG07ACA1 0101)        at scbus4 target 116 lun 0 (pass87,da83)
(ATA TOSHIBA MG07ACA1 0101)        at scbus4 target 117 lun 0 (pass88,da84)
(ATA TOSHIBA MG07ACA1 0101)        at scbus4 target 118 lun 0 (pass89,da85)
(ATA TOSHIBA MG07ACA1 0101)        at scbus4 target 119 lun 0 (pass90,da86)
(ATA TOSHIBA MG07ACA1 0101)        at scbus4 target 120 lun 0 (pass91,da87)
(ATA TOSHIBA MG07ACA1 0101)        at scbus4 target 121 lun 0 (pass92,da88)
(ATA TOSHIBA MG07ACA1 0101)        at scbus4 target 122 lun 0 (pass93,da89)
(ATA TOSHIBA MG07ACA1 0101)        at scbus4 target 123 lun 0 (pass94,da90)
(ATA INTEL SSDSC2KB24 0100)        at scbus4 target 124 lun 0 (pass95,da91)
(ATA TOSHIBA MG07ACA1 0101)        at scbus4 target 125 lun 0 (da3,pass4)
One my ask how to identify which disk is which when the FAILURE will came … this is where FreeBSD’s sesutil(8) command comes handy.
# sesutil locate all off
# sesutil locate da64 on
The first sesutil(8) command disables all location lights in the enclosure. The second one turns on the identification for disk da64.
I will also make sure to NOT use the whole space of each drive. Such idea may be pointless but imagine the following situation. Five 12 TB disks failed after 3 years. You can not get the same model drives so you get other 12 TB drives, maybe even from other manufacturer.
# grep da64 /var/run/dmesg.boot
da64 at mpr1 bus 0 scbus4 target 93 lun 0
da64:  Fixed Direct Access SPC-4 SCSI device
da64: Serial Number 98G0A1EQF95G
da64: 1200.000MB/s transfers
da64: Command Queueing enabled
da64: 11444224MB (23437770752 512 byte sectors)
A single 12 TB drive has 23437770752 of 512 byte sectors which equals 12000138625024 bytes of raw capacity.
# expr 23437770752 \* 512
12000138625024
Now image that these other 12 TB drives from other manufacturer will come with 4 bytes smaller size … ZFS will not allow their usage because their size is smaller.
This is why I will use exactly 11175 GB size of each drive which is more or less 1 GB short of its total 11176 GB size.
Below is command that will do that for me for all 90 disks.
# camcontrol devlist \
    | grep TOSHIBA \
    | awk '{print $NF}' \
    | awk -F ',' '{print $2}' \
    | tr -d ')' \
    | while read DISK
      do
        gpart destroy -F                   ${DISK} 1> /dev/null 2> /dev/null
        gpart create -s GPT                ${DISK}
        gpart add -t freebsd-zfs -s 11175G ${DISK}
      done

# gpart show da64
=>         40  23437770672  da64  GPT  (11T)
           40  23435673600     1  freebsd-zfs  (11T)
  23435673640      2097072        - free -  (1.0G)
ZFS Pool Configuration
Next, we will have to create our ZFS pool, its probably the longest zpool command I have ever executed 🙂
As the Toshiba 12 TB disks have 4k sectors we will need to set vfs.zfs.min_auto_ashift to 12 to force them.
# sysctl vfs.zfs.min_auto_ashift=12
vfs.zfs.min_auto_ashift: 12 -> 12

# zpool create nas02 \
    raidz2  da0p1  da1p1  da2p1  da3p1  da4p1  da5p1  da6p1  da7p1  da8p1  da9p1 da10p1 da12p1 \
    raidz2 da13p1 da14p1 da15p1 da16p1 da17p1 da18p1 da19p1 da20p1 da21p1 da22p1 da23p1 da24p1 \
    raidz2 da25p1 da26p1 da27p1 da28p1 da29p1 da30p1 da31p1 da32p1 da33p1 da34p1 da35p1 da36p1 \
    raidz2 da37p1 da38p1 da39p1 da40p1 da41p1 da42p1 da43p1 da44p1 da45p1 da46p1 da47p1 da48p1 \
    raidz2 da49p1 da50p1 da51p1 da52p1 da53p1 da54p1 da55p1 da56p1 da57p1 da58p1 da59p1 da60p1 \
    raidz2 da61p1 da62p1 da63p1 da64p1 da65p1 da66p1 da67p1 da68p1 da69p1 da70p1 da71p1 da72p1 \
    raidz2 da73p1 da74p1 da75p1 da76p1 da77p1 da78p1 da79p1 da80p1 da81p1 da82p1 da83p1 da84p1 \
    spare  da85p1 da86p1 da87p1 da88p1 da89p1 da90p1

# zpool status
  pool: nas02
 state: ONLINE
  scan: scrub repaired 0 in 0 days 00:00:05 with 0 errors on Fri May 31 10:26:29 2019
config:

        NAME        STATE     READ WRITE CKSUM
        nas02       ONLINE       0     0     0
          raidz2-0  ONLINE       0     0     0
            da0p1   ONLINE       0     0     0
            da1p1   ONLINE       0     0     0
            da2p1   ONLINE       0     0     0
            da3p1   ONLINE       0     0     0
            da4p1   ONLINE       0     0     0
            da5p1   ONLINE       0     0     0
            da6p1   ONLINE       0     0     0
            da7p1   ONLINE       0     0     0
            da8p1   ONLINE       0     0     0
            da9p1   ONLINE       0     0     0
            da10p1  ONLINE       0     0     0
            da12p1  ONLINE       0     0     0
          raidz2-1  ONLINE       0     0     0
            da13p1  ONLINE       0     0     0
            da14p1  ONLINE       0     0     0
            da15p1  ONLINE       0     0     0
            da16p1  ONLINE       0     0     0
            da17p1  ONLINE       0     0     0
            da18p1  ONLINE       0     0     0
            da19p1  ONLINE       0     0     0
            da20p1  ONLINE       0     0     0
            da21p1  ONLINE       0     0     0
            da22p1  ONLINE       0     0     0
            da23p1  ONLINE       0     0     0
            da24p1  ONLINE       0     0     0
          raidz2-2  ONLINE       0     0     0
            da25p1  ONLINE       0     0     0
            da26p1  ONLINE       0     0     0
            da27p1  ONLINE       0     0     0
            da28p1  ONLINE       0     0     0
            da29p1  ONLINE       0     0     0
            da30p1  ONLINE       0     0     0
            da31p1  ONLINE       0     0     0
            da32p1  ONLINE       0     0     0
            da33p1  ONLINE       0     0     0
            da34p1  ONLINE       0     0     0
            da35p1  ONLINE       0     0     0
            da36p1  ONLINE       0     0     0
          raidz2-3  ONLINE       0     0     0
            da37p1  ONLINE       0     0     0
            da38p1  ONLINE       0     0     0
            da39p1  ONLINE       0     0     0
            da40p1  ONLINE       0     0     0
            da41p1  ONLINE       0     0     0
            da42p1  ONLINE       0     0     0
            da43p1  ONLINE       0     0     0
            da44p1  ONLINE       0     0     0
            da45p1  ONLINE       0     0     0
            da46p1  ONLINE       0     0     0
            da47p1  ONLINE       0     0     0
            da48p1  ONLINE       0     0     0
          raidz2-4  ONLINE       0     0     0
            da49p1  ONLINE       0     0     0
            da50p1  ONLINE       0     0     0
            da51p1  ONLINE       0     0     0
            da52p1  ONLINE       0     0     0
            da53p1  ONLINE       0     0     0
            da54p1  ONLINE       0     0     0
            da55p1  ONLINE       0     0     0
            da56p1  ONLINE       0     0     0
            da57p1  ONLINE       0     0     0
            da58p1  ONLINE       0     0     0
            da59p1  ONLINE       0     0     0
            da60p1  ONLINE       0     0     0
          raidz2-5  ONLINE       0     0     0
            da61p1  ONLINE       0     0     0
            da62p1  ONLINE       0     0     0
            da63p1  ONLINE       0     0     0
            da64p1  ONLINE       0     0     0
            da65p1  ONLINE       0     0     0
            da66p1  ONLINE       0     0     0
            da67p1  ONLINE       0     0     0
            da68p1  ONLINE       0     0     0
            da69p1  ONLINE       0     0     0
            da70p1  ONLINE       0     0     0
            da71p1  ONLINE       0     0     0
            da72p1  ONLINE       0     0     0
          raidz2-6  ONLINE       0     0     0
            da73p1  ONLINE       0     0     0
            da74p1  ONLINE       0     0     0
            da75p1  ONLINE       0     0     0
            da76p1  ONLINE       0     0     0
            da77p1  ONLINE       0     0     0
            da78p1  ONLINE       0     0     0
            da79p1  ONLINE       0     0     0
            da80p1  ONLINE       0     0     0
            da81p1  ONLINE       0     0     0
            da82p1  ONLINE       0     0     0
            da83p1  ONLINE       0     0     0
            da84p1  ONLINE       0     0     0
        spares
          da85p1    AVAIL
          da86p1    AVAIL
          da87p1    AVAIL
          da88p1    AVAIL
          da89p1    AVAIL
          da90p1    AVAIL

errors: No known data errors

# zpool list nas02
NAME    SIZE  ALLOC   FREE  CKPOINT  EXPANDSZ   FRAG    CAP  DEDUP  HEALTH  ALTROOT
nas02   915T  1.42M   915T        -         -     0%     0%  1.00x  ONLINE  -

# zfs list nas02
NAME    USED  AVAIL  REFER  MOUNTPOINT
nas02    88K   675T   201K  none
ZFS Settings
As the primary role of this storage would be keeping files I will use one of the largest values for recordsize – 1 MB – this helps getting better compression ratio.
… but it will also serve as iSCSI Target in which we will try to fit in the native 4k blocks – thus 4096 bytes setting for iSCSI.
# zfs set compression=lz4         nas02
# zfs set atime=off               nas02
# zfs set mountpoint=none         nas02
# zfs set recordsize=1m           nas02
# zfs set redundant_metadata=most nas02
# zfs create                      nas02/nfs
# zfs create                      nas02/smb
# zfs create                      nas02/iscsi
# zfs set recordsize=4k           nas02/iscsi
Also one word on redundant_metadata as its not that obvious parameter. To quote the zfs(8) man page.
# man zfs
(...)
redundant_metadata=all | most
  Controls what types of metadata are stored redundantly.  ZFS stores
  an extra copy of metadata, so that if a single block is corrupted,
  the amount of user data lost is limited.  This extra copy is in
  addition to any redundancy provided at the pool level (e.g. by
  mirroring or RAID-Z), and is in addition to an extra copy specified
  by the copies property (up to a total of 3 copies).  For example if
  the pool is mirrored, copies=2, and redundant_metadata=most, then ZFS
  stores 6 copies of most metadata, and 4 copies of data and some
  metadata.

  When set to all, ZFS stores an extra copy of all metadata.  If a
  single on-disk block is corrupt, at worst a single block of user data
  (which is recordsize bytes long can be lost.)

  When set to most, ZFS stores an extra copy of most types of metadata.
  This can improve performance of random writes, because less metadata
  must be written.  In practice, at worst about 100 blocks (of
  recordsize bytes each) of user data can be lost if a single on-disk
  block is corrupt.  The exact behavior of which metadata blocks are
  stored redundantly may change in future releases.

  The default value is all.
(...)
From the description above we can see that its mostly useful on single device pools because when we have redundancy based on RAIDZ2 (RAID6 equivalent) we do not need to keep additional redundant copies of metadata. This helps to increase write performance.
For the record – iSCSI ZFS zvols are create with command like that one below – as sparse files – also called Thin Provisioning mode.
# zfs create -s -V 16T nas02/iscsi/test
As we have SPARE disks we will also need to enable the zfsd(8) daemon by adding zfsd_enable=YES to the /etc/rc.conf file.
We also need to enable autoreplace property for our pool because by default its set to off.
# zpool get autoreplace nas02
NAME   PROPERTY     VALUE    SOURCE
nas02  autoreplace  off      default

# zpool set autoreplace=on nas02

# zpool get autoreplace nas02
NAME   PROPERTY     VALUE    SOURCE
nas02  autoreplace  on       local
Other ZFS settings are in the /boot/loader.conf file. As this system has 128 GB RAM we will let ZFS use 50 to 75% of that amount for ARC.
# grep vfs.zfs /boot/loader.conf
  vfs.zfs.prefetch_disable=1
  vfs.zfs.cache_flush_disable=1
  vfs.zfs.vdev.cache.size=16M
  vfs.zfs.arc_min=64G
  vfs.zfs.arc_max=96G
  vfs.zfs.deadman_enabled=0
Network Configuration
This is what I really like about FreeBSD. To setup LACP link aggregation tou just need 5 lines in /etc/rc.conf file. On Red Hat Enterprise Linux you would need several files with many lines each.
# head -5 /etc/rc.conf
  defaultrouter="10.20.30.254"
  ifconfig_ixl0="up"
  ifconfig_ixl1="up"
  cloned_interfaces="lagg0"
  ifconfig_lagg0="laggproto lacp laggport ixl0 laggport ixl1 10.20.30.2/24 up"

# ifconfig lagg0
lagg0: flags=8843 metric 0 mtu 1500
        options=e507bb
        ether a0:42:3f:a0:42:3f
        inet 10.20.30.2 netmask 0xffffff00 broadcast 10.20.30.255
        laggproto lacp lagghash l2,l3,l4
        laggport: ixl0 flags=1c
        laggport: ixl1 flags=1c
        groups: lagg
        media: Ethernet autoselect
        status: active
        nd6 options=29
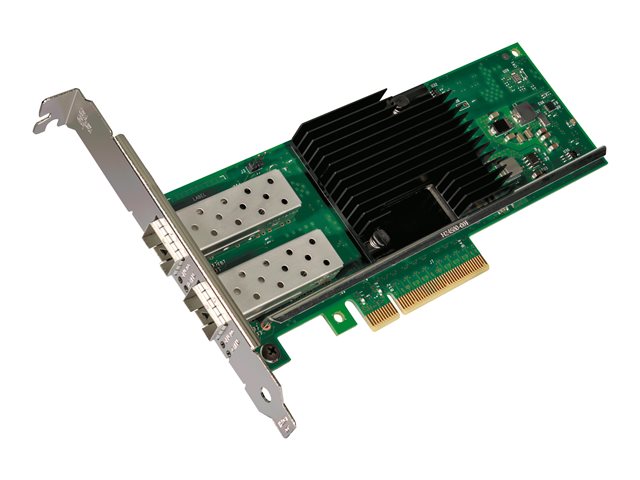
The Intel X710 DA-2 10GE network adapter is fully supported under FreeBSD by the ixl(4) driver.
Cisco Nexus Configuration
This is the Cisco Nexus configuration needed to enable LACP aggregation.
First the ports.
NEXUS-1  Eth1/32  NAS02_IXL0  connected 3  full  a-10G  SFP-H10GB-A
NEXUS-2  Eth1/32  NAS02_IXL1  connected 3  full  a-10G  SFP-H10GB-A
… and now aggregation.
interface Ethernet1/32
  description NAS02_IXL1
  switchport
  switchport access vlan 3
  mtu 9216
  channel-group 128 mode active
  no shutdown
!
interface port-channel128
  description NAS02
  switchport
  switchport access vlan 3
  mtu 9216
  vpc 128
… and the same/similar on the second Cisco Nexus NEXUS-2 switch.
FreeBSD Configuration
These are three most important configuration files on any FreeBSD system.
I will now post all settings I use on this storage system.
The /etc/rc.conf file.
# cat /etc/rc.conf
# NETWORK
  hostname="nas02.local"
  defaultrouter="10.20.30.254"
  ifconfig_ixl0="up"
  ifconfig_ixl1="up"
  cloned_interfaces="lagg0"
  ifconfig_lagg0="laggproto lacp laggport ixl0 laggport ixl1 10.20.30.2/24 up"

# KERNEL MODULES
  kld_list="${kld_list} aesni"

# DAEMON | YES
  zfs_enable=YES
  zfsd_enable=YES
  sshd_enable=YES
  ctld_enable=YES
  powerd_enable=YES

# DAEMON | NFS SERVER
  nfs_server_enable=YES
  nfs_client_enable=YES
  rpc_lockd_enable=YES
  rpc_statd_enable=YES
  rpcbind_enable=YES
  mountd_enable=YES
  mountd_flags="-r"

# OTHER
  dumpdev=NO
The /boot/loader.conf file.
# cat /boot/loader.conf
# BOOT OPTIONS
  autoboot_delay=3
  kern.geom.label.disk_ident.enable=0
  kern.geom.label.gptid.enable=0

# DISABLE INTEL HT
  machdep.hyperthreading_allowed=0

# UPDATE INTEL CPU MICROCODE AT BOOT BEFORE KERNEL IS LOADED
  cpu_microcode_load=YES
  cpu_microcode_name=/boot/firmware/intel-ucode.bin

# MODULES
  zfs_load=YES
  aio_load=YES

# RACCT/RCTL RESOURCE LIMITS
  kern.racct.enable=1

# DISABLE MEMORY TEST @ BOOT
  hw.memtest.tests=0

# PIPE KVA LIMIT | 320 MB
  kern.ipc.maxpipekva=335544320

# IPC
  kern.ipc.shmseg=1024
  kern.ipc.shmmni=1024
  kern.ipc.shmseg=1024
  kern.ipc.semmns=512
  kern.ipc.semmnu=256
  kern.ipc.semume=256
  kern.ipc.semopm=256
  kern.ipc.semmsl=512

# LARGE PAGE MAPPINGS
  vm.pmap.pg_ps_enabled=1

# ZFS TUNING
  vfs.zfs.prefetch_disable=1
  vfs.zfs.cache_flush_disable=1
  vfs.zfs.vdev.cache.size=16M
  vfs.zfs.arc_min=64G
  vfs.zfs.arc_max=96G

# ZFS DISABLE PANIC ON STALE I/O
  vfs.zfs.deadman_enabled=0

# NEWCONS SUSPEND
  kern.vt.suspendswitch=0
The /etc/sysctl.conf file.
# cat /etc/sysctl.conf
# ZFS ASHIFT
  vfs.zfs.min_auto_ashift=12

# SECURITY
  security.bsd.stack_guard_page=1

# SECURITY INTEL MDS (MICROARCHITECTURAL DATA SAMPLING) MITIGATION
  hw.mds_disable=3

# DISABLE ANNOYING THINGS
  kern.coredump=0
  hw.syscons.bell=0

# IPC
  kern.ipc.shmmax=4294967296
  kern.ipc.shmall=2097152
  kern.ipc.somaxconn=4096
  kern.ipc.maxsockbuf=5242880
  kern.ipc.shm_allow_removed=1

# NETWORK
  kern.ipc.maxsockbuf=16777216
  kern.ipc.soacceptqueue=1024
  net.inet.tcp.recvbuf_max=8388608
  net.inet.tcp.sendbuf_max=8388608
  net.inet.tcp.mssdflt=1460
  net.inet.tcp.minmss=1300
  net.inet.tcp.syncache.rexmtlimit=0
  net.inet.tcp.syncookies=0
  net.inet.tcp.tso=0
  net.inet.ip.process_options=0
  net.inet.ip.random_id=1
  net.inet.ip.redirect=0
  net.inet.icmp.drop_redirect=1
  net.inet.tcp.always_keepalive=0
  net.inet.tcp.drop_synfin=1
  net.inet.tcp.fast_finwait2_recycle=1
  net.inet.tcp.icmp_may_rst=0
  net.inet.tcp.msl=8192
  net.inet.tcp.path_mtu_discovery=0
  net.inet.udp.blackhole=1
  net.inet.tcp.blackhole=2
  net.inet.tcp.hostcache.expire=7200
  net.inet.tcp.delacktime=20
Purpose
Why one would built such appliance? Because its a lot cheaper then to get the ‘branded’ one. Think about Dell EMC Data Domain for example – and not just ‘any’ Data Domain but almost the highest one – the Data Domain DD9300 at least. It would cost about ten times more at least … with smaller capacity and taking not 4U but closer to 14U with three DS60 expanders.
But you can actually make this FreeBSD Enterprise Storage behave like Dell EMC Data Domain .. or like their Dell EMC Elastic Cloud Storage for example.
The Dell EMC CloudBoost can be deployed somewhere on your VMware stack to provide the DDBoost deduplication. Then you would need OpenStack Swift as its one of the supported backed devices.

The OpenStack Swift package in FreeBSD is about 4-5 years behind reality (2.2.2) so you will have to use Bhyve here.
# pkg search swift
(...)
py27-swift-2.2.2_1             Highly available, distributed, eventually consistent object/blob store
(...)
Create Bhyve virtual machine on this FreeBSD Enterprise Storage with CentOS 7.6 system for example, then setup Swift there, but it will work. With 20 physical cores to spare and 128 GB RAM you would not even noticed its there.
This way you can use Dell EMC Networker with more then ten times cheaper storage.
In the past I also wrote about IBM Spectrum Protect (TSM) which would also greatly benefit from FreeBSD Enterprise Storage. I actually also use this FreeBSD based storage as space for IBM Spectrum Protect (TSM) container pool directories. Exported via iSCSI works like a charm.
You can also compare that FreeBSD Enterprise Storage to other storage appliances like iXsystems TrueNAS or EXAGRID.
Performance
You for sure would want to know how fast this FreeBSD Enterprise Storage performs 🙂
I will share all performance data that I gathered with a pleasure.
Network Performance
First the network performance.
I user iperf3 as the benchmark.
I started the server on the FreeBSD side.
# iperf3 -s
… and then I started client on the Windows Server 2016 machine.
C:\iperf-3.1.3-win64>iperf3.exe -c nas02 -P 8
(...)
[SUM]   0.00-10.00  sec  10.8 GBytes  9.26 Gbits/sec                  receiver
(..)
This is with MTU 1500 – no Jumbo frames unfortunatelly 😦
Unfortunatelly this system has only one physical 10GE interface but I did other test also. Using two such boxes with single 10GE interface. That saturated the dual 10GE LACP on FreeBSD side nicely.
I also exported NFS and iSCSI to Red Hat Enterprise Linux system. The network performance was about 500-600 MB/s on single 10GE interface. That would be 1000-1200 MB/s on LACP aggregation.
Disk Subsystem Performance
Now the disk subsystem.
First some naive test using diskinfo(8) FreeBSD’s builtin tool.
# diskinfo -ctv /dev/da12
/dev/da12
        512             # sectorsize
        12000138625024  # mediasize in bytes (11T)
        23437770752     # mediasize in sectors
        4096            # stripesize
        0               # stripeoffset
        1458933         # Cylinders according to firmware.
        255             # Heads according to firmware.
        63              # Sectors according to firmware.
        ATA TOSHIBA MG07ACA1    # Disk descr.
        98H0A11KF95G    # Disk ident.
        id1,enc@n500e081010445dbd/type@0/slot@c/elmdesc@ArrayDevice11   # Physical path
        No              # TRIM/UNMAP support
        7200            # Rotation rate in RPM
        Not_Zoned       # Zone Mode

I/O command overhead:
        time to read 10MB block      0.067031 sec       =    0.003 msec/sector
        time to read 20480 sectors   2.619989 sec       =    0.128 msec/sector
        calculated command overhead                     =    0.125 msec/sector

Seek times:
        Full stroke:      250 iter in   5.665880 sec =   22.664 msec
        Half stroke:      250 iter in   4.263047 sec =   17.052 msec
        Quarter stroke:   500 iter in   6.867914 sec =   13.736 msec
        Short forward:    400 iter in   3.057913 sec =    7.645 msec
        Short backward:   400 iter in   1.979287 sec =    4.948 msec
        Seq outer:       2048 iter in   0.169472 sec =    0.083 msec
        Seq inner:       2048 iter in   0.469630 sec =    0.229 msec

Transfer rates:
        outside:       102400 kbytes in   0.478251 sec =   214114 kbytes/sec
        middle:        102400 kbytes in   0.605701 sec =   169060 kbytes/sec
        inside:        102400 kbytes in   1.303909 sec =    78533 kbytes/sec
So now we know how fast a single disk is.
Let’s repeast the same test on the ZFS zvol device.
# diskinfo -ctv /dev/zvol/nas02/iscsi/test
/dev/zvol/nas02/iscsi/test
        512             # sectorsize
        17592186044416  # mediasize in bytes (16T)
        34359738368     # mediasize in sectors
        65536           # stripesize
        0               # stripeoffset
        Yes             # TRIM/UNMAP support
        Unknown         # Rotation rate in RPM

I/O command overhead:
        time to read 10MB block      0.004512 sec       =    0.000 msec/sector
        time to read 20480 sectors   0.196824 sec       =    0.010 msec/sector
        calculated command overhead                     =    0.009 msec/sector

Seek times:
        Full stroke:      250 iter in   0.006151 sec =    0.025 msec
        Half stroke:      250 iter in   0.008228 sec =    0.033 msec
        Quarter stroke:   500 iter in   0.014062 sec =    0.028 msec
        Short forward:    400 iter in   0.010564 sec =    0.026 msec
        Short backward:   400 iter in   0.011725 sec =    0.029 msec
        Seq outer:       2048 iter in   0.028198 sec =    0.014 msec
        Seq inner:       2048 iter in   0.028416 sec =    0.014 msec

Transfer rates:
        outside:       102400 kbytes in   0.036938 sec =  2772213 kbytes/sec
        middle:        102400 kbytes in   0.043076 sec =  2377194 kbytes/sec
        inside:        102400 kbytes in   0.034260 sec =  2988908 kbytes/sec
Almost 3 GB/s – not bad.
Time for even more oldschool test – the immortal dd(8) command.
This is with compression=off setting.
One process.
# dd if=/dev/zero of=FILE bs=128m status=progress
26172456960 bytes (26 GB, 24 GiB) transferred 16.074s, 1628 MB/s
202+0 records in
201+0 records out
26977763328 bytes transferred in 16.660884 secs (1619227644 bytes/sec)
Four concurrent processes.
# dd if=/dev/zero of=FILE${X} bs=128m status=progress
80933289984 bytes (81 GB, 75 GiB) transferred 98.081s, 825 MB/s
608+0 records in
608+0 records out
81604378624 bytes transferred in 98.990579 secs (824365101 bytes/sec)
Eight concurrent processes.
# dd if=/dev/zero of=FILE${X} bs=128m status=progress
174214610944 bytes (174 GB, 162 GiB) transferred 385.042s, 452 MB/s
1302+0 records in
1301+0 records out
174617264128 bytes transferred in 385.379296 secs (453104943 bytes/sec)
Lets summarize that data.
1 STREAM(s) ~ 1600 MB/s ~ 1.5 GB/s
4 STREAM(s) ~ 3300 MB/s ~ 3.2 GB/s
8 STREAM(s) ~ 3600 MB/s ~ 3.5 GB/s
So the disk subsystem is able to squeeze 3.5 GB/s of sustained speed in sequential writes. That us that if we would want to saturate it we would need to add additional two 10GE interfaces.
The disks were stressed only to about 55% which you can see in other useful FreeBSD tool – gstat(8) command.

Time for more ‘intelligent’ tests. The blogbench test.
First with compression disabled.
# time blogbench -d .
Frequency = 10 secs
Scratch dir = [.]
Spawning 3 writers...
Spawning 1 rewriters...
Spawning 5 commenters...
Spawning 100 readers...
Benchmarking for 30 iterations.
The test will run during 5 minutes.
(...)
Final score for writes:          6476
Final score for reads :        660436

blogbench -d .  280.58s user 4974.41s system 1748% cpu 5:00.54 total
Second with compression set to LZ4.
# time blogbench -d .
Frequency = 10 secs
Scratch dir = [.]
Spawning 3 writers...
Spawning 1 rewriters...
Spawning 5 commenters...
Spawning 100 readers...
Benchmarking for 30 iterations.
The test will run during 5 minutes.
(...)
Final score for writes:          7087
Final score for reads :        733932

blogbench -d .  299.08s user 5415.04s system 1900% cpu 5:00.68 total
Compression did not helped much, but helped.
To have some comparision we will run the same test on the system ZFS pool – two Intel SSD DC S3500 240 GB drives in mirror which have following features.
The Intel SSD DC S3500 240 GB drives:
- Sequential Read (up to) 500 MB/s
- Sequential Write (up to) 260 MB/s
- Random Read (100% Span) 75000 IOPS
- Random Write (100% Span) 7500 IOPS
# time blogbench -d .
Frequency = 10 secs
Scratch dir = [.]
Spawning 3 writers...
Spawning 1 rewriters...
Spawning 5 commenters...
Spawning 100 readers...
Benchmarking for 30 iterations.
The test will run during 5 minutes.
(...)
Final score for writes:          6109
Final score for reads :        654099

blogbench -d .  278.73s user 5058.75s system 1777% cpu 5:00.30 total
Now the randomio test. Its multithreaded disk I/O microbenchmark.
The usage is as follows.
usage: randomio filename nr_threads write_fraction_of_io fsync_fraction_of_writes io_size nr_seconds_between_samples

filename                    Filename or device to read/write.
write_fraction_of_io        What fraction of I/O should be writes - for example 0.25 for 25% write.
fsync_fraction_of_writes    What fraction of writes should be fsync'd.
io_size                     How many bytes to read/write (multiple of 512 bytes).
nr_seconds_between_samples  How many seconds to average samples over.
The randomio with 4k block.
# zfs create -s -V 1T nas02/iscsi/test
# randomio /dev/zvol/nas02/iscsi/test 8 0.25 1 4096 10
  total |  read:         latency (ms)       |  write:        latency (ms)
   iops |   iops   min    avg    max   sdev |   iops   min    avg    max   sdev
--------+-----------------------------------+----------------------------------
54137.7 |40648.4   0.0    0.1  575.8    2.2 |13489.4   0.0    0.3  405.8    2.6
66248.4 |49641.5   0.0    0.1   19.6    0.3 |16606.9   0.0    0.2   26.4    0.7
66411.0 |49817.2   0.0    0.1   19.7    0.3 |16593.8   0.0    0.2   20.3    0.7
64158.9 |48142.8   0.0    0.1  254.7    0.7 |16016.1   0.0    0.2  130.4    1.0
48454.1 |36390.8   0.0    0.1  542.8    2.7 |12063.3   0.0    0.3  507.5    3.2
66796.1 |50067.4   0.0    0.1   24.1    0.3 |16728.7   0.0    0.2   23.4    0.7
58512.2 |43851.7   0.0    0.1  576.5    1.7 |14660.5   0.0    0.2  307.2    1.7
63195.8 |47341.8   0.0    0.1  261.6    0.9 |15854.1   0.0    0.2  361.1    1.9
67086.0 |50335.6   0.0    0.1   20.4    0.3 |16750.4   0.0    0.2   25.1    0.8
67429.8 |50549.6   0.0    0.1   21.8    0.3 |16880.3   0.0    0.2   20.6    0.7
^C
… and with 512 sector.
# zfs create -s -V 1T nas02/iscsi/test
# randomio /dev/zvol/nas02/iscsi/TEST 8 0.25 1 512 10
  total |  read:         latency (ms)       |  write:        latency (ms)
   iops |   iops   min    avg    max   sdev |   iops   min    avg    max   sdev
--------+-----------------------------------+----------------------------------
58218.9 |43712.0   0.0    0.1  501.5    2.1 |14506.9   0.0    0.2  272.5    1.6
66325.3 |49703.8   0.0    0.1  352.0    0.9 |16621.4   0.0    0.2  352.0    1.5
68130.5 |51100.8   0.0    0.1   24.6    0.3 |17029.7   0.0    0.2   24.4    0.7
68465.3 |51352.3   0.0    0.1   19.9    0.3 |17112.9   0.0    0.2   23.8    0.7
54903.5 |41249.1   0.0    0.1  399.3    1.9 |13654.4   0.0    0.3  335.8    2.2
61259.8 |45898.7   0.0    0.1  574.6    1.7 |15361.0   0.0    0.2  371.5    1.7
68483.3 |51313.1   0.0    0.1   22.9    0.3 |17170.3   0.0    0.2   26.1    0.7
56713.7 |42524.7   0.0    0.1  373.5    1.8 |14189.1   0.0    0.2  438.5    2.7
68861.4 |51657.0   0.0    0.1   21.0    0.3 |17204.3   0.0    0.2   21.7    0.7
68602.0 |51438.4   0.0    0.1   19.5    0.3 |17163.7   0.0    0.2   23.7    0.7
^C
Both randomio tests were run with compression set to LZ4.
Next is bonnie++ benchmark. It has been run with compression set to LZ4.
# bonnie++ -d . -u root
Using uid:0, gid:0.
Writing a byte at a time...done
Writing intelligently...done
Rewriting...done
Reading a byte at a time...done
Reading intelligently...done
start 'em...done...done...done...done...done...
Create files in sequential order...done.
Stat files in sequential order...done.
Delete files in sequential order...done.
Create files in random order...done.
Stat files in random order...done.
Delete files in random order...done.
Version  1.97       ------Sequential Output------ --Sequential Input- --Random-
Concurrency   1     -Per Chr- --Block-- -Rewrite- -Per Chr- --Block-- --Seeks--
Machine        Size K/sec %CP K/sec %CP K/sec %CP K/sec %CP K/sec %CP  /sec %CP
nas02.local 261368M   139  99 775132  99 589190  99   383  99 1638929  99 12930 2046
Latency             60266us    7030us    7059us   21553us    3844us    5710us
Version  1.97       ------Sequential Create------ --------Random Create--------
nas02.local         -Create-- --Read--- -Delete-- -Create-- --Read--- -Delete--
              files  /sec %CP  /sec %CP  /sec %CP  /sec %CP  /sec %CP  /sec %CP
                 16 +++++ +++ +++++ +++ 12680  44 +++++ +++ +++++ +++ 30049  99
Latency              2619us      43us     714ms    2748us      28us      58us
… and last but not least the fio benchmark. Also with LZ4 compression enabled.
# fio --randrepeat=1 --direct=1 --gtod_reduce=1 --name=test --filename=random_read_write.fio --bs=4k --iodepth=64 --size=4G --readwrite=randrw --rwmixread=75
test: (g=0): rw=randrw, bs=(R) 4096B-4096B, (W) 4096B-4096B, (T) 4096B-4096B, ioengine=psync, iodepth=64
fio-3.13
Starting 1 process
Jobs: 1 (f=1): [m(1)][98.0%][r=38.0MiB/s,w=12.2MiB/s][r=9735,w=3128 IOPS][eta 00m:05s]
test: (groupid=0, jobs=1): err= 0: pid=35368: Tue Jun 18 15:14:44 2019
  read: IOPS=3157, BW=12.3MiB/s (12.9MB/s)(3070MiB/248872msec)
   bw (  KiB/s): min= 9404, max=57732, per=98.72%, avg=12469.84, stdev=3082.99, samples=497
   iops        : min= 2351, max=14433, avg=3117.15, stdev=770.74, samples=497
  write: IOPS=1055, BW=4222KiB/s (4323kB/s)(1026MiB/248872msec)
   bw (  KiB/s): min= 3179, max=18914, per=98.71%, avg=4166.60, stdev=999.23, samples=497
   iops        : min=  794, max= 4728, avg=1041.25, stdev=249.76, samples=497
  cpu          : usr=1.11%, sys=88.64%, ctx=677981, majf=0, minf=0
  IO depths    : 1=100.0%, 2=0.0%, 4=0.0%, 8=0.0%, 16=0.0%, 32=0.0%, >=64=0.0%
     submit    : 0=0.0%, 4=100.0%, 8=0.0%, 16=0.0%, 32=0.0%, 64=0.0%, >=64=0.0%
     complete  : 0=0.0%, 4=100.0%, 8=0.0%, 16=0.0%, 32=0.0%, 64=0.0%, >=64=0.0%
     issued rwts: total=785920,262656,0,0 short=0,0,0,0 dropped=0,0,0,0
     latency   : target=0, window=0, percentile=100.00%, depth=64

Run status group 0 (all jobs):
   READ: bw=12.3MiB/s (12.9MB/s), 12.3MiB/s-12.3MiB/s (12.9MB/s-12.9MB/s), io=3070MiB (3219MB), run=248872-248872msec
  WRITE: bw=4222KiB/s (4323kB/s), 4222KiB/s-4222KiB/s (4323kB/s-4323kB/s), io=1026MiB (1076MB), run=248872-248872msec
Dunno how about you but I am satisfied with performance 🙂
FreeNAS
Originally I really wanted to use FreeNAS on these boxes and I even installed FreeNAS on them. It run nicely but … the security part of FreeNAS was not best.
This is the output of pkg audit command. Quite scarry.
root@freenas[~]# pkg audit -F
Fetching vuln.xml.bz2: 100%  785 KiB 804.3kB/s    00:01
python27-2.7.15 is vulnerable:
Python -- NULL pointer dereference vulnerability
CVE: CVE-2019-5010
WWW: https://vuxml.FreeBSD.org/freebsd/d74371d2-4fee-11e9-a5cd-1df8a848de3d.html

curl-7.62.0 is vulnerable:
curl -- multiple vulnerabilities
CVE: CVE-2019-3823
CVE: CVE-2019-3822
CVE: CVE-2018-16890
WWW: https://vuxml.FreeBSD.org/freebsd/714b033a-2b09-11e9-8bc3-610fd6e6cd05.html

libgcrypt-1.8.2 is vulnerable:
libgcrypt -- side-channel attack vulnerability
CVE: CVE-2018-0495
WWW: https://vuxml.FreeBSD.org/freebsd/9b5162de-6f39-11e8-818e-e8e0b747a45a.html

python36-3.6.5_1 is vulnerable:
Python -- NULL pointer dereference vulnerability
CVE: CVE-2019-5010
WWW: https://vuxml.FreeBSD.org/freebsd/d74371d2-4fee-11e9-a5cd-1df8a848de3d.html

pango-1.42.0 is vulnerable:
pango -- remote DoS vulnerability
CVE: CVE-2018-15120
WWW: https://vuxml.FreeBSD.org/freebsd/5a757a31-f98e-4bd4-8a85-f1c0f3409769.html

py36-requests-2.18.4 is vulnerable:
www/py-requests -- Information disclosure vulnerability
WWW: https://vuxml.FreeBSD.org/freebsd/50ad9a9a-1e28-11e9-98d7-0050562a4d7b.html

libnghttp2-1.31.0 is vulnerable:
nghttp2 -- Denial of service due to NULL pointer dereference
CVE: CVE-2018-1000168
WWW: https://vuxml.FreeBSD.org/freebsd/1fccb25e-8451-438c-a2b9-6a021e4d7a31.html

gnupg-2.2.6 is vulnerable:
gnupg -- unsanitized output (CVE-2018-12020)
CVE: CVE-2017-7526
CVE: CVE-2018-12020
WWW: https://vuxml.FreeBSD.org/freebsd/7da0417f-6b24-11e8-84cc-002590acae31.html

py36-cryptography-2.1.4 is vulnerable:
py-cryptography -- tag forgery vulnerability
CVE: CVE-2018-10903
WWW: https://vuxml.FreeBSD.org/freebsd/9e2d0dcf-9926-11e8-a92d-0050562a4d7b.html

perl5-5.26.1 is vulnerable:
perl -- multiple vulnerabilities
CVE: CVE-2018-6913
CVE: CVE-2018-6798
CVE: CVE-2018-6797
WWW: https://vuxml.FreeBSD.org/freebsd/41c96ffd-29a6-4dcc-9a88-65f5038fa6eb.html

libssh2-1.8.0,3 is vulnerable:
libssh2 -- multiple issues
CVE: CVE-2019-3862
CVE: CVE-2019-3861
CVE: CVE-2019-3860
CVE: CVE-2019-3858
WWW: https://vuxml.FreeBSD.org/freebsd/6e58e1e9-2636-413e-9f84-4c0e21143628.html

git-lite-2.17.0 is vulnerable:
Git -- Fix memory out-of-bounds and remote code execution vulnerabilities (CVE-2018-11233 and CVE-2018-11235)
CVE: CVE-2018-11235
CVE: CVE-2018-11233
WWW: https://vuxml.FreeBSD.org/freebsd/c7a135f4-66a4-11e8-9e63-3085a9a47796.html

gnutls-3.5.18 is vulnerable:
GnuTLS -- double free, invalid pointer access
CVE: CVE-2019-3836
CVE: CVE-2019-3829
WWW: https://vuxml.FreeBSD.org/freebsd/fb30db8f-62af-11e9-b0de-001cc0382b2f.html

13 problem(s) in the installed packages found.

root@freenas[~]# uname -a
FreeBSD freenas.local 11.2-STABLE FreeBSD 11.2-STABLE #0 r325575+95cc58ca2a0(HEAD): Mon May  6 19:08:58 EDT 2019     root@mp20.tn.ixsystems.com:/freenas-releng/freenas/_BE/objs/freenas-releng/freenas/_BE/os/sys/FreeNAS.amd64  amd64

root@freenas[~]# freebsd-version -uk
11.2-STABLE
11.2-STABLE

root@freenas[~]# sockstat -l4
USER     COMMAND    PID   FD PROTO  LOCAL ADDRESS         FOREIGN ADDRESS
root     uwsgi-3.6  4006  3  tcp4   127.0.0.1:9042        *:*
root     uwsgi-3.6  3188  3  tcp4   127.0.0.1:9042        *:*
nobody   mdnsd      3144  4  udp4   *:31417               *:*
nobody   mdnsd      3144  6  udp4   *:5353                *:*
www      nginx      3132  6  tcp4   *:443                 *:*
www      nginx      3132  8  tcp4   *:80                  *:*
root     nginx      3131  6  tcp4   *:443                 *:*
root     nginx      3131  8  tcp4   *:80                  *:*
root     ntpd       2823  21 udp4   *:123                 *:*
root     ntpd       2823  22 udp4   10.49.13.99:123       *:*
root     ntpd       2823  25 udp4   127.0.0.1:123         *:*
root     sshd       2743  5  tcp4   *:22                  *:*
root     syslog-ng  2341  19 udp4   *:1031                *:*
nobody   mdnsd      2134  3  udp4   *:39020               *:*
nobody   mdnsd      2134  5  udp4   *:5353                *:*
root     python3.6  236   22 tcp4   *:6000                *:*
I even tried to get explanation why FreeNAS has such outdated and insecure packages in their latest version – FreeNAS 11.2-U3 Vulnerabilities – a thread I started on their forums.
Unfortunatelly its their policy which you can summarize as ‘do not touch/change versions if its working’ – at last I got this implression.
Because if these security holes I can not recommend the use of FreeNAS and I movedto original – the FreeBSD system.
One other interesting note. After I installed FreeBSD I wanted to import the ZFS pool created by FreeNAS. This is what I got after executing the zpool import command.
# zpool import
   pool: nas02_gr06
     id: 1275660523517109367
  state: ONLINE
 status: The pool was last accessed by another system.
 action: The pool can be imported using its name or numeric identifier and
        the '-f' flag.
   see: http://illumos.org/msg/ZFS-8000-EY
 config:

        nas02_gr06  ONLINE
          raidz2-0  ONLINE
            da58p2  ONLINE
            da59p2  ONLINE
            da60p2  ONLINE
            da61p2  ONLINE
            da62p2  ONLINE
            da63p2  ONLINE
            da64p2  ONLINE
            da26p2  ONLINE
            da65p2  ONLINE
            da23p2  ONLINE
            da29p2  ONLINE
            da66p2  ONLINE
            da67p2  ONLINE
            da68p2  ONLINE
        spares
          da69p2

   pool: nas02_gr05
     id: 5642709896812665361
  state: ONLINE
 status: The pool was last accessed by another system.
 action: The pool can be imported using its name or numeric identifier and
        the '-f' flag.
   see: http://illumos.org/msg/ZFS-8000-EY
 config:

        nas02_gr05  ONLINE
          raidz2-0  ONLINE
            da20p2  ONLINE
            da30p2  ONLINE
            da34p2  ONLINE
            da50p2  ONLINE
            da28p2  ONLINE
            da38p2  ONLINE
            da51p2  ONLINE
            da52p2  ONLINE
            da27p2  ONLINE
            da32p2  ONLINE
            da53p2  ONLINE
            da54p2  ONLINE
            da55p2  ONLINE
            da56p2  ONLINE
        spares
          da57p2

   pool: nas02_gr04
     id: 2460983830075205166
  state: ONLINE
 status: The pool was last accessed by another system.
 action: The pool can be imported using its name or numeric identifier and
        the '-f' flag.
   see: http://illumos.org/msg/ZFS-8000-EY
 config:

        nas02_gr04  ONLINE
          raidz2-0  ONLINE
            da44p2  ONLINE
            da37p2  ONLINE
            da18p2  ONLINE
            da36p2  ONLINE
            da45p2  ONLINE
            da19p2  ONLINE
            da22p2  ONLINE
            da33p2  ONLINE
            da35p2  ONLINE
            da21p2  ONLINE
            da31p2  ONLINE
            da47p2  ONLINE
            da48p2  ONLINE
            da49p2  ONLINE
        spares
          da46p2

   pool: nas02_gr03
     id: 4878868173820164207
  state: ONLINE
 status: The pool was last accessed by another system.
 action: The pool can be imported using its name or numeric identifier and
        the '-f' flag.
   see: http://illumos.org/msg/ZFS-8000-EY
 config:

        nas02_gr03  ONLINE
          raidz2-0  ONLINE
            da81p2  ONLINE
            da71p2  ONLINE
            da14p2  ONLINE
            da15p2  ONLINE
            da80p2  ONLINE
            da16p2  ONLINE
            da88p2  ONLINE
            da17p2  ONLINE
            da40p2  ONLINE
            da41p2  ONLINE
            da25p2  ONLINE
            da42p2  ONLINE
            da24p2  ONLINE
            da43p2  ONLINE
        spares
          da39p2

   pool: nas02_gr02
     id: 3299037437134217744
  state: ONLINE
 status: The pool was last accessed by another system.
 action: The pool can be imported using its name or numeric identifier and
        the '-f' flag.
   see: http://illumos.org/msg/ZFS-8000-EY
 config:

        nas02_gr02  ONLINE
          raidz2-0  ONLINE
            da84p2  ONLINE
            da76p2  ONLINE
            da85p2  ONLINE
            da8p2   ONLINE
            da9p2   ONLINE
            da78p2  ONLINE
            da73p2  ONLINE
            da74p2  ONLINE
            da70p2  ONLINE
            da77p2  ONLINE
            da11p2  ONLINE
            da13p2  ONLINE
            da79p2  ONLINE
            da89p2  ONLINE
        spares
          da90p2

   pool: nas02_gr01
     id: 1132383125952900182
  state: ONLINE
 status: The pool was last accessed by another system.
 action: The pool can be imported using its name or numeric identifier and
        the '-f' flag.
   see: http://illumos.org/msg/ZFS-8000-EY
 config:

        nas02_gr01  ONLINE
          raidz2-0  ONLINE
            da91p2  ONLINE
            da75p2  ONLINE
            da0p2   ONLINE
            da82p2  ONLINE
            da1p2   ONLINE
            da83p2  ONLINE
            da2p2   ONLINE
            da3p2   ONLINE
            da4p2   ONLINE
            da5p2   ONLINE
            da86p2  ONLINE
            da6p2   ONLINE
            da7p2   ONLINE
            da72p2  ONLINE
        spares
          da87p2
It seems that FreeNAS does ZFS little differently and they create a separate pool for every RAIDZ2 target with dedicated spares. Interesting …
UPDATE 1 – BSD Now 305
The FreeBSD Enterprise 1 PB Storage article was featured in the BSD Now 305 – Changing Face of Unix episode.
Thanks for mentioning!
UPDATE 2 – Real Life Pictures in Data Center
Some of you asked for a real life pictures of this monster. Below you will find several pics taken at the data center.
Front case with cabling.

Alternate front view.

Back of the case with cabling.

Top view with disks.
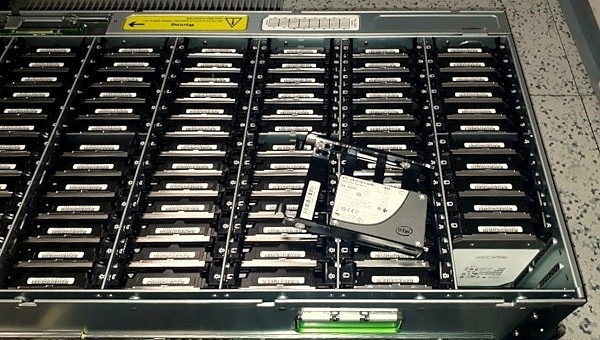
Alternate top view.

Disks slots zoom.

SSD and HDD disks.

Hi, i have similar configuration, Supermicro 5049p with LSI 3008 IT mode, 18x 4TB WD Red, and expirienced this problem. Please, share your future expirience with your system. Thanks.
https://bugs.freebsd.org/bugzilla/show_bug.cgi?id=224496
LikeLike
Hi,
I did not yet hit into this issue, but thanks for the heads up.
Regards.
LikeLike
This is just in time to download this data set just released! LOL
https://www.space.com/breakthrough-listen-largest-ET-data-release.html
LikeLike
Did I miss something? I don’t see where this is enterprise class in that I don’t see where the RAID controllers are fault tolerant. Won’t you lose access to all the drives on one controller in this scenario if it fails?
LikeLike
Its the same ‘class’ of enterprise as Dell EMC Data Domain provide or ExaGrid, or even iXsystems TrueNAS configured with one controller. Motherboard or controller fails and you need to call support … assuming that you have one.
The term ‘enterprise’ degraded VERY MUCH in the last decade. Take Red Hat Enterprise Linux for example and their ‘developments’ like systemd or Avahi, or PulseAudio, they all came from Red Hat and its such a crap software …
Regards.
LikeLike
Your advice to leave a bit of unused space at the end of the disk is unnecessary as it solves a problem which no longer exists. The manufacturers have agreed to have the same number sectors for a stated capacity of disk. There is an actual standard for computing the exact number of blocks: http://www.idema.org/wp-content/downloads/2169.pdf. This gives a few hundred megabytes extra above the nominal value, so for example all disks sold as 3TB have a capacity of exactly 3,000,592,982,016 bytes. Pedantically, this doesn’t apply to disks with sector sizes other than 512 or 4096 bytes, but you’ll not be using those weird disks with ZFS.
LikeLiked by 1 person
Thank you very much for this valuable information – I was not aware of that 🙂
LikeLike
Looking at it from the ZFS side of things, this is also no longer as issue. Internally, ZFS reserves 1 MB of space at the end of the disk provider. So, if you give it a 1024 MB partition, it will actually only use 1023 MB of it. If that disk fails, and you replace it with a disk of size 1023.5 MB, it will still only use 1023 MB internally.
This change went into ZFSv12 or something like that, a long long long time ago, back before there was even an OpenZFS project. 🙂 And it’s been in FreeBSD’s ZFS since FreeBSD 8 or so.
IOW, partition the disk, and label the partition with a nice human-readable name (and use the GPT label when building the pool), but don’t worry about trying to calculate minus . Let ZFS handle that for you. 🙂
LikeLike
This is a fantastic writeup! I do have a question though: When a disk goes bad, how do you physically locate the disk?
LikeLike
Thanks 🙂
I had that in notes but forgot to add that to the article … fixed.
FreeBSD has sesutil(8) command which comes handy here.
# sesutil locate all off
# sesutil locate da64 on
The first sesutil(8) command disables all location lights in the enclosure. The second one turns on the identification for disk da64.
But aside from that I will also label the disks on top with their serial number.
You can get serial number from a disk with diskinfo -v da64 command on FreeBSD.
Regards.
LikeLike
Awesome, thanks!
LikeLike
Pingback: FreeBSD Enterprise 1 PB Storage by vermaden - FreeBSDNews.com
Pingback: ” #ZFS equivalent of course. With 12 disks in each #RAID6 (raidz2) … | Dr. Roy Schestowitz (罗伊)
Thank you for the superb write-up! Just a couple of questions:
* How do you configure alerts for a drive failure?
* What is the procedure to replace a failed drive?
LikeLike
Thanks.
> * How do you configure alerts for a drive failure?
I will configure something SMART based like in this article:
https://www.cyberciti.biz/faq/how-to-check-hard-drive-health-on-freebsd/
> * What is the procedure to replace a failed drive?
If one of the drive fails the zfsd(8) replaces that drive with SPARE.
Then to physically locate and replace the drive I will useFreeBSD’s sesutil(8) commands:
# sesutil locate all off
# sesutil locate da64 on
LikeLike
great great great!
just a question: why mtu 1500 on your NIC if you did set mtu >9000 on your switch?
thank you
LikeLike
Thanks.
Its complicated. I do not control the network where this server runs … I would use MTU 9000 all the way … and from what I know all devices are MTU 1500 configured in this VLAN. I am not sure why network engineer (not me) set that MTU to 9216 there. I asked him to show me the config for the LACP part, but MTU was also configured there.
Sorry to disappoint 🙂
LikeLike
no disappointment at all
thank you for your reply
LikeLiked by 1 person
well we should encourage and appreciate your efforts but can you please tell me is ti only specific for this model and product or it is a general method?
LikeLike
Its general method. You can use any server for that kind of setup – FreeBSD with ZFS for storage.
LikeLiked by 1 person
Pingback: 1PB存储的单台服务器 – 同或门
Pingback: 1PB存储容量的单台服务器 – 同或门
Pingback: 1PB存储容量的单台服务器 | 胜之不易
Thank you for the nice howto. One thing i would do different.
You create a pool with the device names. I would not do that. I think it is better to build the pool using GPT labels. Then if the box fails and other hardware is installed it could be that da54 is not da54 anymore. In small server setup, maybe for emergency it is not da(*) anymore but ada(*).
What i do is label the disk using gpart and the use the label as the disk to add to the pool.
I also always use a small offset to start.
gpart add -a 1m -t freebsd-zfs -l DISK54 /dev/da54
zpool create mirror storage gpt/DISK54 gpt/DISK55 and so on.
It makes it also easier to physically label the disk. DISK54 reads better than serial numbers that all look alike.
If all disk fall out of the box i can put them in in any order i want because zpool will use the label.
Again Thank you for your fantastic article. I wish i had boxes and the amount of disks like that to play with. And keep up wit
LikeLike
Welcome, thank you for comment 🙂
LikeLike
We’ve taken to labelling our drives based on the JBOD they are in, and using grid coordinates like a spreadsheet (columns are letters, rows are numbers).
Our biggest storage boxes have 2 JBODs of 45 drives each attached. So drives are labelled:
– jbod1-a6
– jbod1-h6
– jbod2-c2
– jbod2-f5
And so on. Much easier to handle than trying to get sesutil working (doesn’t work with our Supermicro, Chenbro, or Tyan systems), or trying to map things manually from the command-line via camcontrol or logs or whatnot. smartctl does the bulk of the work for me, and the GPT labels do the rest. 🙂
LikeLike
Excellent work, thanks for letting us updated!
for a pure petabyte solution for enterprise-level you can visit: https://stonefly.com/storage/petabyte-solution
LikeLiked by 1 person
Pingback: Interview with Vermaden – Tinta Escura
Pingback: Sensors Information on FreeBSD | 𝚟𝚎𝚛𝚖𝚊𝚍𝚎𝚗
Thanks a lot,
A question: after replacement of a failed disk, does used spare disk return back to the spare state or the new disk become the new spare?
LikeLike
Spare becomes part of the pool (after resilvering of course) – takes place of the disk that failed.
Then you physically detach the failed disk from the server.
Then when you attach new disk to the system its not ‘attached’ to anything – and then you add it to the ZFS pool as spare disk.
Regards.
LikeLike
Pingback: Important efibootmgr(8) Command | 𝚟𝚎𝚛𝚖𝚊𝚍𝚎𝚗
Pingback: TrueNAS CORE versus TrueNAS SCALE | 𝚟𝚎𝚛𝚖𝚊𝚍𝚎𝚗