This article is an update/rewrite to the already published FreeBSD Desktop – Part 2 – Install. With the upcoming introduction of the FreeBSD 12.0-RELESE version new possibilities arise when it comes to installation. I already talked/showed that method in my ZFS Boot Environments Reloaded at NLUUG presentation but to make it more available and obvious part of my FreeBSD Desktop series I write about it again in dedicated article entry.
You may want to check other articles in the FreeBSD Desktop series on the FreeBSD Desktop – Global Page where you will find links to all episodes of the series along with table of contents for each episode’s contents.
Now (in FreeBSD 12.x) it is possible to install FreeBSD on GELI encrypted root on ZFS pool without any additional partitions or filesystems. No longer separate UFS or ZFS boot pool /boot filesystem is needed. And what is even more appealing such setup is supported both on UEFI and BIOS (also refereed as Legacy or CSM) systems. Such setup is also compatible with both new bectl(8) utility and the old proven beadm(8) tool. It is also nice that to make such setup you only need to choose the Auto ZFS option from the bsdinstall(8) so you will not have to do it by hand. I advice using GPT (BIOS+UEFI) as it will support both system types so when you are running BIOS system now and will move the disk to other system that boots with UEFI it will also just work out of the box.
The FreeBSD 12.0 is currently at the RC1 stage so we will use that one for below examples of such setup. The 12.0-RELEASE is expected to arise before Christmas if no significant problems or bugs will be found on the road to RC2 and RC3 editions.
For the record here is the FreeBSD 12.0-RC1 Availability information page and aggregated FreeBSD 12.0-RELEASE Release Notes for the upcoming new major FreeBSD version, but it is not yet complete/ready.
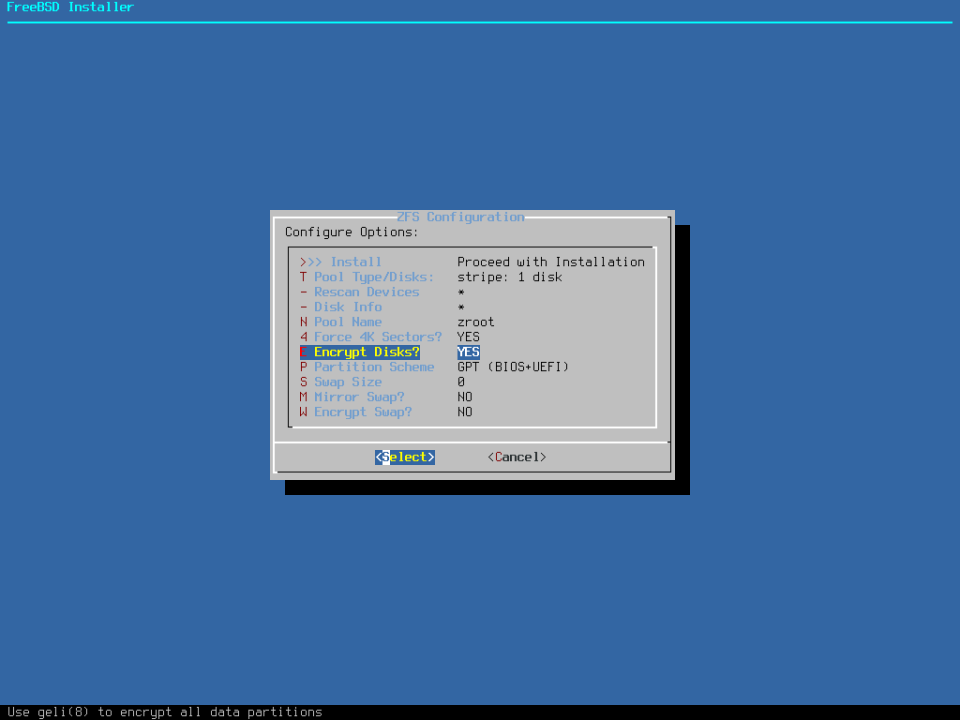
I will only show one install process that will work for both UEFI and BIOS systems – the crucial option here is GPT (BIOS+UEFI) to select (which is also the default one). The other option that You need to select is Yes for the Encryption part and also select the SWAP size. You may as well do not use swap and enter ‘0‘ here which means that SWAP partition will not be created. You may as well create ZFS ZVOL partition for SWAP on ZFS pool later or just create a file like /SWAP and enable it as SWAP. No matter which SWAP option you will choose if your system swaps then you are too low on memory and neither of these methods are better or worse then.


One last thing about the default FreeBSD (no matter if 11.x or 12.x) ZFS dataset/filesystem layout. I showed it on my ZFS Boot Environments/ZFS Boot Environments Reloaded presentations but without any text comment as I talked it live.
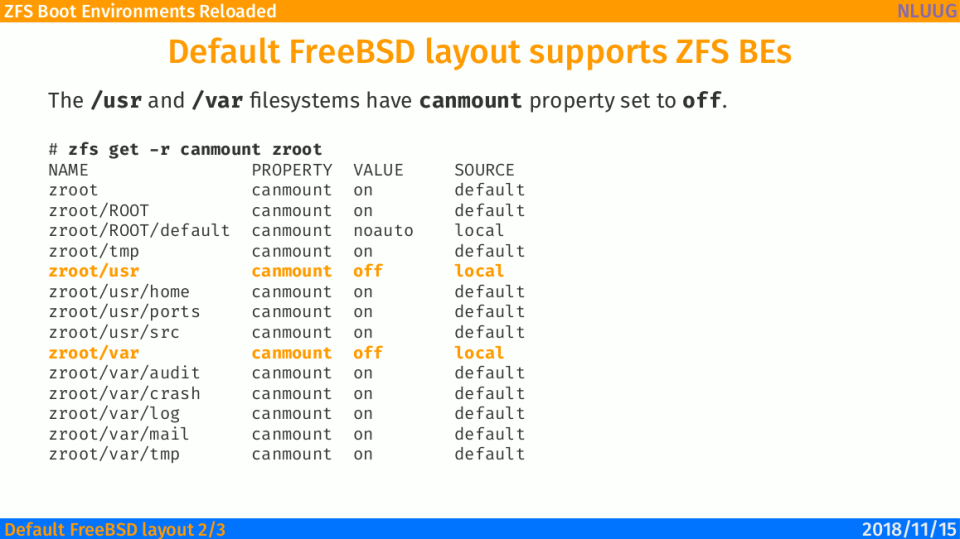
By default both /var and /usr filesystems are part of the Boot Environment. They are protected and snapshoted during the beadm create newbe process (or by bectl(8) also). Its appears that /var and /usr are separate processes when you type zfs list commend as shown on the slide below.

… but when you check the canmount parameter for all ZFS datasets, then it become obvious that /usr and /var are ’empty’ datasets (not mounted).
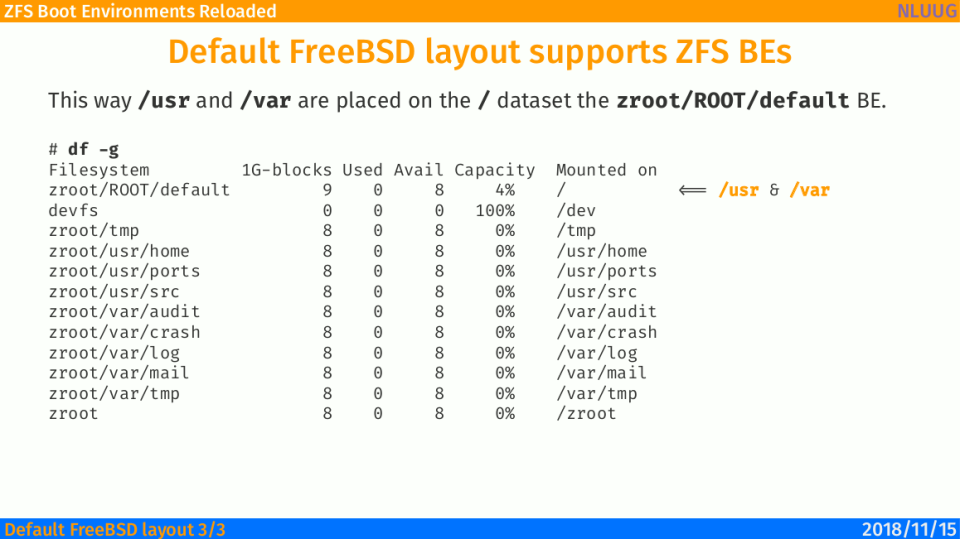
… and also confirmation from the df(1) tool.
I asked FreeBSD Developers what is the reason for such construct and its for the mountpoint inheritance purposes. For example when zroot/usr has mountpoint set to /usr then when you create zroot/usr/local dataset, then it will automatically get the /usr/local for the mountpoint parameter by inheritance. At the first sight it may be misleading (I also got caught) but it makes sense when you think about it.
The only filesystems that are NOT included for the Boot Environment protection are these:
- /usr/home
- /usr/ports
- /usr/src
- /var/audit
- /var/crash
- /var/log
- /var/mail
- /var/tmp
While in most cases it is not needed to protect these in the Boot Environment protection if you want to also protect these type these two comments to move all the /usr/* and /var/* datasets/filesystems into the Boot Environment pool/ROOT/dataset. It will work on a running system without need for reboot, just make sure you use -u flag.
# zfs rename -u zroot/usr zroot/ROOT/default/usr
# zfs rename -u zroot/var zroot/ROOT/default/var
Now grab that FreeBSD ISO and install it the best possible way up to date 🙂
You will probably want to get amd64 version which is suitable for both 64-bit AMD and Intel systems.
- FreeBSD-12.0-RC1-amd64-disc1.iso – CD ISO image
- FreeBSD-12.0-RC1-amd64-memstick.img – USB pendrive image

Pingback: FreeBSD Desktop – Part 1 – Simplified Boot | 𝚟𝚎𝚛𝚖𝚊𝚍𝚎𝚗
Pingback: FreeBSD Desktop – Part 2 – Install | 𝚟𝚎𝚛𝚖𝚊𝚍𝚎𝚗
Pingback: FreeBSD Desktop – Part 3 – X11 Window System | 𝚟𝚎𝚛𝚖𝚊𝚍𝚎𝚗
Pingback: FreeBSD Desktop – Part 4 – Key Components – Window Manager | 𝚟𝚎𝚛𝚖𝚊𝚍𝚎𝚗
Pingback: FreeBSD Desktop – Part 5 – Key Components – Status Bar | 𝚟𝚎𝚛𝚖𝚊𝚍𝚎𝚗
Pingback: FreeBSD Desktop – Part 6 – Key Components – Task Bar | 𝚟𝚎𝚛𝚖𝚊𝚍𝚎𝚗
Pingback: FreeBSD Desktop – Part 7 – Key Components – Wallpaper Handling | 𝚟𝚎𝚛𝚖𝚊𝚍𝚎𝚗
Pingback: FreeBSD Desktop – Part 8 – Key Components – Application Launcher | 𝚟𝚎𝚛𝚖𝚊𝚍𝚎𝚗
It looks like the move to 12-RELEASE also changes/updates your thoughts on beadm usage from your intro to HardenedBSD. It’s nice to know that there is a reason for the seemingly odd decisions of the past.
Thanks for the updates to these guides!
LikeLike
Pingback: FreeBSD Desktop – Part 17 – Automount Removable Media | 𝚟𝚎𝚛𝚖𝚊𝚍𝚎𝚗
CSW should be changed to CSM (compatibility support module).
LikeLike
Thanks, fixed. 🙂
LikeLike
Pingback: FreeBSD Desktop (2) – OS update | 0ddn1x: tricks with *nix
Pingback: FreeBSD Desktop – Part 14 – Configuration – Tint2 | 𝚟𝚎𝚛𝚖𝚊𝚍𝚎𝚗
FreeBSD 12 with ZFS on root installed fine with qemu (kvm) in a Linux Devuan host. Planning for the bare metal install. But, that needs me learning manual partitioning for ZFS. Thanks for your series on FreeBSD. 🙂
LikeLike
Welcome. Please share your thoughts after making the install on bare metal.
LikeLike
Pingback: FreeBSD Desktop – Part 18 – Global Dashboard | 𝚟𝚎𝚛𝚖𝚊𝚍𝚎𝚗
Pingback: FreeBSD GNOME 3 Fast Track | 𝚟𝚎𝚛𝚖𝚊𝚍𝚎𝚗
Pingback: XFCE Cupertino Way | 𝚟𝚎𝚛𝚖𝚊𝚍𝚎𝚗
Pingback: FreeBSD 13.1 on ThinkPad W520 | 𝚟𝚎𝚛𝚖𝚊𝚍𝚎𝚗
Release should be release. Any 13.1 post planned?
LikeLike
Hi,
nothing changed since 12.x in the install method.
Its exactly the same for 13.x systems.
I will have to mention this somewhere 🙂
Regards.
LikeLike
Thanks for the response. S
LikeLike
Pingback: FreeBSD 13.2 on ThinkPad T14 (GEN1) | 𝚟𝚎𝚛𝚖𝚊𝚍𝚎𝚗
What you would suggest for W520 disk setup?
One msata + one/two SSDs ?
Or just one SSD ?
LikeLike
The setup I currently use is small mSATA SSD (128GB) with large (8TB) SATA (2.5″) SSD.
I would only use 8TB 2.5″ SATA drive – but for some reason – the ThinkPad W520 – is not able to boot from it.
I suspect some strange BIOS limitation at 2TB limit as I earlier had 4TB SSD 2.5″ drive – and still was not able to boot from it.
It also depends how much data You have. There are 1-2 TB mSATA drives that can also suit your needs.
Regards,
vermaden
LikeLike
Indeed, but what about zfs, just one 8tb vdev stripe, no mirrors or raidz, log, l2arch – just curious because I can’t do that obviously on my x220… but on w520 it’s very possible to have at list a mirror, not sure about msata role it that case.
LikeLike
The X220 can do the same – You would just put that 2.5 SATA 8TB SSD into the 2.5″ bay. X220 also can fit mSATA disk.
I use just one large GPT partition, then GELI encrypted, then ZFS pool in it.
These are my ZFS pool settings:
# zpool set autotrim=on ${POOL} # zfs set atime=off ${POOL} # zfs set compression=zstd ${POOL} # zfs set recordsize=1m ${POOL}LikeLike
Hello @vermaden, probably the last q on that topic do you stripe and creating one zpool on your both drives 128GB msata + 8GB 2.5 sata ? in othe words, how many zpools in your w520 having 2 drives in it. thx !
LikeLike
I have the zroot pool on mSATA drive and separate data pool on the 8TB 2.5 SATA drive.
No stripes.
No mirrors.
Two separate ZFS pools.
Regards.
LikeLike